


Page 14
Stylos User's Manual
STEP 4 STEP 4
STEP 4 STEP 4
STEP 4
(Figure 4)
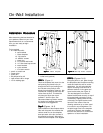
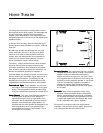
We have supplied plastic Zip-It
anchors designed for easy installation
on drywall only*. If you have drywall,
insert the provided Zip-It anchors** at
the 8 previously marked locations,
until flush. DO NOT OVERDRIVE. If
you hit a wall stud, back the anchor
out and use a 1-1/2" drywall screw
(not supplied) instead of the Zip-It
anchor when attaching the bracket.
**
**
*If you have a masonry, paneled,
plaster or other type of wall, you
should consult a local hardware store
for proper anchors for your wall type.
You will need 16 anchors that will
accept a #8 screw for the total
installation.
****
****
**
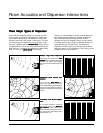
To insert Zip-It anchor, insert #2
Phillips driver bit into the recess of the
Zip-It anchor head. Use manual screw
driver or electric drill. Push the Zip-It
anchor into the surface of the wall
board until the two cutting blades
penetrate the surface. Rotate the Zip-It
into the drywall until the collar sets
flush to the surface. DO NOT OVER-
DRIVE.
STEP 5STEP 5
STEP 5STEP 5
STEP 5
(Figure 5)
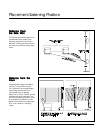
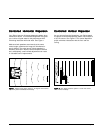
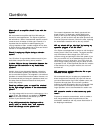
Install the lower bracket first, using
any of the 4 brackets. Place the
bracket over the four lower anchors,
with the protruding arm of the bracket
located towards the bottom; insert all
four screws, do not tighten. Place a
level on the top of the bracket. With
the bracket resting on the screws,
level and tighten the screws.
Install the top bracket, with the
protruding arm located above the
anchors. The distance between the
top surface of the lower bracket arm
and the bottom surface of the upper
bracket arm should be approximately
62.5". Level and tighten.
Figure 5Figure 5
Figure 5Figure 5
Figure 5. Bracket Mounting Details
Figure 4Figure 4
Figure 4Figure 4
Figure 4. Insert Zip Anchors into Wall
Figure 3Figure 3
Figure 3Figure 3
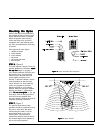
Figure 3. Zip Anchor Locations
On-Wall Installation Cont.,