


Page 13
Stylos User's Manual
Installation ProcedureInstallation Procedure
Installation ProcedureInstallation Procedure
Installation Procedure
After determining the best location for
your speakers, based on your room
requirements and our recommenda-
tions, you are ready to begin
installation.
Tools required:
1 - M-L Wall Mount Kit:
4 - wall brackets
1 - Stylos template
16 - zip anchors
16 - #8X3/4" screws
1 - plumb line
2 - 1/2" screws with knobs
2 - 1/2" allen head cap screws
4 - metal washers
4 - nylon washers
1 - 3/16 allen wrench
1 - pencil or scratch awl
1 - screw driver
1 - power drill
1 - #2 phillips bit for drill
1 - tape measure 6ft or longer
1 - roll of masking tape
On-Wall Installation
Figure 1Figure 1
Figure 1Figure 1
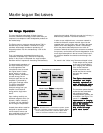
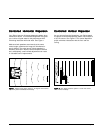
Figure 1. Mount Template
Figure 2Figure 2
Figure 2Figure 2
Figure 2. Mark Zip Anchor Locations
1 - bullet level (optional)
STEP 1 STEP 1
STEP 1 STEP 1
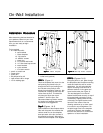
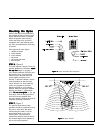
STEP 1
(Figure 1)
Unroll the template and mount it to the
wall pushing the plumb line's pin
through the bull's-eye (making sure
the line tied to the push-pin falls
directly from the bottom of the pin). We
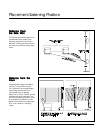
recommend locating the bull's-eye 66
inches from the floor. This distance
will place the Stylos the recom-
mended 7" from the floor. See
Placement/Listening Position section
for seating and speaker placement,
information and suggestions.
Step 2 Step 2
Step 2 Step 2
Step 2
(Figures 1 & 2)
Shift the bottom of the template side to
side until the plumb line matches the
vertical center line on the template;
then tape each of the four corners of
the template to the wall. After taping
make sure the template is still aligned.
STEP 3 STEP 3
STEP 3 STEP 3
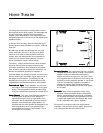
STEP 3
(Figures 2 & 3)
Using the pencil or awl, poke through
the template at the 8 bracket mounting
marks and mark the wall for anchor
attachment.
You will notice that the
anchor mounting cross-hairs fall in
different locations in the upper and
lower bracket slots (see Figure 3).
This was designed-in so that the
bottom bracket rests securely on top of
the screw shafts, preventing it from
inadvertently slipping down the wall;
conversely, the upper bracket cross-
hairs fall in the center of the slot
allowing maximum up or down travel
to correct for any misalignment
. Do
not poke large holes in the template
cross-hairs.
Remove the template
from the wall and save it for the other
speaker or a future installation.