


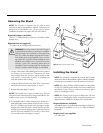
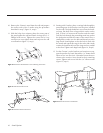

10 Remove the Cinema i stand from the wall and prepare
the wall at each of the 5 marks using the procedure
described in step 7 (figure 12, step I).
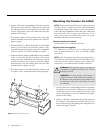
11 With the help of an assistant, place the center part of
the stand against the wall and attach it using the (6) 1“
Phillips head screws. Tighten the screws but be very
careful not to over tighten them and strip out the wall
or wall anchors (figure 13, step J).
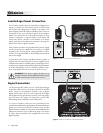
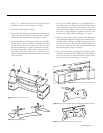
12 Starting with 1 bracket, place a carriage bolt through the
protruding arm of the bracket (not the piece installed
on the wall). The bolt should face away from the brack-
ets large, flat shelf. Place a large rubber washer on the
bolt, so that it is between the bracket and the stand.
Push the bolt through the protruding stand arm so that
the bolt points toward the center of the stand. Place a
small plastic washer over the bolt and thread on to the
large knob. Hand tighten so that the bolt is flush with
the metal and repeat this step for the other side. Make
certain the brackets stick out like wings and are parallel
to the floor. Tighten each large knob (figure 14, step K).
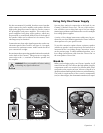
13 Set the Cinema i on the brackets and continue to sup-
port the speaker. By hand, thread the
5
/32” button head
Allen screws into the front 2 threaded inserts that are
closest to the woofers. Next, thread in the 4 remaining
screws. Tighten each screw with the
5
/32” Allen wrench
(figure 15, step L).
10 Stand Options
Figure 12. Remove the stand and drive in the 5 remaining wall anchors.
Figure 13. Attach the stand to the wall.
Figure 14. Attach the brackets to the stand.
Figure 15. Attach the Cinema i to the brackets.