


8 Mounting the Theater On A Wall
MOUNTING THE THEATER ON A WALL
WARNING! Installing the Theater on the wall
requires 2 people. Do not try this alone.
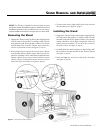
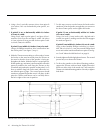
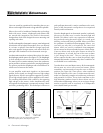
Mounting the Theater on a wall requires a mini-
mum use of 1 lag bolt sunk directly into a stud
and 2 wall anchors. If you are able to engage
more than 1 stud with a lag bolt when mounting
the Theater on a wall we highly recommend
doing so (see figure 8).
NOTE: To assure that your Theater is safely wall mounted,
these instructions must be carefully followed. Study them
thoroughly before beginning to install your Theater.
NOTE: The following instructions assume the mounting
surface is of standard wood frame and standard sheet rock
construction. If you wish to mount the Theater to another
type of material, you should consult a bonded contractor.
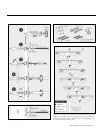
About the Wall Anchors
When using the special wall anchors provided with the
Theater, it is recommended that they are sunk into the
wall by hand and not by using an electric screwdriver (see
figure 5, step 1). Once the special self-drilling wall anchors
(provided with the Theater) have been set into the wall,
they work as follows: after the screw has been inserted
approximately
1
/2 inch into the wall anchor, the screw will
hit a seal that requires slight pressure to break. Once the
seal has broken, the screw will continue to slide into the
wall anchor another 1
1
/2 inch. At this point the screw will
have rotated the anchor out and into position inside of
your wall (see figure 5, step 2 and 3). The screw will now
require slight pressure to engage the anchor. When the
anchor has been engaged, the screw will continue to slide
into the wall anchor until it is flush (see figure 5, step 4).
You will notice however that the screw continues to freely
turn at this point. The screw is now pulling the anchor up
against the back of the drywall. The screw will tighten and
stop turning when it has securely engaged the anchor with
the back of the drywall (see figure 5, step 5).
Required Tools (not included):
24 inch (60 cm) or longer ruler, level, pencil, electric drill,
1
/8 inch (3 mm) drill bit, Phillips head bit,
7
/16 inch (11 mm)
socket wrench, #2 Phillips head screw driver
Required Hardware (included, see figure 7):
(2) wall anchors, (2) Z-brackets, (2) 2
1
/8 inches (5.4 cm) sheet
metal Phillips head screws, (2) lag bolts, (4) washers
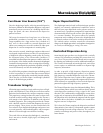
1. Locate and mark the center point (point A, see figure 9)
where you would like to position the top of the Theater.
Measure 24 inches (61 cm) horizontally in each direction
from the center point. This area should be clear of any
obstructions in order to mount the Theater. Also make
certain that there will be at least 12 inches (30.5 cm) of
clearance above or below in order to access the knobs
and tilt the speaker up and down.
2. Using a level, vertically measure down 2
3
/8 inches (6 cm)
from point A and mark this point (point B, see figure 9).
Next, measure horizontally to the left of point B a minimum
of 2
3
/4 inches (7 cm) and mark the nearest stud or put a
mark at 13 inches (33 cm), whichever comes first (point C,
see figure 9). Repeat the same to the right of point B
(point D, see figure 9). Pre-drill holes at points C and D
with a
1
/8 inch (3 mm) size drill bit.
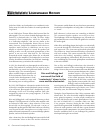
3. If point(s) C and/or D are on a stud:
Using a
7
/16 inch (11 mm) socket, attach a Z-bracket to
point(s) C and/or D with a lag bolt, making sure that the
bolt engages the stud. Make sure that the Z-bracket is
snug to the wall, but not overly tightened (see figure 6).
If point(s) C and/or D are not on a stud:
Using a #2 Phillips screwdriver, drive a wall anchor into
point(s) C and/or D. Next, attach a Z-bracket by sinking
a 2
1
/8 inch (5.4 cm) sheet metal Phillips head screw and
washer into the wall anchor (see "About the Wall Anchors"
and figure 5). Make sure that the Z-bracket is snug to
the wall, but not overly tightened.
NOTE: When the Z-bracket is properly installed on a wall,
its thickest half should hang down, and its thinner half
should point up. The bend at the top of the Z-bracket
should point away from the wall.
Mounting the Theater