


10 Mounting the Theater On A Wall
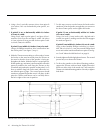
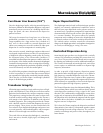
4. Using a level, vertically measure down from point B
4
1
/16 inches (10.3 cm) and mark this point (point E, see
figure 9).
5. If point E is on, or horizontally within 2
1
/2
inches
(6.3 cm) of a stud:
Using a level, mark a point (point F, see figure 9) hori-
zontal to Point E on the stud that is within 2
1
/2 inches
(6.3 cm) of point E. Next, pre-drill a hole at point F with
a
1
/8 inch (3mm) size drill bit.
If point E is not within 2
1
/2 inches (5 cm) of a stud:
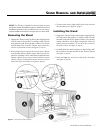
Using a #2 Phillips screwdriver, drive a wall anchor into
the wall at point E (see figure 5, step 1).
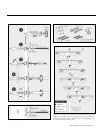
6. With the Theater mount sitting on a flat surface, loosen
the knobs on the stand arm and pivot the Theater on
the stand so that the front of the speaker is facing up.
Re-tighten the knobs. With the help of a second person,
lift the speaker up, and rotate it (mount and all) so that the
mount is parallel to the wall. Hang the Theater on the
Z-brackets and position the speaker so that point E (or F)
lines up with the long hole in the stand, above the cut-
out MartinLogan zig logo. The second person should
continue to support the speaker once it is in place. At this
point the Theater and mount can be carefully slid to
the left or right to fine tune its position.
7. For this step you may need to loosen the knobs on the
stand arm, pivot the speaker enough that you can access
the lower center point, and re-tighten the knobs.
If point E is on, or horizontally within 2
1
/2
inches
(6.3 cm) of a stud:
Using a
7
/16 inch (11 mm) socket, sink a lag bolt and a
washer into point F, making sure that the bolt engages
the stud (see figure 6).
If point E is not within 2
1
/2 inches (6.3 cm) of a stud:
Using a short handled Phillips screwdriver or electric
drill, sink a 2
1
/8 inch (5.4 cm) sheet metal Phillips head
screw and washer into the wall anchor at point E (see fig-
ure 5 and "About the Wall Anchors" on page 8).
8. Securely tighten all of the lag bolts and screws. The second
person may now release the Theater.
9. To direct the speaker to the desired listening position,
support the Theater with one hand, slightly loosen the
knobs on either side of the stand arm, and rotate the
Theater to its desired listening position. Securely re-tighten
both knob.
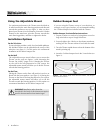
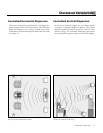
Figure 9. Measurements and point locations required to mount the Theater. Please note, to simplify this illustration, the stand is shown without the Theater
attached. When mounting the Theater, the stand should not be removed.