


ENGLISH
11
CONNECTIONS
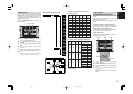
SPEAKER PLACEMENT
The ideal surround speaker system for this unit is 7-
speaker systems, using front left and right speakers,
a center speaker, surround left and right speakers,
surround back left and right speakers, and a
subwoofer.
For best results we recommend that all front speakers
be of the same type, with identical or similar driver
units. This will deliver smooth pans across the front
sound stage as the action moves from side to side.
Your center channel speaker is very important as
over 80 % of the dialog from a typical motion picture
emanates from the center channel.
It should possess similar sonic characteristics to
the main speakers. Surround channel speakers
need not be identical to the front channel speakers,
but they should be of high quality.
The surround center speaker is useful for playback
of Dolby Digital Surround EX or DTS-ES. One of
the benefits of both Dolby Digital and DTS is that
surround channels are discrete full range, while
they were frequency limited in earlier “Pro Logic’
type systems.
Bass effects are an important part of home theater.
For optimal enjoyment a subwoofer should be used
as it is optimized for low frequency reproduction. If
you have full range front speakers, however, they
may be used in place of a subwoofer with proper
setting of the switches in the menu system.
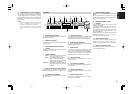
Front left and right speakers
We recommend to set the front L and R speakers
with 45-60 degrees from the listening position.
Center speaker
Align the front line of the center speaker with the
front L/R speakers. Or place the center speaker a
little backward from the line.
Surround left and right speakers
When the SR4500 is used in surround operation,
the preferred location for surround speakers is on
the side walls of the room, at or slightly behind the
listening position.
The center of the speaker should face into the room.
Surround back left and right speakers
Surround back speakers are required when a full
7.1-channel system is installed.
Speakers should be placed on a rear wall, behind
the listening position.
The center of the speaker should face into the room.
Subwoofer
We recommend using a subwoofer to have maximum
bass effect. Subwoofer bears only low frequency
range so you can place it any where in the room.
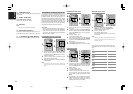
HEIGHT OF THE SPEAKER UNITS
Front left and right speakers, and a center speaker
Align the tweeters and mid-range drivers on the
three front speakers at the same height, as best as
possible.
Surround left and right speakers, and surround
back speaker
Place the surround left, right and surround back
speakers higher than your ears by about 70cm – 1m.
Also place the speakers at the same height, as best
as possible.
Note:
• Use magnetically-shielded speakers for front left,
right and the center speakers when the speakers
are installed near the TV and the TV is a monitor
type.
90
°
110
°
22
°
30
°
135
°
150
°
0
°
Front Right
Front Left
Front Center
Surround Left
Subwoofer
Surround
Back Left
Surround Right
Surround
Back Right
70cm
1m
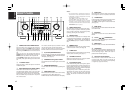
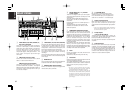
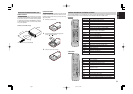
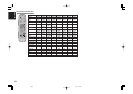
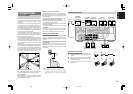
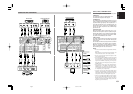
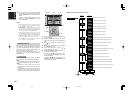
CONNECTING SPEAKERS
IN OUT
MONITOR
VCR1
MONITOR
RSR
C
SW SBR
SL SBLL
R
SPEAKER SYSTEMS 6
-
8 OHMS
CENTER
R
FRONT SURROUND BACK SURROUND
LLLR
DVD
OUT
IN
MONITOR
TVDVDVCR1
OUTIN
DSS
/
VCR2
OUT
VIDEO
IN
Y
DSS
/
VCR
2
DVD
COAX.
OUT
43OPT.
OUT
21
7.1CH INPUT
L SL C SBL
SBRSWSRR
TVDVDVCR1
OUTININ OUT
DSS
/
VCR2
IN OUT
CDR/MDTAPE
PRE OUT
OUTIN
CD
R
L
FM
(
75
Ω
)
GND AM
C
B
/
P
B
C
R
/
P
R
AUDIO
ANTENNA
RC-5
DIGITAL
COMPONENT VIDEO
AUDIO
AC OUTLET
AC IN
100W MAX.
230V 50H
Z
SWITCHED
S-
VIDEO
R
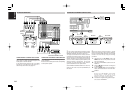
SPEAKER SYSTEMS 6
-
8 OHMS
CENTER
R
FRONT SURROUND BACK
S. SPEAKER B
SURROUND
LLLR
SW
INVERT
OUTPUT
INPUT
LEVEL
BTL REMOTE CONT.EXT. CONT. IN
VIDEO/
+5~13V DC
SYSTEM OUT OUT
INPUT
MASTER SLAVE
MIN MAX
IN
F
U
S
E
SPEAKER SYSTEM
MINIMUM 4 OHMS
POWERED
SUBWOOFER
POWER
AMPLIFIER
PASSIVE
SUBWOOFER
FRONT
RIGHT
LEFT
SURROUND
SURROUND
BACK LEFT
CENTER
or
RIGHT
LEFT
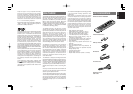
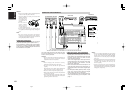
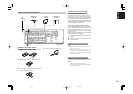
CONNECTING SPEAKER WIRE
1.
Strip away approx. 10 mm of wire insulation.
2.
Twist the bared wire ends tight, to prevent short
circuits.
3.
Loosen the knob by turning it counterclockwise.
4.
Insert the bare part of the wire into the hole in
side of each terminal.
5.
Tighten the knob by turning it clockwise to
secure the wire.
1. 2.
3. 4. 5.
10 mm
SURROUND
BACK RIGHT
04.5.14, 4:16 PMPage 11