18
M-Series
M-Series
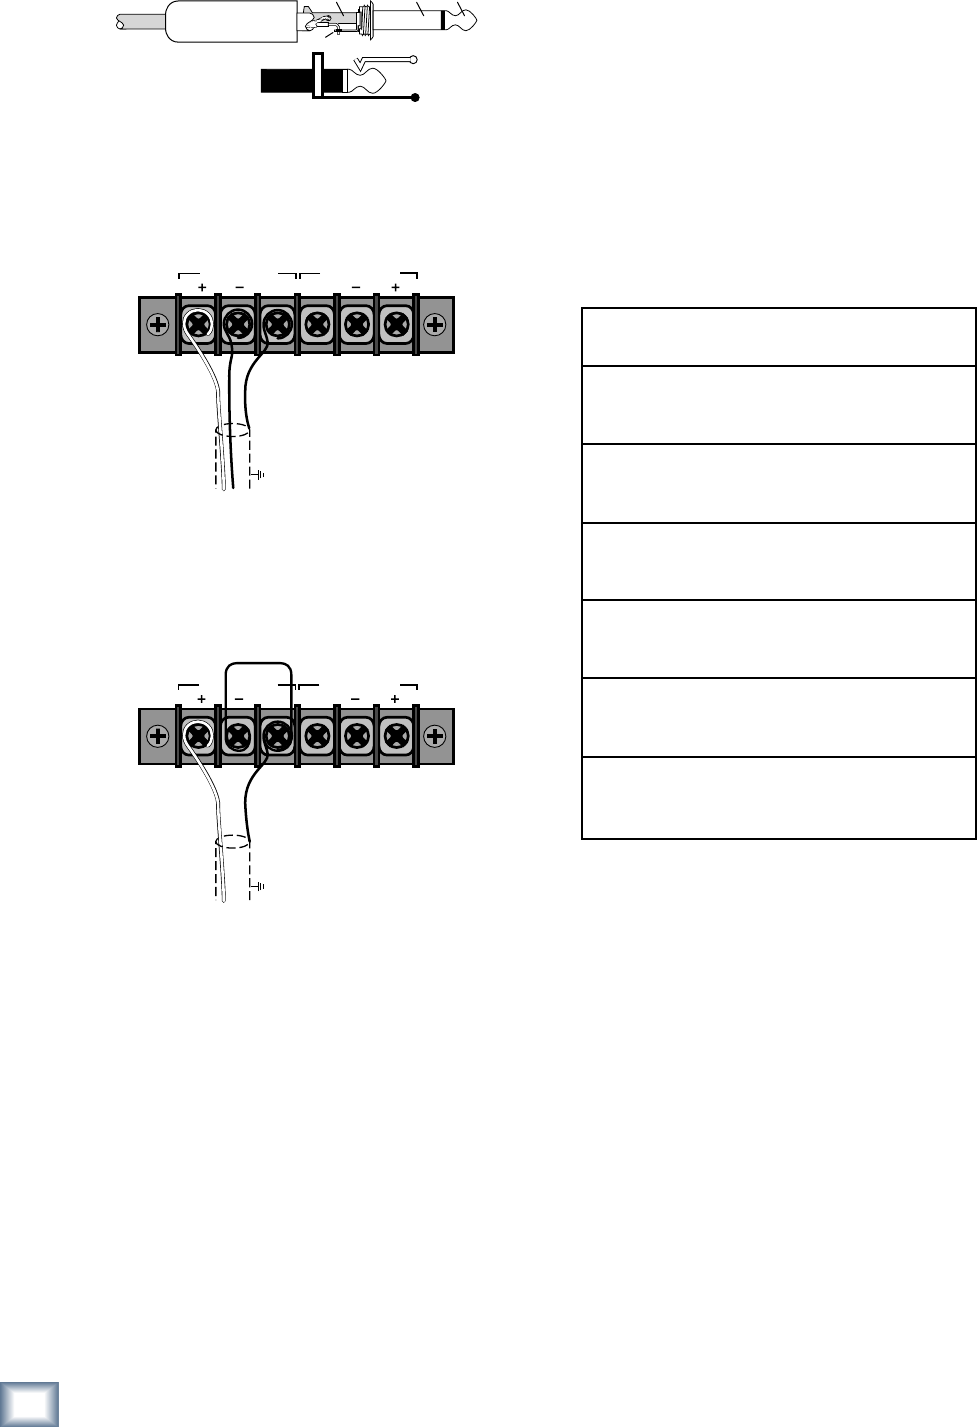
Unbalanced TS (tip-sleeve) signals can be accom-
modated via the combination jack. Make sure the cord
terminates with a TS plug (like a guitar plug), or if it’s a
TRS plug (like a headphone plug), make sure the ring is
tied to the shield, preferably at the source.
SLEEVE
TI
P
TI
P
SLEEVE
TIP
SLEEVE
Unbalanced TS Plug
The screw terminal connections are clearly marked,
indicating “+”, “–”, and GND. You can use bare wire to
wrap around the screws, or spade lugs connected to the
wires.
GND
CHANNEL 1
GND
CHANNEL 2
GND
CHANNEL 1
GND
CHANNEL 2
SHIELD
SHIELD
HOT (+)
COLD (--)
Balanced Screw Terminal Connection
If connecting an unbalanced line-level input to the
screw terminals, connect a jumper between the “–” and
GND screws.
GND
CHANNEL 1
GND
CHANNEL 2
GND
CHANNEL 1
GND
CHANNEL 2
SHIELD
SHIELD
HOT (+)
JUMPER
Unbalanced Screw Terminal Connection
Output Wiring
Use heavy gauge, stranded wire for connecting speak-
ers to the M-Series amplifier’s SPEAKER OUTPUT
terminals. As the distance between the amplifier and
the speakers increases, the thickness of the wire should
also increase. Speaker wire has resistance, and when
electricity passes through a resistor, power is lost. The
thicker the wire, the less resistance it offers, and the
more power actually gets to the speakers.
The thickness of wire is rated in gauges. Use the chart
below to determine the correct gauge of wire to use
according to the distance between the speakers and the
amplifier, and the impedance of the load the amplifier
is driving. This ensures that the power lost across the
speaker wire is less than 0.5 dB.
Stereo and Mono Modes
Binding Posts
When using the binding post outputs in stereo or
mono modes, you can terminate your speaker cables
with single or double banana plugs, spade lugs, or leave
them unterminated (bare wires): unscrew the amp’s
binding posts enough to reveal the holes on their sides,
then insert your stripped wires (stripped about 3/8"
back) into the holes and retighten the posts (finger
tight is fine). Be careful that no runaway strands touch
the chassis or other terminal.
Up to 25 ft. 2Ω 14 gauge
4Ω 16 gauge
8Ω 18 gauge
Up to 40 ft. 2Ω 12 gauge
4Ω 14 gauge
8Ω 18 gauge
Up to 60 ft. 2Ω 10 gauge
4Ω 12 gauge
8Ω 16 gauge
Up to 100 ft. 2Ω 8 gauge
4Ω 10 gauge
8Ω 14 gauge
Up to 150 ft. 2Ω 6 gauge
4Ω 8 gauge
8Ω 12 gauge
Up to 250 ft. 2Ω 4 gauge
4Ω 6 gauge
8Ω 10 gauge
Load Gauge of
Wire Length Impedance Wire


