


Setup
6
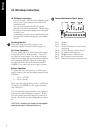
LR-100 Setup Instructions
LR-100 Setup Instructions
· If you are using the LR-100’s power amplifier, make
sure the unit is given sufficient room around the
ventilation holes.
· If you are rack mounting the LR-100, use the
optional LA-326 rack mounting kit. This kit allows
for single and dual rack mounting, and comes with
a security cover.
· For mounting on vertical or horizontal surfaces, use
the optional L bracket mounting kit, part number
LA-327.
Powering the Unit
Please note: if the unit will not power up, see
Resetting After an Overload Condition, page 14.
AC Power Operation
The unit comes with a UL listed inline power supply
designed for 115VAC, 60Hz operation. Do not use
any other AC power supply. Use of any non-Listen
supplied power supply will void the warranty. (Battery
use is permitted; see below.) Plug the power supply
into the back of the unit at the connector labeled
POWER. Now connect the power supply to power.
Battery Operation
To operate the unit on a battery or +12VDC power
supply, connect to the rear detachable terminal block
as follows:
i. Pin 3: +12VDC
ii. Pin 4: Ground
Please note that when operating on the +12VDC bat-
tery supply, the POWER switch is bypassed and the
unit is always on.
You can optionally charge batteries by also supplying
power to unit with the batteries connected. In this
case, the batteries are trickle charged at a rate of 18 -
36 mA. You should only use rechargeable type batter-
ies.
CAUTION: Attempting to charge non-rechargeable
batteries may result in explosion and/or fire.
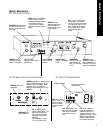
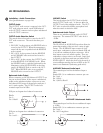
Detachable Terminal Block Wiring:
Pin 1: Speaker +
Pin 2: Speaker –
Pin 3: Ground for Battery or Power Source
connection
Pin 4: +12VDC Battery or Power Source
Pin 5: UP remote control function
Pin 6: DOWN remote control function
Pin 7: MUTE remote control function
Pin 8: Common for remote control function