


Programming
9
LR-100 Programming
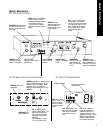
To make setup adjustments, remove the two hex screws
that secure the front panel security cover.
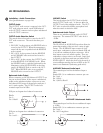
Setup VU Meter
The front panel VU meter indicates the audio level of
the OUTPUT signal. When making input audio level
adjustments, ensure that the red LED does not illumi-
nate.
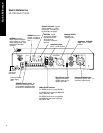
Input Audio Levels
Proper adjustment of input levels is critical to the
proper operation of the LR-100.
a. Receiver Audio Level Adjustment. Under normal
audio conditions adjust the receive audio level to
meet the output level needs of your installation.
Make sure that the red LED on the VU meter does
not illuminate.
b. Auxiliary Input Level Adjustment. Under normal
audio conditions adjust the receive audio level to
meet the output level needs of your installation.
Make sure that the red LED on the VU meter does
not illuminate.
Selecting SQ ON or OFF
See Listen SQ™ on page 12. If the transmitter that is
broadcasting to the LR-100 is SQ capable, make sure
the SQ switch for the transmitter and the LR-100 is
turned ON. If not, the SQ switch should be turned
OFF.
Channel Selection
Select the most appropriate channel by pressing the
UP or DOWN button (see Channel Selection on page
13). You can also press the SEEK button and the unit
will SEEK for the strongest RF signal. The unit may
stop on a channel that is close to the actual broadcast
channel, in which case the channel will sound noisy or
distorted. Simply press SEEK again until you find the
clearest operating channel.
To Lock Into Only One Channel: press and hold the
SEEK button for 5+ seconds to lock a receiver into the
currently tuned channel. Press and hold the button
again to unlock.
NOTE: It is highly recommended to lock the channel
after installation to prevent accidental channel selec-
tion.
Programming
In some cases, you may choose to give users the ability
to select multiple channels. For example, let’s say you
are using the LR-100 for language interpretation. In
this example, channels A, E and I are three different
languages. You can use the LR-100 programming fea-
ture to lock out all but the three channels used in this
example. By pressing the UP or DOWN button, the
user can select between the three channels.
To Lock Out Channels in the LR-100:
· Simultaneously press and hold the UP and DOWN
buttons. You will notice the PGM indicator on the
LCD indicating you are in the programming mode
(the unit will go out of the programming mode if
you don’t press a key for 10 seconds).
· Use the UP and DOWN buttons to select the chan-
nels you want to lock out.
· As channels are displayed on the unit, those chan-
nels that are locked out from user access will be
indicated by the L/O symbol on the display. When
a channel is locked out, the LR-100 will skip over
that channel when a user is tuning the unit. Press
the SEEK button while in program mode to lock
out a channel (lock out means the channel will
NOT be displayed to the user). To reverse the lock
out process, press the SEEK button on locked out
channels.
· When you have completed programming the unit,
don’t press any key for 10 seconds and the unit will
exit the programming mode.