


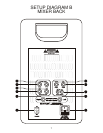


Setup Instructions:
Making Connections:
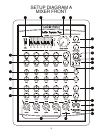
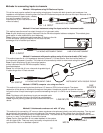
• Using the Profile speaker cables, or a set of your own, connect an end of each cable into the
speaker outputs of the mixer (R & W). Then connect the opposite end of each cable to the
appropriate speaker cabinet input (Y). Hint: For ease of use, connect the right output jack (R) to the
speaker cabinet on the right side of the mixer front and connect the left output jack (W) to the
speaker cabinet on the left side of the mixer front. Doing this will ensure that the pan control (E) will
be in sync with the appropriate speaker.
• If you are using a powered monitor, connect the input of the powered monitor to the monitor output
jack (T) on the back of the mixer.
• If you are using a powered subwoofer, connect the input of the powered subwoofer to the sub output
jack (U) on the back of the mixer.
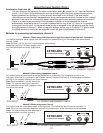
• Be sure that the power switch (S) is set to the “off” position and then attach the AC cable to the AC
input jack (X).
• Plug in the microphones and instruments you plan to use into the mic/line combination jacks (L & M).
Note: If you are using an instrument that has a stereo output connect that one to the mic/line
combination jack on channel 5 (M) using a stereo (tip/ring/sleeve) cable. If you are using a passive
acoustic instrument, you should use the mic/line combination jack on channel 5 (M) and set the
inst/line switch (H) to the inst position.
• If you are using an audio source, such as a CD player or computer, connect the output of the source
to the RCA input jacks (I) or the line input jack (J).
• If you are using a microphone with a mini (1/8”) plug, you can use the mic in jack (K) to connect to
the mixer.
Master Section:
• Turn the master volume control (3) and the monitor volume control (5) counter-clockwise to the
lowest setting.
• Set the master equalizer controls (2) to their center positions (0dB).
• If you are not using a subwoofer, set the sub volume to the center position. If you are using a
subwoofer, set the sub volume to its lowest position.
• Turn the effects volume control (6) counter-clockwise to the lowest setting.
Input Section:
• Turn all volume controls (G) counter-clockwise to their lowest positions.
• Set the pan controls (E) to their 12 o’clock positions.
• Set the treble and bass controls (C & D) to their 12 o’clock positions.
• Turn the monitor controls (B & F) counter-clockwise to their lowest positions.
• Turn the effects controls (A) counter-clockwise to their lowest positions.
Playing:
• Turn the power switch (S) to the “on” position. Note: The power indicator (4) on the front of the
mixer should now be lit.
• Turn the master volume control (3) clockwise to the 9 o’clock position and begin adjusting the
volume controls (G) of the individual channels (that you are using) clockwise to reach desired level.
After you are happy with the basic level, you then use the master volume control (3) to increase or
decrease the overall amount of volume. Note: If you are using a powered subwoofer, adjust the sub
volume slider (1) to the center position. After setting the basic level, you can then adjust this control
to increase or decrease the output of the powered subwoofer.
• Adjust the treble and bass controls (C & D) on the individual channels and the master equalizer
controls (2) to achieve the desired sound.
• Turn the master effects volume control (6) clockwise to the 9 o’clock position and begin adjusting the
effects controls (A) on the individual channel to achieve the desired amount of digital effects for each
channel. Note: You should also turn the effects selector control (7) to the desired effect selection
and press the effects active switch (0) to the “on” position.
9