


14 Krell KAV–400xi
Krell recommends using balanced interconnect cables. Balanced
interconnect cables not only can minimize sonic loss but are also
immune to induced noise, especially with installations using long
cables. Balanced connections have 6 dB more gain than single-
ended connections. When level matching is critical, keep this gain
value in mind.
Follow these steps to connect the KAV–400xi to your system.
1. Make sure all power sources and components are off before
connecting inputs and outputs.
2. Neatly organize the wiring between the KAV–400xi and all sys-
tem components. Separate AC wires from audio cables to
prevent hum or other unwanted noises from being introduced
into the system.
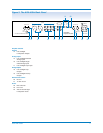
3. Connect the left and right loudspeaker cables to the integrated
amplifier’s left and right loudspeaker output terminals (14).
The KAV–400xi uses standard binding posts for each amplifier
channel. These connectors accept bare wire, pins, or spade
lugs. Use the red terminal for the positive connection and the
black terminal for the negative connection.
4. Connect the left and right outputs of your source components to
the appropriate analog inputs (15, 16, 17) on the KAV–400xi.
The KAV–400xi is equipped with one balanced input (B-1),
three single-ended inputs (S-1, S-2, or S-3), and one tape input.
The B-1, S-1, S-2, and S-3 inputs can be configured for Theater
Throughput. See Optional Configurations, on page 17 for
information on configuring an input for Theater Throughput.
5. Use the preamp outputs (19) to connect to an additional power
amplifier, for loudspeakers in another room.
6. Plug the AC cord into the IEC connector (22) on the back
panel of the KAV–400xi. Plug the remaining end into the AC
wall receptacle. The red stand-by LED (3) illuminates. There is
no audible click or delay.
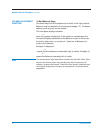
Pin 1 Shield (ground)
Pin 2 Non-inverting (hot) (0°)
Pin 3 Inverting (cold) (180°)
Connecting the KAV–400xi
to Your System
USING BALANCED
CONNECTIONS
Connection
Steps
Pin assignments for the
XLR connectors