


1. Unplug your multimedia speaker
system from your computer’s sound
card or sound outputs, making careful
note of which output jack is associated
with each speaker connection. Usually
the plugs and jacks will be color-coded
GREEN for front left/right and BLACK
for surrounds (rear), with the front jack
directly above the surround jack on the
back of the sound card. Placement and
color coding of the jack used for cen-
ter/subwoofer (center/bass) output, if
any, varies from card to card; Klipsch
uses ORANGE miniplugs and mini-
jacks for this connection.
2. Plug the cables from your speaker
system into the corresponding OUTPUT
minijacks on the SWS subwoofer’s
back panel. The cable for the front left
and right speakers plugs into the
GREEN OUTPUT jack. The cable for
surround speakers (if any) plugs into
the BLACK OUTPUT jack. The cable for
a center speaker and a separate bass
module (if any) plugs into the
ORANGE OUTPUT jack.
3. Use the cables supplied with the
SWS to connect its INPUT minijacks to
your computer’s sound card. Attach the
cable with a GREEN miniplug at each
end to the front left/right sound card
output and the SWS subwoofer’s
FRONT L/R INPUT. Plug the cable with
BLACK miniplugs into the surround
(rear) sound card output (if any) and
the SWS subwoofer’s REAR L/R INPUT.
Plug the cable with ORANGE mini-
plugs into the center/ subwoofer (cen-
ter/bass) sound card output (if any)
and the SWS subwoofer’s
CENTER/SUB INPUT. Your input con-
nections to and output connections
from the SWS should match. For
example, if the REAR L/R output is
connected, so should the REAR L/R
input. But if the REAR L/R output is not
connected, neither should the REAR
L/R input.
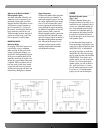
Klipsch ProMedia Speaker System
with Subwoofer Outputs (Fig. 2)
The directions in this section apply to
Klipsch ProMedia multimedia speaker
systems which have the SWS-link sub-
woofer output jacks. For earlier
ProMedia models, follow the instruc-
tions in the previous section.
On the SWS subwoofer’s back panel is
an RCA (phono) INPUT jack. Use an
RCA audio interconnect cable (one is
supplied with the SWS) to connect this
input to the RCA SUBWOOFER OUT-
PUT (SWS-link) jack on your ProMedia
speaker system. This is the only signal
connection you need to make unless
you are using multiple SWS sub-
woofers (see “Multiple Subwoofers”).
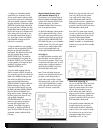
TV Set (Fig. 3)
An SWS subwoofer can add a solid
bass foundation to the sound from a
TV set’s built-in speakers, if the TV has
a line-level audio output jack. You will
need to make a single connection to
the RCA (phono) INPUT jack on the
SWS subwoofer’s back panel.
Most TV sets sold today have one
(mono) or two (stereo) audio line out-
put jacks on their back panels. A
mono audio output will be a single
RCA (phono) jack, usually with a black
inner ring for identification. A stereo
audio output will be two RCA jacks,
one with a white (or occasionally
black) inner ring, the other with a red
inner ring. (RCA jacks with yellow
inner rings are for video.) Use an
audio interconnect cable with RCA
plugs at each end (one is supplied with
the SWS) to connect one of these out-
put jacks to the RCA INPUT jack on the
SWS subwoofer’s back panel.
Even if the TV’s audio output is stereo,
use only one of the two jacks; this will
not impair performance. If the TV has
one set of audio outputs labeled
"Fixed" or "Fixed Level" and another
labeled "Variable" or "Variable Level,"
make sure you use one of the variable-
level jacks.
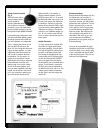
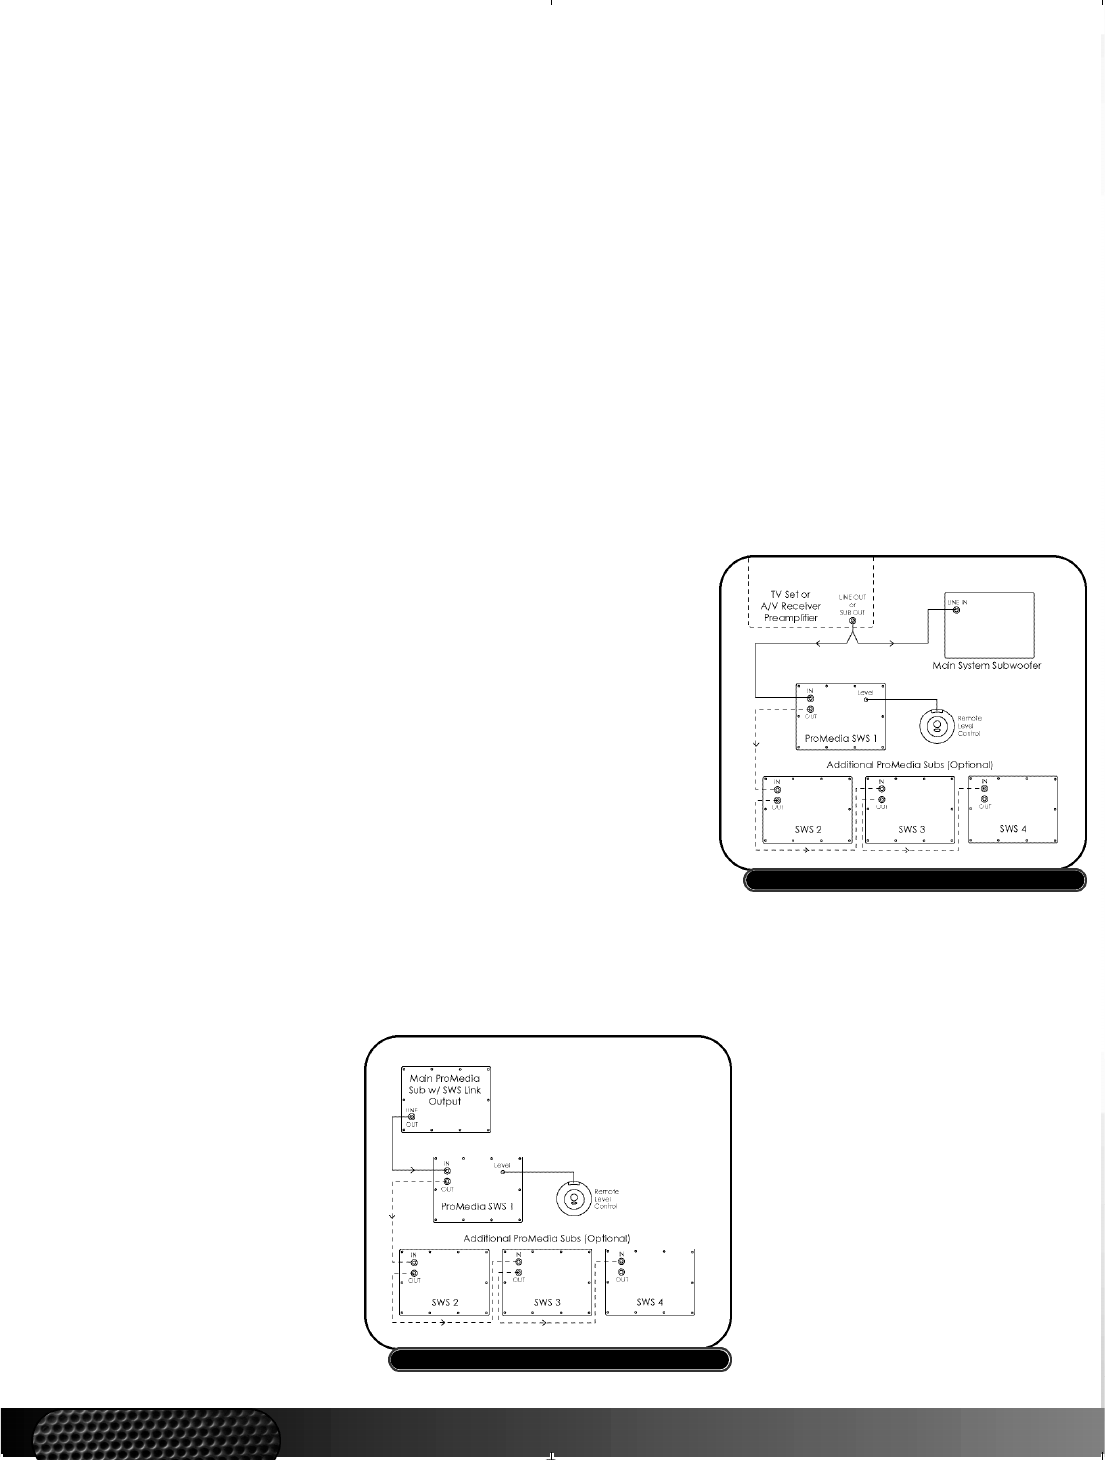
Home Audio System (Fig. 4)
You can connect the SWS to any home
audio system that has a subwoofer
output or preamp outputs for its front
left and right channels. Just use an
audio interconnect cable with RCA
plugs at each end (one is supplied with
the SWS) to connect one of these out-
put jacks to the RCA INPUT jack on the
SWS subwoofer’s back panel.
If the system has both subwoofer and
preamp output jacks, use the sub-
woofer output. And if the subwoofer
output is on an A/V receiver or ampli-
fier, make sure you go into its bass-
management setup menu and set
Subwoofer to "On" or "Yes."
FIGURE 4
FIGURE 3