


Crossover Adjustment — Using the LFE Direct input bypasses the Crossover Frequency
control on the back panel. Your receiver or processor will handle the crossover function.Most use
a single,set frequency between 80Hz and 100Hz.If your receiver or processor gives you a
choice of crossover frequencies,80Hz is usually a good starting point.Refer to the adjustment
section for more information.In that case,start with the frequency that comes closest to match-
ing the specified low-frequency limit of the smallest speakers in the system.After completing the
other adjustments,you may want to experiment with moving the frequency up and down a little,
to see if a different setting works slightly better. If the crossover frequency is set higher than
100Hz,the subwoofer should be in the front of the room near the front main speakers.
Volume Control — Adjust the subwoofer’s Level to get a smooth transition between its output
and that of the main speakers. Your receiver or processor will have a subwoofer level control in
its speaker setup menu,so you will have to go back and forth a bit between it and the Level
control on the subwoofer itself.In the end,you should wind up with the menu control somewhere
in the middle of its range.Strive for bass that is solid but not overblown or boomy.
Phase Control — In some installations the setting of the Phase Control may not make much
difference,whereas in others it may be necessary to go back and forth between the Phase and
the Level controls for a while in order to get the very best blend with the main speakers.Since
each control setting (including the one for crossover frequency in the receiver or processor)
affects the optimum settings for the others,it often takes a while to get everything dialed in just
right.Start with the phase knob at 0° and play a recording with a prominent,repeating bass line
in your listening position.Repeat this process with the control in the 90° and 180° positions.Use
the setting that yields the greatest bass output.
Analog Surround Receiver / Processor or Two-Channel Stereo System
Connection — Some analog A/V receivers and processors (without Dolby Digital
®
or DTS
®
capability) have a line-level subwoofer output.Others have left- and right-channel line-level out-
puts,as do some stereo receivers and integrated amplifiers.All separate stereo preamps and
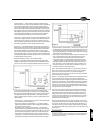
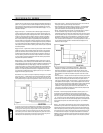
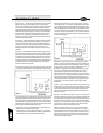
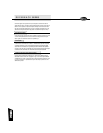
surround processors have line-level outputs.These outputs can be connected to your sub-
woofer’s main line-level inputs (See Figure 2). You will need one or two shielded,high quality
interconnect cables of appropriate length with RCA plugs on each end.Your dealer can help you
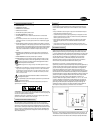
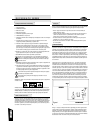
select suitable cables.If your system does not provide any of these outputs,you will need to
connect the subwoofer’s Speaker Level inputs to your receiver or integrated amplifier’s speaker
outputs (See Figure 3).
• Subwoofer Output — Connect the subwoofer output jack to one of the line-level input jacks
on the subwoofer. Do not use the LFE Direct input.
• Preamp Outputs on Receiver or Integrated Amplifier — If your receiver or integrated
amplifier has spare preamplifier outputs for its front left and right channels,connect these to
the line-level input jacks on the subwoofer.
• Pre-out/Main-in Loops on Receiver or Integrated Amplifier — Some receivers and
integrated amplifiers have their preamplifier and power amplifier stages connected externally
via jumpers.If yours has its left and right front channels connected this way, you can connect
your subwoofer to those preamp outputs. You will need a pair of Y-adaptors,each with two
male RCA plugs and one female RCA jack.Remove the jumpers for the two channels.For
each,plug one leg of a Y-adaptor into the preamp output jack and another into the main amp
input jack.Plug the cables leading to the subwoofer into the female ends of the Y-adaptors.
Figure 2
• S e p a rate Preamplifier or Surround Pr o c e s s o r — You will need a pair of Y- a d ap t o r s ,each with
one male RCA plug and two female RCA jacks. Unplug the cables leading from the front left- and
right-channel outputs on the preamp or processor and plug the Y- a d aptors into them. For each
c h a n n e l ,plug the cable leading to the power amplifier into one of the RCA jacks on the Y- a d aptor
and the cable leading to the subwoofer into the other.
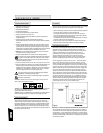
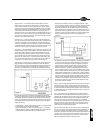
• S p e a ker Ou t p u t s — Connect the subwoofer’s Speaker Level inputs to the same outputs on your
receiver or integr ated amplifier as your front left and right speakers.This involves running a
second set of wires from the left and right speaker outputs to the subwoofer. Maintain
correct polarity,with positive (+, red) outputs connected to the positive inputs and negative
( – , black) outputs connected to the negative inputs.Make sure that there is no metal-to-metal
contact between the positive and negative sides of either connection at either end. Failure to
o b s e rve this precaution can result in amplifier malfunction or damag e .The subwoofer can be
connected to a secondary or “ B ”main channel output of your apmplifier if the volume of your
main speakers is unaffected when both outputs are selected.
P ower — Set the subwoofer’s Main Power switch to "Off." Then plug the power cord into an A C
o u t l e t .You can turn the power on and off manually using the switch, or you can leave the Main
Power turned on and set the Auto Power switch to "On," which will automat i c a l ly turn the
subwoofer on when a signal is detected at one of the inputs and off after a period of inactivity.We
recommend Auto Power "On" for most systems.
A d j u s t m e n t — Start by setting the Crossover Frequency control to the ap p r o x i m ate low-frequency
limit of your main left and right front speakers.If you don’t have their specificat i o n s , take an
e d u c ated guess based on the size of the speakers.A large speaker will usually work down to lower
frequencies than a small speaker. So for a large floorstanding loudspeaker, you might start with the
Crossover Frequency set all the way down to 40Hz, whereas for very small satellite speakers you
might want to turn it all the way up to 120Hz.Typical bookshelf speakers would tend to be in the
50Hz to 80Hz range. If the crossover frequency is set higher than 100Hz, the subwoofer should be
in the front of the room near the front main speakers.
P l ay a variety of music recordings containing strong but not overpowering bass.Adjust the sub-
w o o f e r ’s Level control until the music sounds consistently warm and nat u r a l .If you have trouble
getting enough low bass without the sound becoming boomy, it probab ly means the Crossover
Frequency is set too high.Try turning it down a bit at a time until the problem goes aw ay. If the
sound is thin until you turn the subwoofer Level up so much that the lower bass is too prominent,
start by varying the setting of the Phase control. If that does not entirely solve the problem, y o u
p r o b ab ly need to raise the Crossover Frequency.
G e n e ral Comment About A d j u s t m e n t s: Since any change in the setting of one control tends to
change the optimum settings for the others to some degr e e ,the adjustment process is very interac-
tive and involves a gr e at deal of trial and error. If after a period of listening and calibration you’re
still not hap py,it may mean that you need to experiment a little with the location of the subwoofer.
T h at ,of course, also interacts with everything else.A g a i n ,p a tience is a virtue.The end result will be
well worth the effo r t .
CARE AND CLEANING
The only thing you should ever need to do to your subwoofer is to dust it occasionally. Never ap p ly
a ny abrasive or solvent-based cleaner or any harsh detergent.You can clean the grille with the
brush attachment of a vacuum cleaner.
Figure 3
SPEAKER