


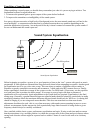


A good idea is to rotate the measuring microphone in a wide arc or circle round the measuring position and to
see if any strong interactions occur causing large deviations in response. If necessary, move to another position.
Also ensure that the ambient noise level is at least 6dB (preferably 10dB) below the signal level you are using.
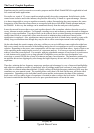
Having set up the desired house curve as smoothly as possible, move round and check the response throughout
the listening area. Good equalisation requires time and patience. Do not forget that some interaction will occur
between a particular filter and its adjacent bands. A better sound may be produced by adjusting several bands
rather than by strong cutting just the centre one. Do not forget to pause to talk or play music through the system
as you go, so that you keep in touch with what the resultant sound quality is like.
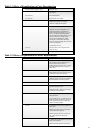
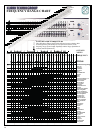
If the Real Time Analyser you are using is the Klark Teknik DN6000 you have a powerful averaging capability
which means that averaging the response throughout the coverage area becomes very much easier. The
response displayed by the analyser should also become smoother as local fluctuations are averaged out whilst
persistent peaks and dips clearly stand out and show where adjustment is truly required.
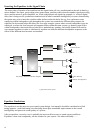
Connecting a stage or house microphone into the analyser can be a most instructive exercise - showing up
any local reflection or acoustic resonance or loudspeaker sidelobes. Generally repositioning the microphone
or adjusting individual microphone channel equalisation will be needed, rather than adjustment to the overall
house curve. This technique is particularly useful when investigating acoustic feedback after the initial house
curve has been set.
DN6000
17