


Equalising a Sound System
When equalising a sound system you should always remember just what it is you are trying to achieve. Two
fundamental reasons for equalization are:-
1. To increase the potential gain or power output of the system before feedback.
2. To improve the naturalness or intelligibility of the sound system.
In a space with poor acoustics or high levels of background noise, the most natural sound may well not be the
most intelligible - a compromise must therefore by reached between these two qualities depending on the
particular application in question - but at the end of the day it doesn’t matter how natural the system sounds if
no one can understand the sound it puts out!
Before beginning to equalise a system, it is a good practice to listen to the “raw” system with speech or music
programme. If such signals are distorted then stop and rectify them before attempting to equalise. Another good
pre-equalisation test is to use a slow sine-sweep. This can expose a number of problems such as rattles or
distortion or poorly controlled room modes and resonances - which pink noise RTA cannot discover. Finally,
before equalisation, check the coverage of the system over the 2 to 4kHz bank. (If necessary, use the equaliser
as a band pass filter to produce the desire range). If coverage is poor to begin with then no amount of
equalisation will overcome this. Again adjustments to the system itself are required. Equalisation is the final
tuning stage. Generally, a gradual transition between adjacent bands should be aimed for, particularly in studio
monitoring situations where the maximum difference between bands should only be 3dB or so. A warning bell
should be ringing if you are using much more than this! This does not mean however that more drastic
adjustments should not be used - this is very often necessary with sound systems operating in poor or severe
acoustic environments, but the reason why such a particularly large fader excursion is being used at a given
frequency should always be carefully considered.
Once satisfied with the basic system, performance equalisation can begin. If using a real time analyser ensure
that the microphone is in a sensible position i.e within the coverage area of the system and not in an area where
strong local acoustics effects might be expected such as within 1 metre of a rear or side wall or in a balcony
opening.
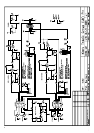
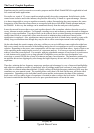
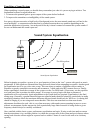
Test Microphone
Spectrum
Analyzer
EQ
Pink
Noise
general.
Sound System Equalisation
Sound System Equalisation
16