


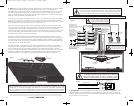
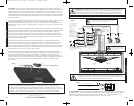

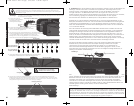
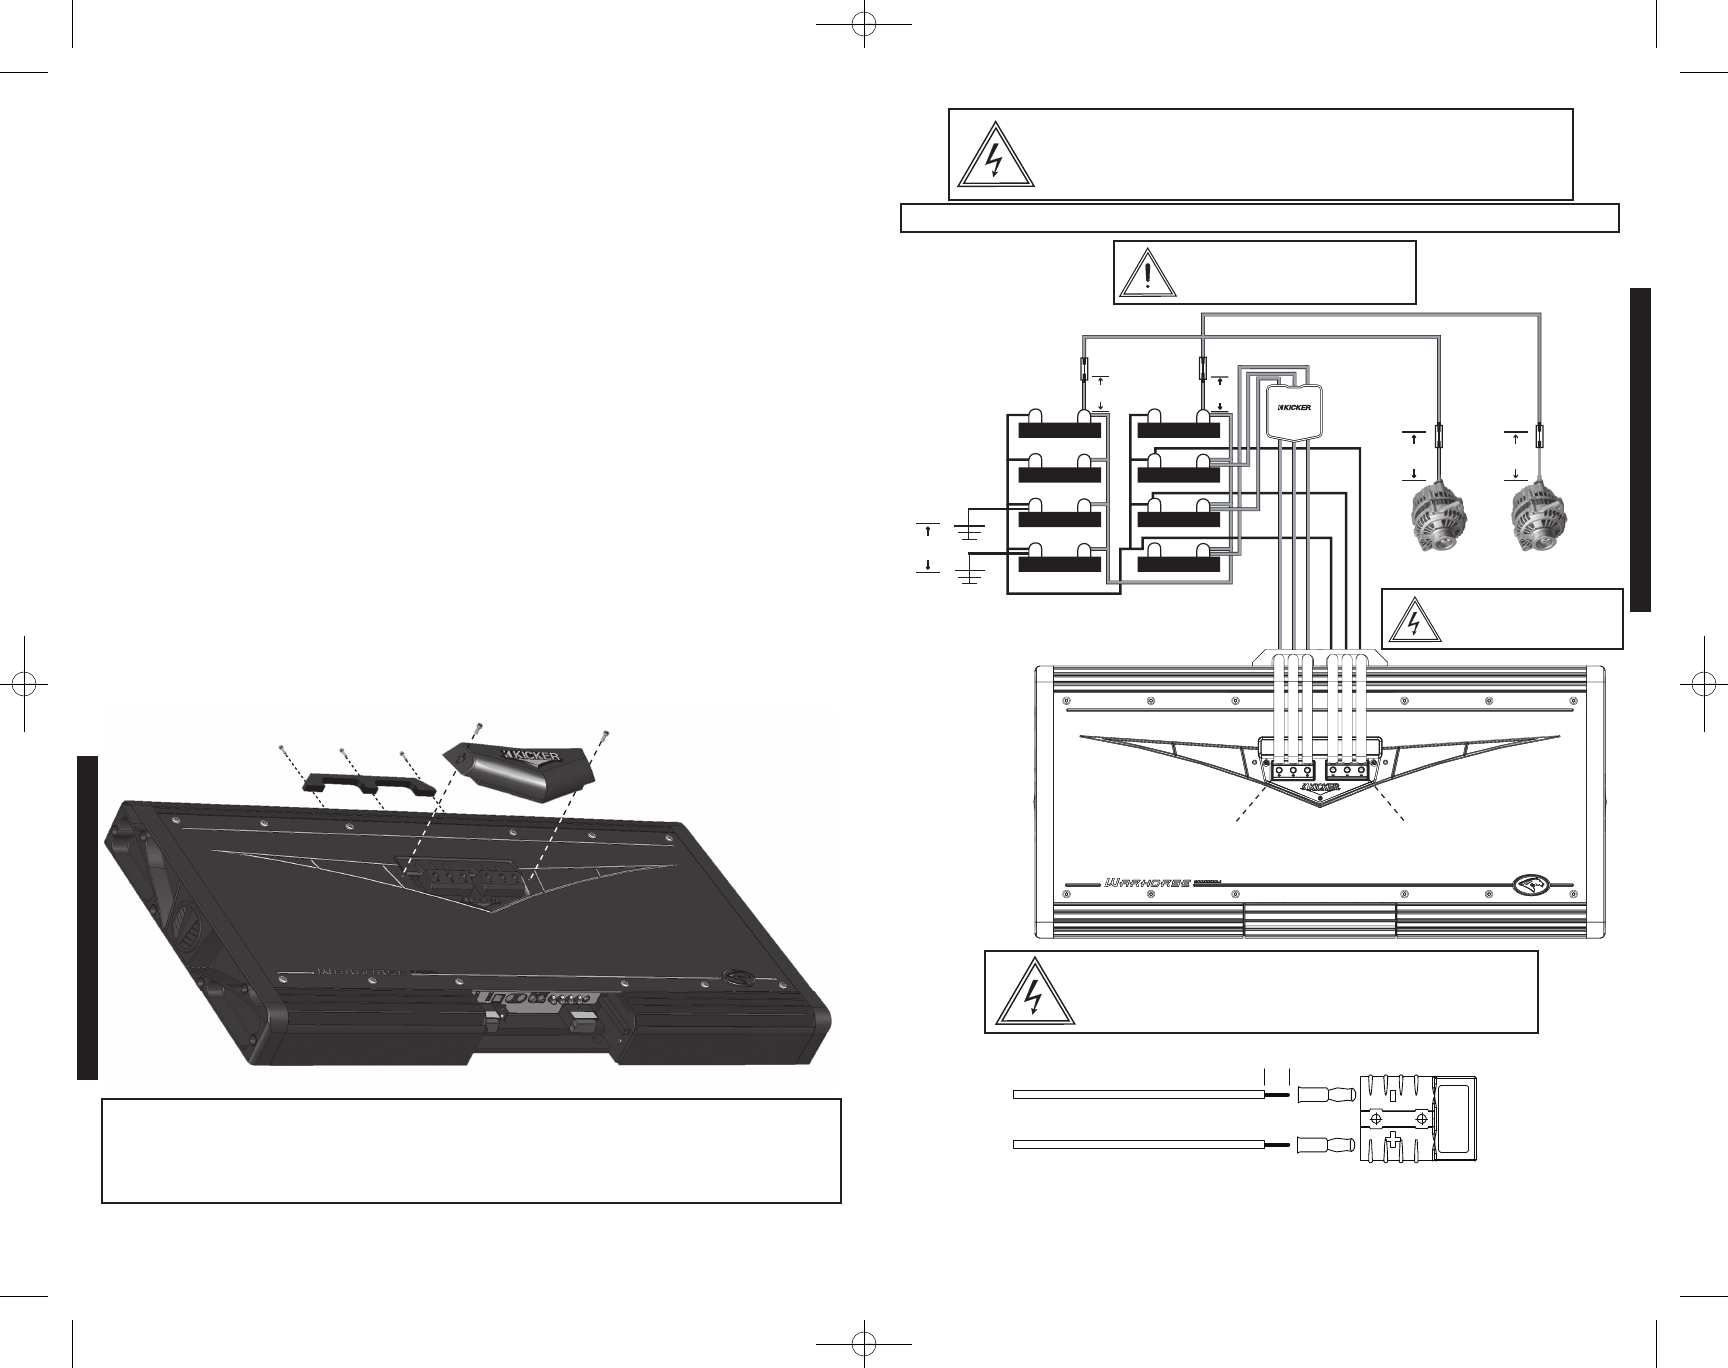
2. Wiring Before wiring the Warhorse amplifier, disconnect the vehicle’s batteries to avoid an electrical
short. Eight (8) identical, high-quality, 800-cold-cranking-ampere (cca), 12-volt batteries are
recommended to power the WX amplifier. All power and ground wires should be as short as possible
and utilize 1/0 gauge wire. Remove the wire guide and power hood from the amplifier as shown in
Figure 3. Connect three (3) ground wires from the amplifier’s negative power connector to the negative
terminals of three (3) batteries in the battery network.
From two (2) of the batteries in the battery network, connect 1/0 gauge ground wire from the negative
terminals of the batteries to a paint-free and corrosion-free solid-metal area of the vehicle's chassis.
Make the ground wires short, 18” (45cm) or less. To reduce noise, make sure the ground wires connect
to the same piece of metal and are within 18” (45cm) of each other.
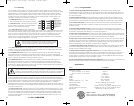
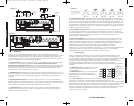
With the control panel shield removed, connect a twisted pair of RCA (low-level) interconnect cable,
carrying the incoming audio signal, to the RCA inputs on the amplifier. Connect the speaker wires to the
supplied Anderson
TM
connectors. Use 8 gauge wire and strip 9/16” (14mm) from the end being
inserted into the metal contacts. See Figure 5. The wire should be secured by placing the metal contact
into a vise and melting solder inside the metal contact. Then, insert the stripped wire into the molten
solder within the contact. Do not use acid core solder.
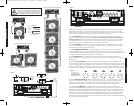
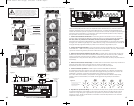
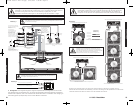
The Warhorse amplifier requires at least two (2) 200-ampere-output-capacity alternators. For each
alternator, connect a 250 ampere fuse within 18” (45cm) of each alternator and a second 250 ampere
fuse within 18” (45cm) of the battery network. Without adequate charging capability, the WX amplifier
can draw enough current to shut down your vehicle’s computer system. This may adversely affect your
ability to control your vehicle. See Figure 4.
The three (3) positive 1/0 gauge power wires should be the last wires connected in the installation.
Install a Kicker three (3) gang ANL fuse holder (not incuded) within 18” (45cm) of the battery network
and in-line with the three (3) power cables connected to the amplifier’s positive power connector.
Improper connections will damage the amplifier and/or cause serious injury or death. If you ever need to
remove the amplifier from the vehicle after it has been installed, the ground wires should be the last
wires disconnected from the amplifier, just the opposite as when you installed it. See Figure 4.
4
INSTALLATION
WX10000.1AMPLIFIER
Figure 5
Strip Wire
9/16” (14mm
)
Anderson
TM
Connector
8 Gauge Speaker Wire
Metal Contacts
Secure wire to metal
contacts by soldering.
If you have more questions about the installation or operation of your new KICKER product, see the
Authorized KICKER Dealer where you made your purchase. For more advice on installation, click on the
SUPPORT tab on the Kicker homepage, www.kicker.com. Choose the TECHNICAL SUPPORT tab,
choose the product or subject you are interested in, and then view the corresponding information. Please
E-mail support@kicker.com or call Technical Services (405) 624-8583 for unanswered or specific questions.
ModelWX10000.1 Fuse Three (3) x 250 Ampere PowerGroundWire Three (3) x 1/0 Gauge
+12V
+12V
+12V
+12V
+12V
18"
Or Less
(45cm)
18"
Or Less
(45cm)
18"
Or Less
(45cm)
18"
Or Less
(45cm)
+12V
+12V
+12V
18"
Or Less
(45cm)
At least two (2) 200-ampere alternators are
required to power the Warhorse amplifier.
Run two (2) ground wires from
separate negative battery
terminals. Ground wires should
connect to vehicle chassis
within 18” of each o
ther.
Eight (8) identical, high-
quality, 800-cca, 12-volt
batteries are recommended
for optimum performance.
250 ampere
fuse
250 ampere
fuse
250 ampere
fuse
250 ampere
fuse
ANL fuse holder
contains three (3) 250
ampere fuses. The fuse
holder should be
installed within 18” of
battery network.
Mount Amplifier within 48”
(122cm) of Battery Network
-
+
Figure 4
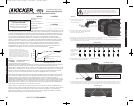
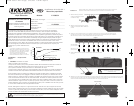
3. Configuration The following diagram shows the recommended mono configuration for your
Kicker WX amplifier. The WX amplifier can only drive extremely high-power-rated, dual-voice coil
speakers. We recommend using one or more Kicker SoloX Subwoofers. Each voice coil (speaker)
output is rated at 2 ohms minimum.
Power Hood
Wire Guide
Warning: This amplifier is not like anything you
have ever hooked up before. Pay close
attention to the wiring diagrams in this manual.
Improper connections will damage the amplifier.
Negative Power
Connector
Positive Power
Connector
Note: To get the best performance from your new Kicker Amplifier, we recommend using genuine Kicker Accessories and Wiring.
All specifications and performance figures are subject to change. Please visit the www.kicker.com for the most current information.
5
Figure 3
CONFIGURATION
Without adequate
charging capability, the
WX amplifier can draw
enough current to shut
down your vehicle’s
computer system. This
may adversely affect
your ability to control
your vehicle.
The WX amplifier outputs dangerous voltage levels from the voice
coil (speaker) outputs and can cause serious injury or death from
electrocution . Never contact the voice coil outputs, connect
speakers, or contact speaker wires while the amplifier is turned on.
Caution The Kicker WX amplifier outputs extremely high voltage signals
from the voice coil (speaker) outputs and can cause serious injury or death
from electrocution. It is imperative to read the manual carefully and follow all
of the recommended safety precautions before installing the WX amplifier.
Improper connections will damage the
amplifier and/or cause serious injury or
death. Be sure that all wiring is
connected to the appropriate polarity.
or less
or less
or less
or less
or less
2007 WX 10000-1 4in1 v01.qxp 4/25/2008 1:46 PM Page 3