


4 English
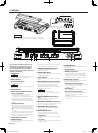
P.CON
SPEAKER OUTPUT
BRIDGED
LEFT
RIGHT
FUSE
[
30A
x
2
]
GNDBATT.
+
LINE OUT
LINE IN
L
R
A A
SPEAKER OUTPUT
BRIDGED
B B
A B
SPEAKER OUTPUT
BRIDGED
SPEAKER OUTPUT
BRIDGED
LEFT
RIGHT
LEFT
RIGHT
A B
LEFT
RIGHT
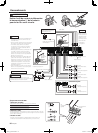
CAUTION
• If sound is not output normally, immediately
turn power off and check connections.
• Be sure to turn the power off before
changing the setting of any switch.
• If the fuse blows, check wires for shorts, then
replace the fuse with one of the same rating.
• Check that no unconnected wires or
connectors are touching the car body. Do
not remove caps from unconnected wires or
connectors to prevent short circuits.
• Connect the speaker wires to appropriate
speaker connectors separately. Sharing the
negative wire of the speaker or grounding
speaker wires to the metal body of the car
can cause this unit to fail.
• After installation, check that the brake
lamps, winkers, and wipers work properly.
* Commercially available parts
WARNING
To prevent fire caused by a short in the
wiring, connect a fusible link or breaker
nearby the battery’s positive terminal.
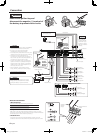
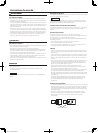
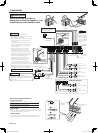
Connection
Ground wire*
Power control wire*
B channel
Right speaker
Battery wire*
Protective Fuse*
CENTER UNIT
(CD receiver, etc.)
RCA cable*
Left input
Right input
Battery
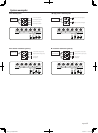
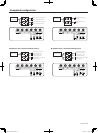
Bridged Connections
B channel
Left speaker
A channel
Right speaker
A channel
Left speaker
B channel
Speaker (Bridged)
A channel
Speaker (Bridged)
A channel input
B channel input
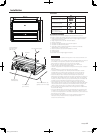
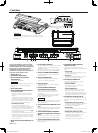
Hexagon Wrench
(Small)
Hexagon
Wrench (Large)
Hexagon Wrench
(Small)
Use the
attached
Hexagon
Wrench.
Use the
attached
Hexagon
Wrench.
WARNING
Remove the ignition key and
disconnect the negative · terminal of
the battery to prevent short circuits.
Hexagon Wrench
(Small)
Hexagon
Wrench
(Large)
Terminal cover
NOTE
Use a RCA cable
with a straight
terminal. If a RCA
cable with L type
terminal is used, it
may not be able to
connect.
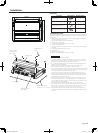
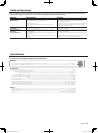
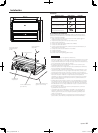
About the Lead Terminals
1. Wire Thicknesses
You can use wires with the following thicknesses:
Battery wire and ground wire AWG 4 – AWG 6
Speaker wire AWG 8 – AWG 12
2. Strip the wire
Make a cut in the wire sheath (insulator made from vinyl, etc.) at the
position 10-13 mm away from the end of the wire, and then remove the
unnecessary portion of the sheath by twisting it.
3. Install the wire
Loosen the screw using the supplied hexagon wrench. Insert the
conductor of the wire in the terminal hole, and then tighten the screw.
10 - 13 mm
(3/8" - 1/2")
X600F_K_1English.indd 4 08.10.21 1:34:18 PM