


21
EN
Preparing for surround sound
Setting up the speakers automatically
(AUTO SETUP)
“Kenwood Room Acoustic Calibration”
A very loud test sound is produced during the measure-
ment. Please take into consideration that it may disturb
your neighborhood, especially, when you measure it at the
night time.
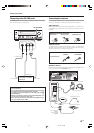
“Kenwood Room Acoustic Calibration” function automatically per-
forms the following adjustments with the provided microphone by
measuring sound characteristics for the best listening environment
according to your room conditions and speakers layout.
1 Speaker presence and its size
2 Volume level differences from each speaker
3 Sound delay from speakers
4 Room sound characteristics
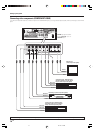
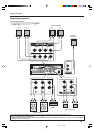
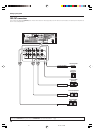
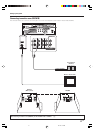
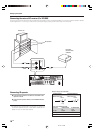
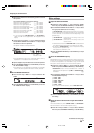
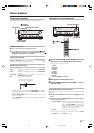
• Image of the measurement
Place the microphone at a height of your ears.
Do not place any obstacles between the microphone and speakers
during the measurement.
The measurement may not be carried out properly because of
speaking voice or other noise. Keep it down while measuring.
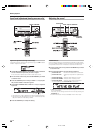
1
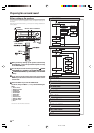
Perform automatic calibration.
1 Use the 5/∞ keys or MULTI @/# keys to select the “AUTO
SETUP” and press the MEMORY/ENTER key or the ENTER key.
2 Use the 5/∞ keys or MULTI @/# keys to select the "CALI-
BRATE" and press the MEMORY/ENTER key or the ENTER key.
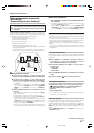
• The display which indicates start of the measurement, "START"
is displayed.
• If you wish not to start measuring, use the 5/∞ keys or MULTI
@/# keys to select "RETURN", and then press the MEMORY/
ENTER key or the ENTER key to return to "CALIBRATE"
display.
3 Press the MEMORY/ENTER key or the ENTER key to start
measuring.
• The display which indicates during the measurement, "Measur-
ing..." is displayed.
• It takes about 2 minutes to complete the measurement.
• If the provided microphone is not connected, "E01:No MIC" is
displayed and no measurement is performed.
• After the measurement is completed, analyzing starts and
"Analyzing x/4" (x changes from 1 to 4) is displayed. When the
analyzing is completed, "COMPLETE" will be shown for a few
seconds, and changed to "CONFIRM".
• Do not turn off the receiver while measuring. Otherwise, the
measurement contents are changed back to the factory setting.
2
Exit the AUTO SETUP mode.
When "CONFIRM" is displayed, press the MEMORY/ENTER key
or the ENTER key.
• The display which indicates the confirmation of the measurement
contents, "SP SETUP" is displayed. £
• Use the 5/∞ keys or MULTI @/# keys to select "RETURN" while
"CONFIRM" is displayed, and then press the MEMORY/ENTER
key or the ENTER key to return to the "AUTO SETUP" display.
Notes
• Sometimes due to the electrical complexities of subwoofers and the
interaction with the room, THX recommends setting the level and the
distance of the subwoofer manually.
• Sometimes due to interaction with the room, you may notice irregular
results when setting the level and/or distance of the main speakers.
If this happens, THX recommends setting them manually.
• Please note that any THX main speakers should be set to NML/THX
(80Hz).
If you set up your speakers using AUTO SETUP, please make sure
manually that any THX speakers are set to NML/THX with 80Hz
CROSSOVER.
Test signal level adjustment
If a message such as "Exx : No Spk XX" or "Wxx : No Spk XX" is displayed
even though each speaker is connected correctly, adjust the level of the
test signal.
1 While "CONFIRM" or "CALIBRATE" is displayed, use the 5/∞
keys or MULTI @/# kyes to select "TEST SIG LVL", and then
press the MEMORY/ENTER key or the ENTER key.
2 Use the MULTI CONTROL knob or MULTI %/fi keys to select a
test signal level.
1 LEVEL LOW
2 LEVEL MID
3 LEVEL HIGH
3 Press the MEMORY/ENTER key or the ENTER key to accept the
setting.
4 Proceed to step 2 of "
1
Perform automatic calibration."
Cancelling the measurement
If you operate any of the keys shown below, the measurement is
cancelled and the display is return to the ordinary input display.
1
(POWER ON/STANDBY) key or RECEIVER STANDBY key
2 VOLUME CONTROL knob or VOLUME %/fi keys
3 SETUP key
4 INPUT SELECTOR key
• If the measurement is cancelled, the measurement contents are
changed back to the factory setting.
About error messages
If the receiver detects some kind of problems while in calibration, an error
message is shown in the display, and the processing is stopped.
Eliminate the problem according to the message and try the calibration
again. If there are more than one error messages, press the 5/∞ keys or
MULTI @/# keys to find the next one while the message is shown on the
display.
Press the MEMORY/ENTER key or the ENTER key to return to the
“CALIBRATE“ display.
Continued to next page.
05.7.16, 1:24 PM21