Page 2
The Video CD player must be connected directly to a television set or,
an amplifier or receiver that is connected to a television or monitor.
Select a level, dry location free of dust and vibration, having a
temperature maintained between 5 and 35°C (41 and 95°F).
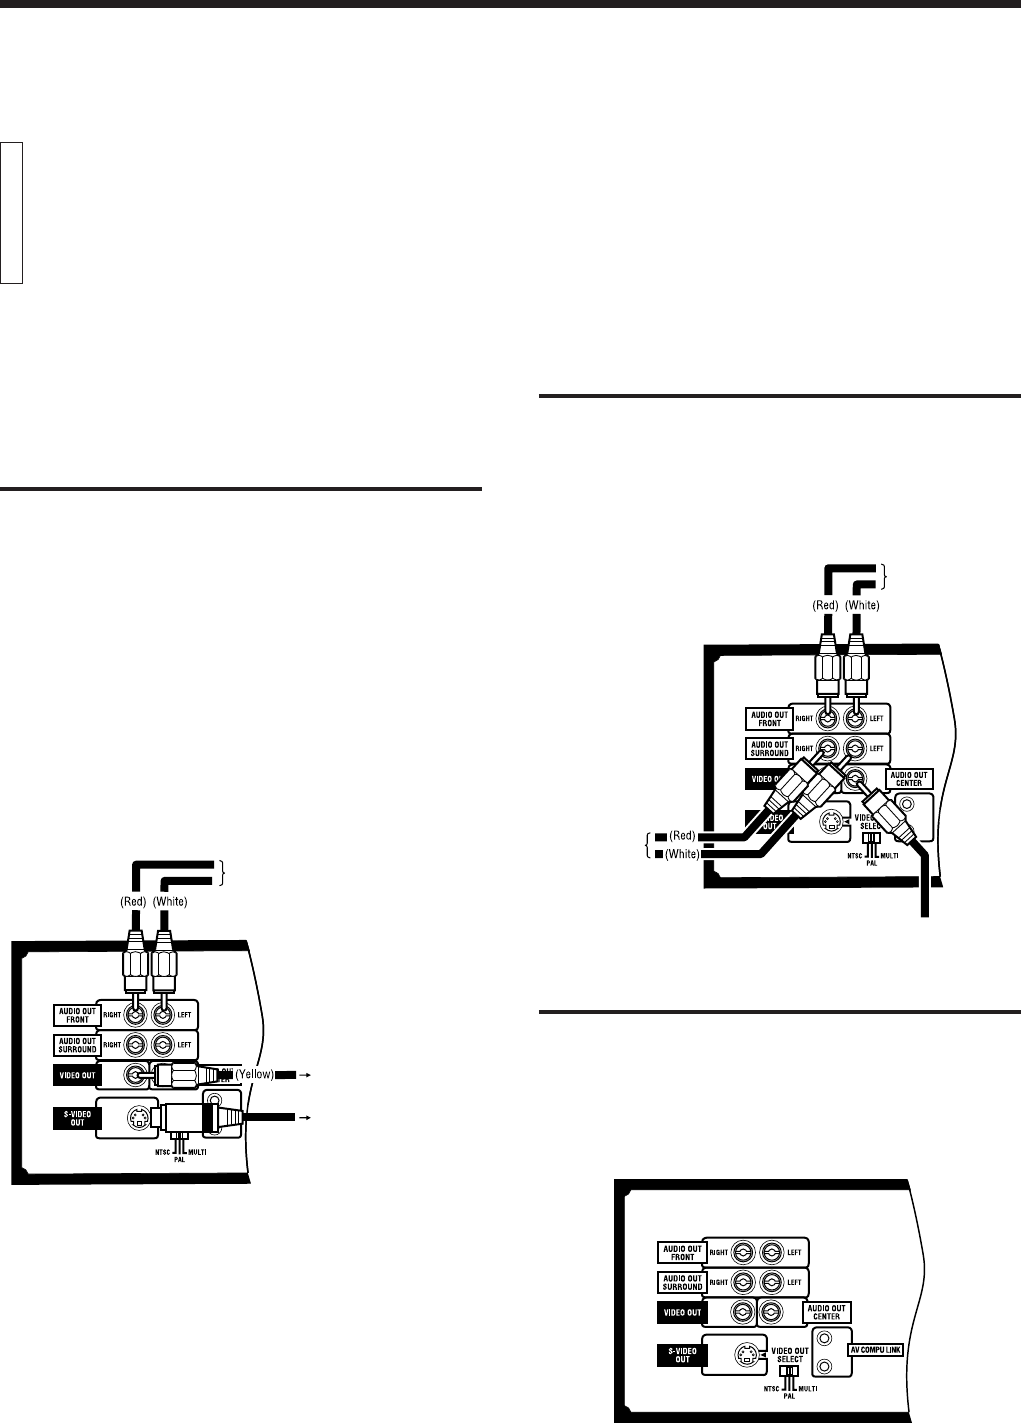
Connecting the player to a TV or ampli-
fier/receiver using the Audio Video cable
First make the audio and video connections before connecting the AC
power cord. Also, make sure that the equipment (television, amplifier
or receiver) to be connected with the player is turned off.
Firmly insert the yellow pin plug of the Audio Video cable in the yellow
VIDEO OUT jack on the rear panel of the player; the red pin plug in the
red AUDIO OUT FRONT (RIGHT) jack; and the white pin plug in the
white AUDIO OUT FRONT (LEFT) jack. (The RIGHT and LEFT output
jacks are for the right and left audio channels.)
Then firmly insert the pin plugs at the other end of the Audio Video cable
into the matching video and audio INPUT jacks.
If your television set has an S-video input, we recommend you to
connect it with S-VIDEO OUT of the player using the optional S-Video
cable, in addition to the (standard) video connection, to get a better
picture quality.
BEFORE USING FOR THE FIRST TIME
Basic connections
Note
• Set the switch before turning the power on. If you change the switch
position while the power is on, the new setting does not become
effective until you turn the power to standby and then on.
Video out select
Set the VIDEO OUT SELECT switch on the rear panel to NTSC, PAL,
or MULTI mode according to your television system.
NTSC .................... for NTSC exclusive TV
PAL ....................... for PAL exclusive TV
MULTI ................... for Multisystem TV
Connecting the player to an amplifier/
receiver equipped with the analog dis-
crete inputs
Connect the player’s 5-channel outputs (AUDIO OUT FRONT-RIGHT/
LEFT, AUDIO OUT SURROUND-RIGHT/LEFT, and AUDIO OUT
CENTER) to the analog discrete inputs of an amplifier/receiver using
audio cables, while the VIDEO OUT to the television’s video input
terminal using the yellow plugs of the supplied Audio Video cable. Be
sure to connect correctly between corresponding terminals.
AV COMPU LINK
To input FRONT
jack of the
amplifier/receiver
To input REAR
jack of the
amplifier/receiver
To input CENTER jack of
the amplifier/receiver
Audio cable (optional)
Audio cable
(optional)
AV COMPU LINK
VIDEO OUT
SELECT
To input audio jack of
the television/amplifier/
receiver
To input video jack of
the television/amplifier/receiver
To input S-Video jack of
the television/amplifier/receiver
Audio Video cable (supplied)
Audio Video cable (supplied)
S-Video cable (optional)
EN.01-27.XL-MV7000GD[U,US] 99.11.15, 3:48 PM2


