


17
English
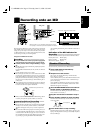
Erasing all the tracks (ALL ERASE
function)
All the tracks can be erased at once without recording fresh material
over them.
Giving titles to discs and tracks
(TITLE function)
A title consisting of up to 32 characters can be given to a disc and a
track. The title given appears in the display window.
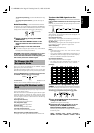
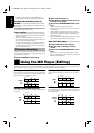
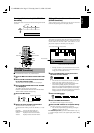
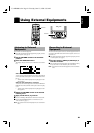
Note: Track marks
These marks are provided to locate the start of each track. Whatever
lies between one track mark and the next is considered to a track.
and the numbers of the tracks (called “track numbers”) are dis-
played in the sequence in which they are to be played.
Track A Track B Track C Track D
Track No.
ALL
ERASE
New tracks can be recorded.
><
VOLUME
CD
TUNER
BAND
MD
DOWN
SET
UP
TREBLE CANCELBASS
RANDOM REPEATPROGRAM
AUTO
PRESET
DISPLAY
/CHARA
EDIT
/TITLE
DISPLAY MODE
PTY/EON
AHB.
SUPER PRO
FM MODE TAPE/AUXCLOCK
SLEEPDIMMER
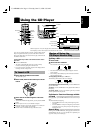
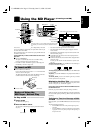
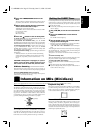
REMOTE CONTROL RM-RXUMD9000R
DISPLAY/CHARA
7
MD 38
UP
¶/8
>
¢
EDIT/TITLE
CANCEL
DOWN
4
<
SET
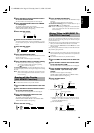
Music calender
Track number, Playing time, Preset number
OVER indicator which lights up if the
number of tracks of the MD exceeds 20.
■ Use the Remote Control to carry out this function.
■
1. Insert an MD to be edited with its label side
up.
■
2. Press the MD
38
button and then
7
button
to set the function to MD.
The track numbers and total playback time are displayed.
■
3. Press the EDIT/TITLE button until "DIVIDE
?" is displayed.
The "EDIT" indicator appears on the display.
DIVIDE= JOIN=MOVE=ERASE=ALL ERASE=DISC
TITLE
= TITLE =(Back to the beginning)
■
4. Press the SET button.
■
5. Select the track number to be divided.
The selected track is automatically played.
To select the track number, press the UP, DOWN, >, or < but-
ton.
UP button: Increases the track number by 1.
DOWN button: Decreases the track number by 1.
> button: Rapidly increases the track number.
< button: Rapidly decreases the track number.
• Example: for track 2, press the UP button twice. For track
12, use the > button to rapidly increase the track number (or
simply press the UP button 12 times.)
■
6. Press the SET button at the point where
the track is to be divided.
• The selected track is divided into two tracks and the track
number in the music calender will increase by 1.
• The recording lasting for 4 seconds starting where the track
was divided is repeatedly played for your reference.
Movement is possible within the POSITION-128 to 128 range
(about 8 seconds before or after the position). The recording
lasting for 4 seconds starting from the position to which the di-
viding point has been moved is repeatedly played.
■
7. Press the SET button.
■
8. Press the EDIT/TITLE button.
The “EDIT” indicator disappears on the display.
■
9. Press the MD
0
button to complete editing.
The MD is ejected after "UTOCwriting" is displayed.
• You can also complete editing operation by pressing the
button to turn off the power.
To cancel the operation, press the CANCEL button in step 4, 5,
or 7 until the display returns to the original display before editing
the track.
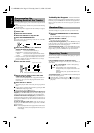
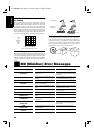
Dividing Tracks
(DIVIDE Function)
EDIT
/TITLE
SET
Playback time of the track
Track to be divided
SET
SET
Alternates
Ux-MD9000-e.fm Page 17 Tuesday, June 23, 1998 9:38 AM