Automatic Source Selection (COMPU LINK-1, 3)
When the provided remote cables are used for connecting this
unit to other components which have COMPU LINK-1 or
3/SYNCHRO terminals, the switch-over of all system compo-
nents is possible with simple one-touch of the source selector
button of JVC’s amplifier or receiver.
By doing this, the corresponding component will start playing
automatically.
The source select button of the remote control unit or the acti-
vation button of the desired component can be also used for this
purpose. When the components have been switched over, the
previous component will stop playing within five seconds.
Synchronized Recording (COMPU LINK-1, 3)
Synchronized recording refers to the process in which the deck
starts recording in synchronism with the CD player. Perform the
synchronized recording as follows:
1. Set the cassette deck to the record-pause mode in accor-
dance with the recording procedures on page 8.
2. If you want the programmed recording, program the desired
tunes in any order you wish to hear.
3. Press the PLAY/PAUSE button of the CD player. By so
doing, the cassette deck is placed in the record mode and
synchronized with the CD player for recording. Synchronized
recording thus can be made possible.
DDRP (Dynamics Detection Recording Processor) record-
ing
The DDRP function makes possible fully automatic recording
when used with a suitable JVC CD player. When the DDRP but-
ton of a suitable JVC CD player is pressed, the recording level
is first adjusted automatically, then recording starts; it is not nec-
essary to start recording by the normal procedure.
Notes:
•
Synchronized recording or DDRP recording stops automati-
cally when the CD player stops playing.
•
To cancel synchronized recording or DDRP recording, press
the STOP button of the CD player or cassette deck.
•
Synchronized recording does not start except when the record-
pause mode is set by simultaneously pressing the
REC/REC MUTE and PAUSE buttons in the stop mode.
•
The source is locked to the CD position during synchronized
recording or DDRP recording to avoid accidental stops or
switch-over to another component. To switch over the compo-
nents, cancel synchronized recording or DDRP recording first.
•
The INPUT LEVEL control does not function during DDRP
recording.
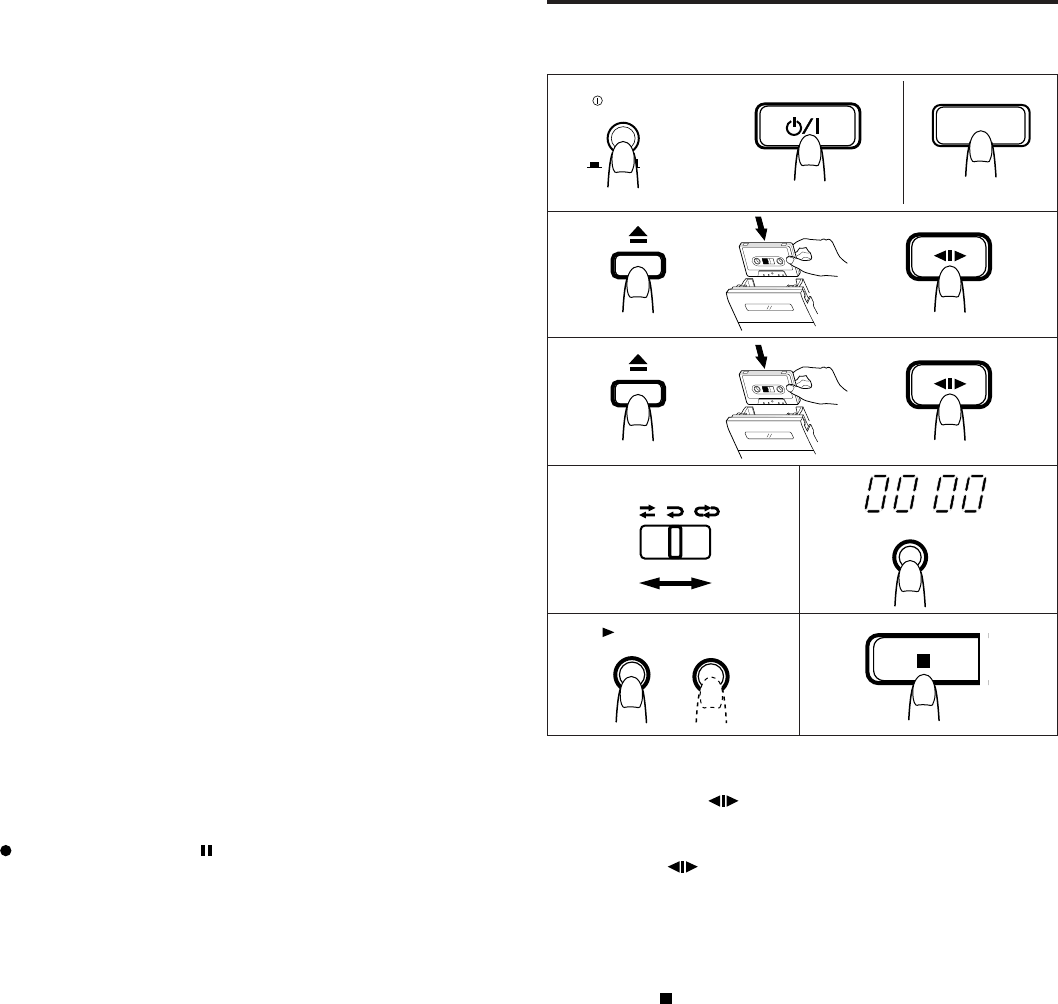
DUBBING
•
Synchro dubbing
Operate in the order of the numbers in the illustration.
1 Turn the power on.
2 Load a prerecorded tape with side A facing out into deck A,
and press the
(direction) button to select the travel
direction.
3 Load the blank tape with side A facing out into deck B, and
press the
(direction) button to select the side to be
recorded.
4 Select the REVERSE MODE.
5 Press to ‘‘00 00’’. (Deck B)
6 Press the SYNCHRO DUBBING (NORM or HIGH SPEED)
button to start dubbing.
7 Press the
(stop) button of deck B to stop dubbing.
When deck B stops, the dubbing mode is automatically
released.
•
Synchro record muting
When deck A stops or enters any mode other than the play-
back mode during dubbing, deck B enters the record mute
operation automatically and then enters the record-pause
mode.
•
Before pressing the SYNCHRO DUBBING button
Confirm that deck B is in the stop mode before starting dub-
bing.
Dubbing and DOLBY NR switch
During dubbing, the same NR mode selected for the playback
cassette is applied to the recording cassette, regardless of the
position of the NR switch.
Input level
Recording is performed at the same level as the playback tape
during dubbing regardless of the position of the INPUT LEVEL
control.
1
POWER
ON
OFF
STANDBY / ON
(B version)
POWER
(J version)
2
A
3
A
4
REVERSE MODE
5
COUNTER RESET
6
A B SYNCHRO DUBBING
NORM SPEED HIGH SPEED
7
–10–
id8/i10371/ 09/23/99 Page 10


