


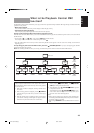


31
English
Standard Recording
This is the basic method for recording. You can record from a tape in Deck A, a CD, the Tuner or Auxiliary source.
Insert a tape into Deck B to be recorded. Only Deck B can record.
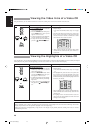
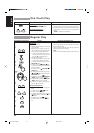
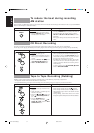
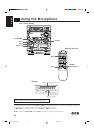
On the Unit
1. Insert a blank or erasable tape into Deck
B.
2. Press the REVERSE MODE button if
you want to record on both sides of the
tape. Press until the (
) or ( ) in-
dicator lights up on the display.
3. Check the recording direction for the
tape.
If you want to change the tape direc-
tion, press (
) RETURN (7) STOP
button after pressing the (
™™
™™
™) TAPE
(
££
££
£) button.
4. Prepare the source by inserting a tape
into Deck A, playing CDs, tuning in a
radio station or turning on the connected
equipment.
5. Press the REC START/STOP button
to start recording. Use this button also
if the recording is Paused.
6. To Stop recording, press REC START/
STOP button.
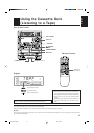
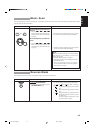
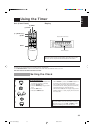
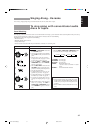
On the Remote Control
1. Insert a blank or erasable tape into Deck
B on the unit.
2. Press the REVERSE MODE button on
the unit if you want to record on both
sides of the tape.
3. Check the recording direction for the
tape.
If you want to change the tape direc-
tion, press (7) button after pressing the
(
™™
™™
™) TAPE (
££
££
£) button.
4. Prepare the source by inserting a tape
into Deck A, playing CDs, tuning in a
radio station or turning on the connected
equipment.
5. Press the REC PAUSE (¶) button.
6. To start, press the (
22
22
2) or (
33
33
3) button.
Recording starts in the direction pressed.
When using Reverse Mode to record
both sides of a tape, press the (
33
33
3) but-
ton.
7. To Pause at any one time of the record-
ing, press the REC PAUSE (¶) but-
ton.
8. To Restart, press the (
22
22
2) or (
33
33
3) button
(for the same direction as the tape was
running)
(If using the Unit, press REC START/
STOP button)
9. To Stop recording, press (7).
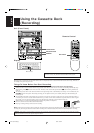
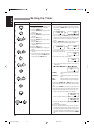
Unit/Remote Control
Steps
Explanation/Remarks
1. Make sure the tapes are of Type I or II. Their tabs must
not be opened.
2. When using the Reverse Mode, ensure the tape to be
recorded will be recorded in the forwards (
33
33
3) direc-
tion.
3. When REC START/STOP or REC PAUSE (
÷÷
÷÷
÷) but-
ton is pressed, the REC indicator will lit on the display.
Note:
When recording in the Reverse Mode, the System automati-
cally stops when it reached the end of the reverse (
22
22
2) di-
rection. To record on both sides of a tape, make sure that
the recording direction for the tape inserted into Deck B is
forwards (
33
33
3). The tape indicator should also be in the for-
wards (
33
33
3) direction before you start recording.
3
5
3
5
REC PAUSE
6
7
REC PAUSE
8
9
2
EN31-44;MX-V508T[U]/1 98.6.5, 9:57 AM31