


30
COMPACT
DIGITAL AUDIO
BAND
ONE TOUCH
REC
TAPE
OPEN
CD
TUNER
TIMER/SNOOZE
AUX
AUTO REVERSE
VOLUME
M
U
L
T
I
J
O
G
ACTIVE HYPER
BASS PRO
1
6
4 3 2
CLOCK
R D S
MICRO COMPONENT SYSTEM UX-T250R
EON
SLEEP
12
3
4
7
10
8
+10
AUX
9
6
5
AUTO
PRESET
DISPLAY
PROGRAM RANDOM
REPEATBEAT CUT
PTY/EON SELECT
DISPLAY MODE
REVERSE
MODE
STEREO
AUTO/MONO
MULTI CONTROL
REW
FF
TAPE TUNER
BAND
C D
EON
5
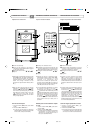
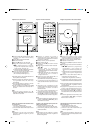
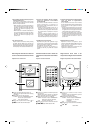
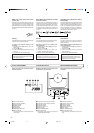
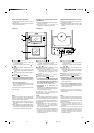
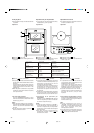
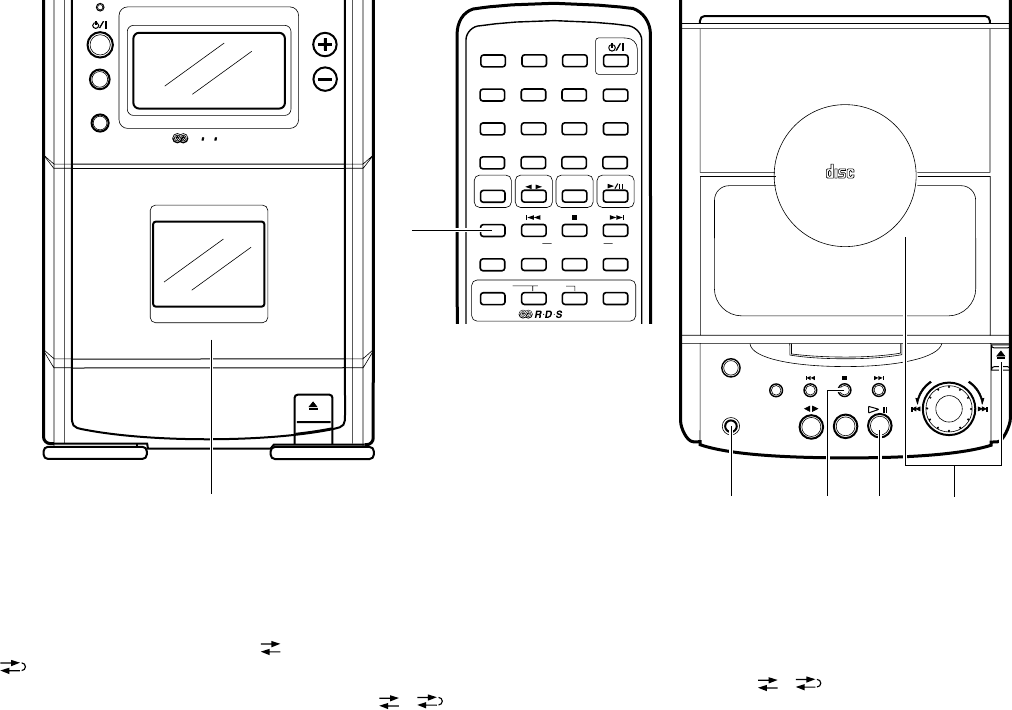
Operate in the order shown Eseguire le operazioni nell’ordine indicatoOpere en el orden mostrado
1 Coloque un cassette con el lado A
apuntando hacia afuera. (Bobine hasta
pasar extremo no grabable de la cinta antes
de iniciar la grabación.)
2 Coloque un CD y cierre el portadisco.
3 Active el modo de CD.
4 Presione el botón 5 para activar el modo
de parada.
5 Seleccione el modo de inversión deseado
( o ).
● Cuando desea la reproducción
programada, programe las pistas
deseadas utilizando el controlador remoto.
(Ver página 19).
● Seleccione las pistas con un tiempo total
de reproducción que no exceda la
longitud de la cinta.
6 Presione el botón ONE TOUCH REC; se
inicia la grabación sincronizada.
(Se enciende la luz indicadora de grabación.)
● La grabación se inicia hacia adelante y se
inicia automáticamente la reproducción del
CD.
1 Load a cassette with side A facing out. (Wind
past the tape leader before starting
recording.)
2 Load a CD and close the CD holder.
3 Set to the CD mode.
4 Press the 5 button to set stop mode.
5 Select the required reverse mode ( or
).
● When programmed play is required,
program the required tracks using the
remote control. (See page 19.)
● Select tracks with a total playing time which
does not exceed the tape length.
6 Press the ONE TOUCH REC button;
synchronized recording will start.
(The recording indicator lights up.)
● Recording starts in the forward direction and
CD play starts automatically.
1
Inserire una cassetta col lato A rivolto
all’esterno. (Superarne la sezione guida del
nastro prima di avviare la registrazione.)
2
Inserire un CD e chiudere il piatto del CD.
3
Impostare il modo del CD.
4
Premere il tasto
5
per impostare il modo di
arresto.
5
Selezionare il modo autoreverse desiderato
( o ).
●
Per la riproduzione programmata,
programmare i brani richiesti col
telecomando. (Consultare a proposito pag.
19.)
●
cegliere i brani con un tempo di riproduzione
totale che non superi la lunghezza del
nastro.
6
Premere il tasto ONE TOUCH REC; la
registrazione sincronizzata inizia.
(L’indicazione di registrazione si illumina.)
●
La registrazione inizia nella direzione in avanti
e la riproduzione del CD inizia automaticamente.
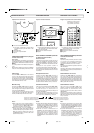
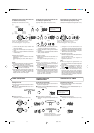
● After the CD player has played the entire CD
or programmed tracks, the deck stops
automatically
● Non-recorded sections of approx. 4 seconds
are automatically left between tunes
● To stop recording in the middle, press the 5
button. The cassette deck also stops after 4
seconds.
Note:
● During CD synchro recording, the $6,
SEARCH (™, £) buttons and MULTI
JOG dial do not function.
● Después de que el reproductor de CD
termina de reproducir todo el CD o las pistas
programadas, la platina se detiene
automáticamente.
● En la cinta quedan automáticamente sin
grabar secciones de 4 segundos aprox..
● Para parar la grabación en la mitad, presione
el botón (5) . La platina de cassette también
para después de transcurridos 4 segundos.
Nota:
● Durante la grabación sincronizada de CD, los
botones $6, SEARCH (™, £) y disco
MULTI JOG no funcionan.
●
Dopo che il lettore CD ha riprodotto l'intero CD
o i brani programmati, il registratore si ferma
automaticamente.
●
Degli spazi non registrati da circa 4 secondi
vengono creati automaticamente tra i brani.
●
Per interrompere la registrazione, premere il
tasto arresto/cancellazione (
5
). Il registratore
a cassette si ferma a sua volta dopo 4 secondi.
Note:
●
Durante la registrazione sincronizzata, i tasti
$6
, SEARCH (
™
,
£
) e manopola
MULTI JOG non funzionano.
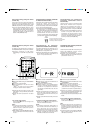
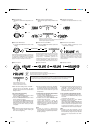
When non-recorded section between tunes
is not required ...
1 Press the $6 button twice.
The CD player enters the pause mode.
2 Press the ONE TOUCH REC button to start
recording.
Note:
● Depending on the CD used, non-recorded
sections of different lengths may be left
between tunes.
Cuando no es necesario dejar espacios sin
grabar entre músicas...
1 Presione dos veces el botón $6.
El reproductor ingresa en el modo de pausa.
2 Para iniciar la grabación presione el botón
ONE TOUCH REC.
Nota:
● Dependiendo del CD utilizado es posible
dejar entre músicas secciones sin grabar de
diferentes longitudes.
Quando sezioni non registrate tra i brani non
sono necessarie ...
1
Premere due volte il tasto
$6
.
Il lettore CD entra nel modo di pausa.
2
Premere il tasto ONE TOUCH REC per
avviare la registrazione.
Nota:
●
A seconda del CD utilizzato, degli spazi non
registrati di lunghezza diversa possono essere
lasciati tra i brani.
UX-T250R E 4/8/98, 13:0130