


50
• You cannot use Karaoke Scoring during Program Play,
Random Play, or recording. However, you can turn
Karaoke Scoring on and off by using KARAOKE
SCORING button during these play modes.
• The ranking (top 3) is cleared when you turn off the
System.
• For some VCD, the Karaoke Scoring result may not appear
at the end of the track if PBC is activated. In this case, press
7 to view your scoring result.
Reserving Karaoke Songs—Karaoke Program Play:
• You can use RESERVE button when a microphone is
plugged in. However, you can cancel Karaoke Program
Play using the button even if a microphone is not plugged
in. In case you reactivate Karaoke Program Play, plug in a
microphone.
• If you have selected a disc tray on which a disc containing
Video files or JPEG file or DVD-VR is loaded, that disc
number is skipped.
• If DVD-VR or a disc containing Video files and JPEG file
is loaded on the current tray, you cannot activate Karaoke
Program Play.
• When the track starts playback, that track number will be
erased from the Karaoke Reserve screen (the programmed
contents will remain until you erase it).
• While the PROGRAM indicator is flashing, you cannot
change the disc to play. (DISC 1 – 5 on the remote control
and 3 on the main unit do not work.)
Timer Operations (see pages 42 to 43)
Setting the Timer:
• If you do not specify the preset station or track number
correctly while setting a timer, the currently selected
station or the first track will be played when timer is
activated.
• When you unplug the AC power cord or if a power failure
occurs, the timer will be canceled. You need to set the
clock first, then the timer again.
• Without stopping the recording, you cannot change the
source while Recording Timer is recording.
• Daily Timer will not work correctly for some DVDs.
Setup Menu Operations (see pages 44 to 45)
General:
• If the upper and lower parts of the menu are cut off, adjust
the picture size control of the TV.
LANGUAGE menu:
• When the language you have selected for MENU
LANGUAGE, AUDIO LANGUAGE, or SUBTITLE is
not recorded on a disc, the original language is used as the
initial language.
PICTURE menu—MONITOR TYPE:
• Even if “4:3 PS/4:3 MULTI PS” is selected, the screen size
may become 4:3 letter box with some disc. This depends
on how they are recorded.
• When you select “16:9 NORMAL/16:9 MULTI
NORMAL” or “16:9 AUTO/16:9 MULTI AUTO” for a
picture whose aspect ratio is 4:3, the picture slightly
changes due to the process for converting the picture width.
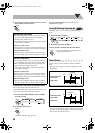
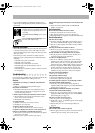
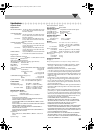
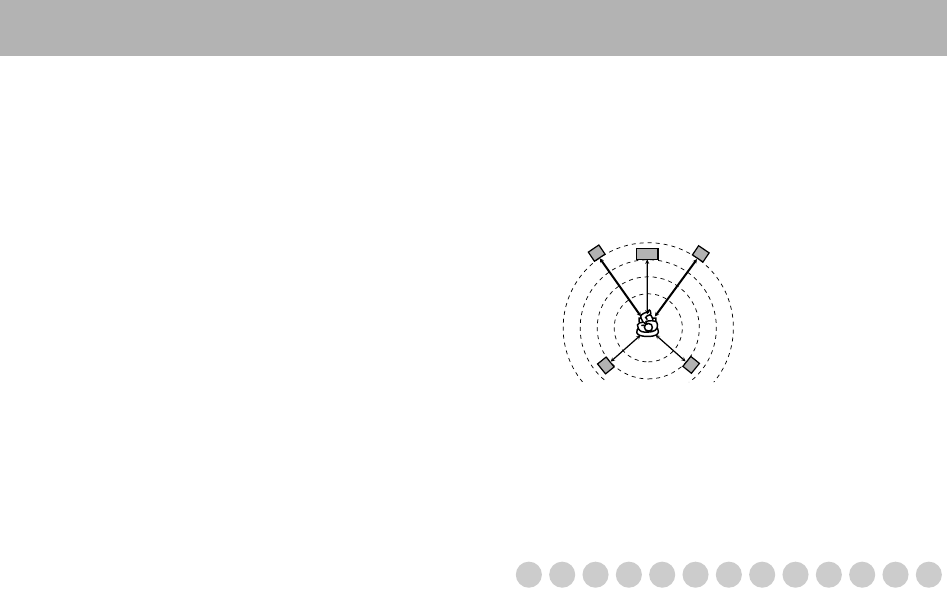
SPK. SETTING menu—DELAY:
• See the following diagram as an example for setting the
delay time:
OTHERS menu—ON SCREEN GUIDE:
• The setup menu and on-screen bar will be displayed (and
recorded) even though this function is set to “OFF.”
Subtitles and the information for zoom-in always appear on
the display regardless of this setting.
Maintenance
To get the best performance of the System, keep your discs,
tapes and mechanism clean.
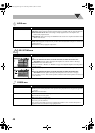
Handling discs
• Remove the disc from its case by holding it at the edge
while pressing the center hole lightly.
• Do not touch the shiny surface of the disc, or bend the disc.
• Put the disc back in its case after use to prevent warping.
• Be careful not to scratch the surface of the disc when
placing it back in its case.
• Avoid exposure to direct sunlight, extreme temperatures,
and moisture.
To clean the disc:
Wipe the disc with a soft cloth in a straight line from center
to edge.
Handling cassette tapes
• If the tape is loose in its cassette, take up the slack by
inserting a pencil in one of the reels and rotate it.
– If the tape is loose, it may get stretched, cut, or caught in
the cassette.
• Be careful not to touch the tape surface.
• Avoid the following places to store the tape—in dusty
places, in direct sunlight or heat, in moist areas, on a TV or
speaker, or near a magnet.
To keep the best recording and playback sound quality:
• Use a cotton swab moistened with alcohol to clean the
heads, capstans and pinch rollers.
Front speakers:
0 ms
Center speaker:
1 ms
Surround speakers:
2 ms
Center speaker
Front right
speaker
Front left
speaker
Surround left
speaker
Surround right
speaker
DX-U20_9[U].book Page 50 Wednesday, March 4, 2009 10:59 AM