


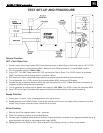

TEST SET-UP AND PROCEDURE
General Function
UUT = Unit Under Test
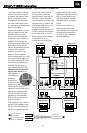
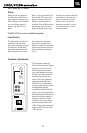
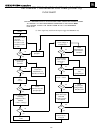
1) Connect a pair of level input cables (RCA) from signal generator to either Right or Left Level input on UUT. LEVEL
control should be full counterclockwise (MIN). Make sure the LFE/Normal switch is in the NORMAL position.
2) Turn on generator, adjust to 100mV, 50Hz.
3) Plug in UUT; Turn Main Power switch ON. LED may be either Red or Green. Turn LEVEL control full clockwise
(MAX). Low Pass control should be set fully clockwise (150Hz).
4) LED should turn Green; immediately bass response should be heard and felt from port tube opening.
5) Turn off generator, turn LEVEL control fully counterclockwise (MIN), disconnect RCA cables.
6) Connect one pair of speaker cables to either high level input terminal on UUT. Cables should be connected to an
integrated amplifier fed by the signal generator.
7) Turn on generator and adjust so that speaker level output is 1.0V, 50Hz. Turn LEVEL control full clockwise (MAX).
8) Green LED should light, immediate bass response should be heard and felt from the port tube opening.
Sweep Function
1) Follow steps 1-4 above, using a sweep generator as a signal source.
2) Sweep generator from 20Hz to 300Hz. Listen to the cabinet and drivers for any rattles, clicks, buzzes or any other
noises. If any unusual noises are heard, remove driver and test.
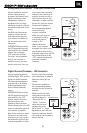
Driver Function
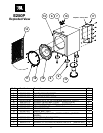
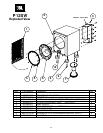
1) Remove driver from cabinet; detach + and - wire clips.
2) Check DC resistance of driver; it should be 4.8 ohms.
3) Connect a pair of speaker cables to driver terminals. Cables should be connected to an integrated amplifier fed by a
signal generator and adjust so that speaker level output is 5.0V.
4) Sweep generator from 20Hz to 1kHz. Listen to driver for any rubbing, buzzing, or other unusual noises.
13
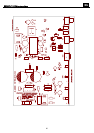
E250P/P12SW subwoofers