23
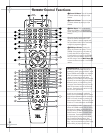
e Status Button: This button operates only
when the DVD600
II
has been selected. When a
disc is playing, pressing this button will display
the Status Banner, which contains information
about the disc and enables you to change the
functions.
fg M1 and M2 Macro Buttons/Open-
Close Button:
Press these buttons to store or
recall a “Macro”, which is a preprogrammed
sequence of commands stored in the remote.
When the DVD600
II
has been selected, the M1
Button
f functions to open or close the disc
tray drawer. (
M2 g has no function.) If the
drawer is opened while a disc is still playing,
playback will continue and discs not in use
may be changed. If the drawer is opened while
the unit is stopped, the disc that was playing
will be presented at the front-center position
of the tray.
h Main Input Selector: Pressing this
button will perform two actions: 1) If the
DCR600
II
is not turned on, it will power up.
2) It will switch to the page for the DCR600
II
,
which will cause the remote to operate only
the receiver and the transport functions of
the DVD600
II
.
i CD Input Selector: Pressing this button
will perform three actions: 1) If the DCR600
II
is
not turned on, it will power up. 2) It will select
CD as the input source. 3) It will switch to the
page for the CD player whose codes have been
programmed into the remote, which will cause
the remote to operate only the CD player. Press
the
Main Button h to return the remote to
control of the DCR600
II
receiver.
j Tape Input Selector: Pressing this
button will perform three actions: 1) If the
DCR600
II
is not turned on, it will power up.
2) It will select TAPE as the input source.
3) It will switch to the page for the tape deck
whose codes have been programmed into the
remote, which will cause the remote to oper-
ate only the tape deck. Press the
Main Button
h to return the remote to control of the
DCR600
II
receiver.
k AM/FM Tuner: Selects the receiver’s
tuner as the listening choice. Pressing this but-
ton when the tuner is already in use will select
between the AM and FM bands.
l Video 1 Input Selector (VCR 1): Press-
ing this button will perform three actions: 1) If
the DCR600
II
is not turned on, it will power up.
2) It will select VIDEO 1 as the input source. 3)
It will switch to the page for the video device
whose codes have been programmed into the
remote, which will cause the remote to oper-
ate only that video device. You may find it con-
venient to connect your VCR to the Video 1
input, since it is the only video source that also
features outputs for recording. Press the
Main
Button
h to return the remote to control of
the DCR600
II
receiver.
m Video 2 Input Selector (VCR 2): Press-
ing this button will perform three actions: 1) If
the DCR600
II
is not turned on, it will power up.
2) It will select VIDEO 2 as the input source. 3)
It will switch to the page for the video device
whose codes have been programmed into the
remote, which will cause the remote to oper-
ate only that video device. You may find it con-
venient to connect a video cassette player to
the Video 2 input. Press the
Main Button h
to return the remote to control of the DCR600
II
receiver.
n Video 3 Input Selector (Cable or
Satellite):
Pressing this button will perform
three actions: 1) If the DCR600
II
is not turned
on, it will power up. 2) It will select Video 3
(the front panel input) as the input source.
3) It will switch to the page for the video
device whose codes have been programmed
into the remote, which will cause the remote
to operate only that device. You may find it
convenient to connect your cable television box
or satellite receiver to this input. Since it is
located on the front panel of the receiver, you
may also wish to use this input to temporarily
connect a portable camcorder or video game to
your system. Press the
Main Button h to
return the remote to control of the DCR600
II
receiver.
o TV Input Selector: Pressing this button
will perform three actions: 1) If the DCR600
II
is
not turned on, it will power up. 2) It will select
TV as the input source. 3) It will switch to the
page for the television whose codes have been
programmed into the remote, which will cause
the remote to operate only that device. You
may find it convenient to connect your televi-
sion to this input, particularly since it does not
have a video input associated with it, the
assumption being that the program signal orig-
inates at the TV, and that the TV is already dis-
playing the video portion of the signal. Press
the
Main Button h to return the remote to
control of the DCR600
II
receiver.
p Sleep: Places the DCR600
II
in the Sleep
Timer mode. After the time shown in the
display has elapsed, the DCR600
II
will auto-
matically go into Standby. Each press of this
button changes the time until turn-off in inter-
vals of 10 minutes, starting with a maximum
of 90 minutes.
This button is also used to change channels on
your TV when the TV is selected.
This button is also used during the “Auto Search”
procedure when programming the remote.
q Test: Begins the sequence used to
calibrate the speaker output levels.
When the CD input has been selected and a CD
recorder is in use, this button is used to select
among the analog and digital inputs to the CDR.
r 6CH (TV/VID): Press to select the
6-Channel Direct Input ∞ as the input
source. When used with a compatibly pro-
grammed VCR, DVD, TV or Satellite receiver
that has a “TV/Video” function, pressing this
button will switch between the output of that
device and the external video input to that
device. Consult the owner’s manual for your
specific player or satellite receiver for the
details of how it implements this function.
s Volume Up: Use to raise the system
volume.
t Surround Mode/Audio: Begins the
process of changing the surround mode when
the DCR600
II
is selected. After the button has
been pressed, use the
⁄
/
¤
Buttons y
to select the desired surround mode.
When the DVD600
II
is selected, this button
allows you to select from the available audio
tracks (including audio surround modes) or lan-
guages on a DVD disc that is currently playing.
Press this button repeatedly until the desired
audio selection appears.
This button is also used to tune channels when
the TV is selected.
This button is also used during the “Auto
Search” procedure when programming the
remote.
u
All Off: This feature of the JBL One-Click
™
(patent pending) remote simultaneously sends
Power Off commands to all programmed
devices controlled by the remote.
v All On: This feature of the JBL One-Click
remote simultaneously sends Power On com-
mands to all programmed devices controlled by
the remote.
w Volume Down: Use to lower the system
volume.
x Channel/Title/Guide: Starts the process
of setting the receiver’s speaker output levels
using an input source rather than the test tone.
Press this button, then use the
⁄
/
¤
Buttons


