


11
11
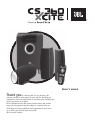
WWW.JBL.COM
English
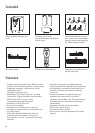
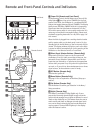
SETUP PROCEDURE (via Remote Control Only):
The CS360 System enters SETUP when you press and hold
the MENU Button on the Remote Control for 3 seconds.
The Front Display now shows the word TEST blinking. Press
the [<] or [>] Navigation Button
F
on the Remote to
scroll through the options. If scrolling with the Right
Navigation Button, the Display shows these (blinking)
words in the following order:
TEST – LEVELS – UNITS – DISTNC – LIPSNC – DISPLY - ON
VOL – NAME - AU ON - AU SRC - RESET? - And TEST again.
Select any of these functions for adjustment by pressing
the SET Button
4
on the Remote. See below for explana-
tion of each adjustment.
If you want to leave the SETUP Mode at any time, press
the EXIT Button
E
on the Remote once or twice.
NOTE: If the unit is left in SETUP mode or its sub-menus
for 60 seconds without any user commands, the unit
leaves SETUP menu and returns to regular operation.
NOTE: In SETUP, when a selection has sub-selections
(such as LEVELS having a sub-selection of Front Left, Cen-
ter, Front Right, ……), this selection blinks to prompt you
to press SET to enter the next menu layer. If a menu item
offers no further options (such as Front Left Speaker in
the LEVELS menu), the indication does not blink.
DESCRIPTION OF EACH SETUP FUNCTION
To enter the SETUP menu, first press the MENU Button
for two seconds. When the Display shows the word TEST
blinking, either acknowledge with the SET Button to enter
the TEST tone menu, or move forwards or back between
the Setup options with the RIGHT ARROW or LEFT ARROW
Buttons. The following explanations follow the Setup
Functions as you see them if using the RIGHT ARROW to
circulate through the menus.
TEST:
After pressing the SET Button, a pink noise test signal
circulates between the three speakers and the subwoofer,
(sound from the subwoofer only if SUBWFR is ON). While
the test signal is heard from each speaker, the Display
shows which one you are listening to, as well as the level.
(FL for Front Left, C for Center, FR for Front Right, S for
Subwoofer). Adjust the output level by pressing the Up or
Down Navigation Buttons. Initial level for all speakers is
shown as “0”, and may be increased to +10 or decreased
to -10, except the subwoofer, which may be increased to
+20. The noise is heard from each speaker for 5 seconds,
and if no action or adjustment is done, it goes to the next
speaker. You can circulate between the speakers quickly
by pressing the RIGHT ARROW Button. The system stays in
TEST mode until you press EXIT or SET. SET or first press
of EXIT will take you to the next SETUP item (LEVELS). A
second press of EXIT button will cause the system to leave
the SETUP menu.
LEVELS:
Here you can adjust the level of each speaker while lis-
tening to normal music or any other program material of
your choice. (No test tone or pink noise is heard). Press
SET when LEVELS blinks on the Display. The Display shows
“FL 0” for Front Left Channel, standard level. Increase or
decrease the Level with the Up and Down Navigation But-
tons, and move through the four speakers with the Left
and Right Navigation Buttons, adjusting each one accord-
ing to taste. When you are done, press SET or EXIT to jump
to the next SETUP item.
UNITS:
Units lets you select either meters or feet for setting
speaker distances. This selection is relevant only if you
want to adjust Distance (next point).
DISTNC:
Adjusts perceived speaker Distance from user by add-
ing delay. Select each speaker in turn with the Left and
Right Navigation Buttons and adjust the distance from
0.0 meters to 9.0 meters to reflect the actual distance
between yourself and each speaker. Press SET or EXIT to
jump to the next item.