


3
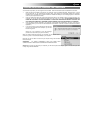
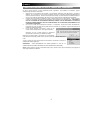
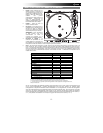
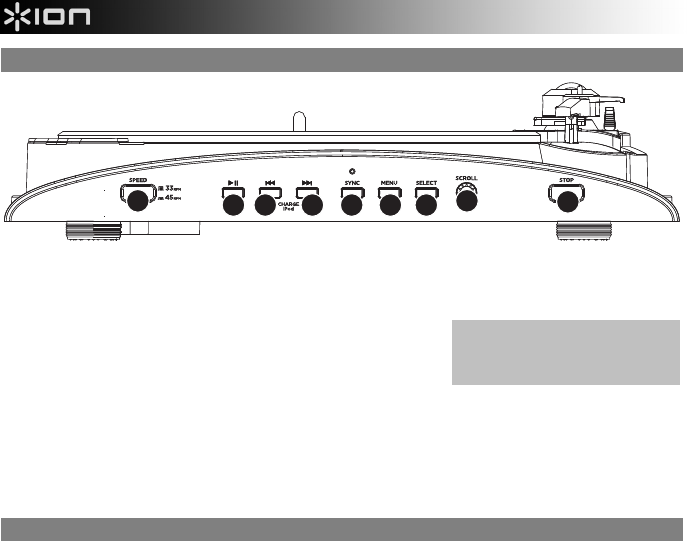
FRONT PANEL OVERVIEW
1
3
4
2
5 9
6
7
8
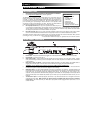
The following controls, 1-7, can be used to browse and navigate menus and features of your iPod directly from the turntable.
1. Scroll – This knob acts as the Touchwheel controller on your iPod.
2. Menu – This button acts as the ‘Menu’ button on your iPod.
3. Select – This button functions as the ‘Select’ command on your iPod.
4. Stop – Press this button to stop playback.
5. >>| – Functions as the ‘>>|’ button on your iPod.
6. |<< – Functions as the ‘|<<’ button on your iPod.
7. >|| – Functions as the ‘>||’ button on your iPod.
8. 33 / 45 RPM Button – This button controls the RPM of the turntable platter.
9. Sync – When your iPod is connected to the dock and when iPROFILE is connected to your computer via USB, hold this
button down for two seconds to sync your iPod to your computer's iTunes library. When finished, eject the iPod from the
iTunes interface. Only remove the iPod from the dock or disconnect the USB cable after you've safely ejected the iPod
from your computer. (WARNING: Failure to properly eject your iPod can result in loss of data or damage to the player.)
Once your iPod has been safely ejected, you can reconnect the iPod to the turntable by pressing and holding the Sync
button again for two seconds or removing the iPod and placing it back in the dock.
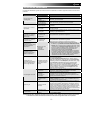
RECORDING TO YOUR iPod
Please follow the instructions below to record music directly to your iPod. Note that your iPod will record audio from your
turntable, as well as audio coming through the 1/8” Stereo Aux Input.
Note that it is possible to record to your iPod without having any audio connections plugged in. However, we highly
recommend connecting the audio outputs (RCA or USB) to a speaker system so you can monitor your recordings.
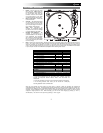
1. Place your iPod into the dock, making sure that it fits snuggly over the connector. Note that depending on your iPod
model, you may need to use the Universal Dock Adapter included with your iPod.
2. Place a record on the platter and cue the music you would like to record.
3. Enter Record Mode in your iPod by navigating to Extras Voice Memos from the main menu.
4. Raise the turntable's tonearm with the Raise / Lower Lever and place the needle at the beginning of the song you want
to record.
5. When you are ready to start recording, press the Select button to begin recording to your iPod.
6. Lower the tonearm with the Raise / Lower Lever to play the song.
7. When you wish to stop recording, stop the turntable.
8. Then, use the Scroll knob to select ‘Stop and Save’ and press Select.
When you have finished, you can locate the recording by navigating to Extras Voice Memos. Your recordings will be
identified by the date and time that the recording was completed.
IMPORTANT: Renaming your recordings directly from your iPod is not recommended. If you change the filename, your iPod
may no longer be able to access the file. If you would like to rename the recording, you should transfer the file to your
computer, rename it and import it back into your iTunes library as an AAC or MP3 file.
Please note that pressing
|
<< and >>
|
simultaneously while recording will
enable iPod charging. Press again to
disable iPod charging.