


7
Quick Operation Guide
Here is a quick guide for those who want to listen to
music or view their favorite movies as soon as possible.
Connections and operations are explained briefly here
for the purpose of just getting you started.
For those of you who want to operate the DTA-70.1 (the
amplifier) right away, follow the guide below. However,
this instruction manual contains a great deal of other
information that you should know for the proper opera-
tion of the amplifier and for a more pleasurable experi-
ence with the amplifier. Be sure to read the rest of this
manual as well after reading this quick guide.
The procedures given below assume that the other sys-
tem components are already connected and configured.
(For example, that the source components are already
connected to the control amplifier.)
1. Lower the volume at the control amplifier.
Lower the volume of the control amplifier to the
minimum so that when the amplifier is turned on,
you do not hear loud unwanted sounds.
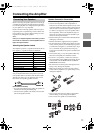
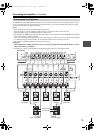
2. Connect the speakers to the amplifier.
Connect the speakers to the amplifier using the
proper speaker cables. Be sure to match the channels
and the positive (+) and negative (–) polarities
between the speakers and the amplifier. If the con-
nections are mistaken, the correct orientation will
not be obtained.
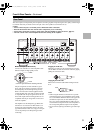
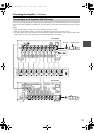
3. Select balanced input (XLR) or unbalanced input
(RCA) with the INPUT SELECT switch.
The amplifier possesses a balanced input (XLR) and
unbalanced input (RCA) for each channel and the
switch for the two is located between the two input
terminals. Select the proper input type depending on
the functionality of the connected cables and the
control amplifier.
Note:
Do not change the INPUT SELECT switch setting when
the amplifier is turned on.
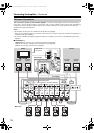
4. Connect the control amplifier to the amplifier.
After selecting the correct input type in step 3 above,
connect the output from the control amplifier to the
corresponding input terminal on the amplifier.
Note:
Do not connect anything to the other input jack.
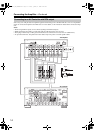
5. Connect the supplied power cord to the amplifier
and to the wall power outlet.
Be sure to properly plug the power cord all the way
in.
6. Press the Power switch.
The Standby indicator lights red.
7. Press the On/Standby button.
The On indicator lights blue.
When you connect other device to the 12V TRIG-
GER IN terminal using the supplied cable, the power
on or off status of the amplifier synchronizes to the
action of turning on or off the connected device.
While the Standby indicator lights red, the amplifier
is in standby state waiting for 12V trigger signal.
8. Slowly increase the control amplifier volume.
Note:
After the amplifier is turned on, it takes approximately
10 seconds before the output sounds. During this time,
do not turn up the volume.
Now all that remains is to control the control amplifier
and the other connected system components and enjoy
your music or movies.
DTA-70.1_En_100108.book Page 7 Friday, January 8, 2010 2:04 PM