SETUP AND CONNECTIONS 15
SETUP AND CONNECTIONS
• Ensure that the power switch of this unit (and of
other equipment to be connected) is set to “Off”
before commencing connection. We also strongly
recommend that you leave all system components
unplugged from AC power until after you have com-
pleted the interconnections described in this section.
• Do not block the ventilation holes of any of the
equipment and arrange them so that air can
circulate freely.
• Read through the instructions before connecting
other equipment.
• Ensure that you observe the color-coding when con-
necting audio and video cables.
VIDEO NOTES:
• For the best quality, if your receiver or processor
and/or video display are HDMI-capable, we recom-
mend using the HDMI output. With a single cable
connection between components, HDMI is able to
deliver uncompressed high-definition digital video
and digital audio programming. Even without audio
processing capability, your HDMI-ready receiver will
be able to pass the uncompressed digital video
signal to your video display.
NOTE: If your video display has a DVI input, you
may use an optional HDMI-to-DVI cable or adapter
for the connection to the display. In all cases, the
video display must be HDCP-compliant in order to
use the HDMI output.
• If your equipment is not HDMI-ready, we recom-
mend the use of component video for higher quality
pictures. You may also use the standard S-video or
composite video connection if your TV does not
have component video inputs. The component and
S-video outputs are not available simultaneously.
• The composite video output (yellow) sends the com-
plete video signal to the TV (or to the A/V receiver)
by one cable only. Use this video output when your
TV set is equipped with a video input jack only.
• The S (separate) video output connector separates
the color (C) and luminance (Y) signals before trans-
mitting them to the TV set in order to achieve a
sharper picture. Use the S-video cable when con-
necting the player to a TV equipped with an S-video
input for improved picture clarity.
• The component video outputs further separate the
color components of the video signal, optimizing the
DVD 47’s video performance. Component video
connections are preferred, when available on your
TV or receiver. If you are using a television or video
display that is compatible with high-resolution 480P
video signals, make sure to use the input jacks on
the video display marked “HD Component,” if avail-
able. Also, make sure to configure the display’s input
settings for use with “480P” video signals. You will
also need to change the scan type in the DVD 47’s
Video Setup menu from “Interlaced” to “Progressive.”
See page 23.
• Modern audio/video receivers are capable of con-
nection to several video source devices, such as
the DVD 47 and a VCR, cable television set-top
box, HDTV tuner or other device. The receiver is
equipped with video monitor outputs for connection
to your television, projector or plasma display. As
you select any input source device, the receiver
selects the correct video input and routes it to the
correct video monitor output to your television. It is
recommended that you connect one of the video
outputs from the DVD 47 to the corresponding input
on your receiver to simplify operation of your home
entertainment system. Refer to the owner’s guide for
your receiver for more information.
• If your receiver is capable of multiroom operation, it
is recommended that you connect both the compo-
nent (or HDMI) and composite video outputs of the
DVD 47 to the receiver. This enables the highest-
quality picture (component video) for viewing in the
main listening room, while enabling the multiroom
system, if it is video-capable, to distribute the com-
posite video signal to the remote zone. Consult the
owner’s guide for your receiver to determine
whether it has video multiroom capability.
Connecting to a TV Only
When using the DVD 47 with a television but no audio
receiver or processor, connect it as follows. Make the
Analog Audio Connection å and one of the Video
Connections (Composite Video ∫, S-Video ç,
Component Video ∂). If your television or video
display is HDMI-capable, you only need to make the
HDMI é connection, as it handles both audio and
video. Remember to plug in the power cord.
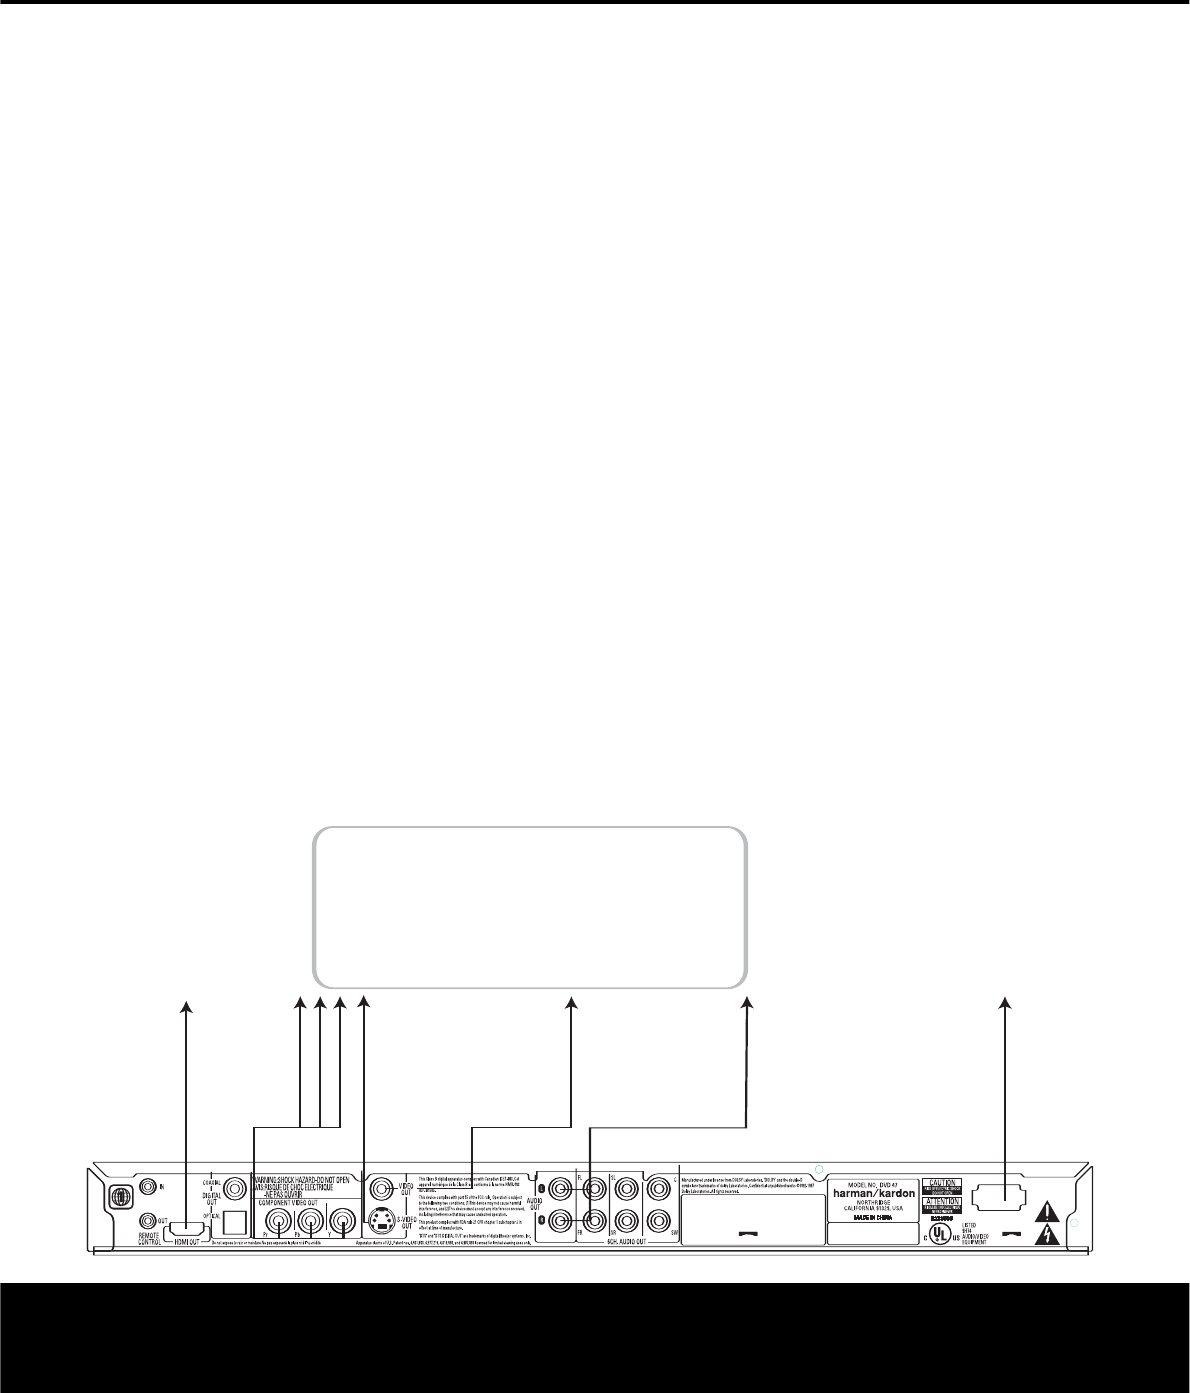
TV
∂ é ç ∫ å
To Y (green)/
Pb (blue)/
Pr (red)
component
video
connectors
To HDMI
or DVI
port on TV
To S-video
input
connectors
on the TV
To analog audio
input connectors
(red/white) on the TV
To video
input
connectors
(yellow)
on the TV
To power outlet
(AC 120V/60Hz)
AC INPUT
120V~, 60Hz
13W


