19
c3
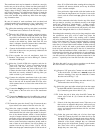
Prepare a 7” green wire. Connect one end to terminal
LB. (S-2). Place this wire towards the center of the
chassis.
20 Ll Prepare a 10” white wire and a
10”
green wire. Starting
with the white wire
3/4"
longer, twist them together. Con-
nect the projecting white wire to red terminal RR. (S).
Connect the green wire to terminal RB. Place these
wires off to the right.
2 1
C
Prepare a
5
1/2" green wire. Connect one end to terminal
RB. (S-2). Place this wire towards the center of the
chassis.
22
0
Prepare a 16” green wire, but strip
1 1/4"
of insulation
from one end. Prepare a 15” white wire. Start with the
normally stripped
(l/4”)
ends even, and twist these wires
uniformly together. Thread the longer bared end of the
green wire through LS short lug
#2
from the top left,
then through GLlug
#3,
and connect it to RSshort lug
#4.
Solder only LS lug
#2.
Connect the corresponding end of
the white wire to LS lug
#l.
(S). Place this wire up under
the chassis rear lip, above the output terminals, and off
to the left.
23
L!
Prepare a
6 1/2"
green wire. Connect one end to CL lug
#3.
(S2). Place this wire over the rear of the chassis.
24
C
Prepare a 10” green wire and a 10” white wire. Twist
these together with the ends even. Connect the green
wire from the right to RS short lug
#4.
(S-2). Connect the
white wire to RS lug
#5.
(S). Place these wires off to the
right.
25
0
Prepare two 22” white wires, and twist them together
throughout their length.
8”
in from one end of the pair,
cut
one
of the wires, and unwind it about
1
1/2" in each
direction from the cut. Strip
1/4"
of insulation from each
of these cut ends. Place the longer portion of the wire
along the lower front edge of the chassis, with the break
at the terminal strip TS. Connect the cut end from the left
to TS lug
#2.
Connect the other end to the
lower
hole of
TS lug
#5.
(S). Place this pair along the front edge of the
chassis, under the power switch, with the ends project-
ing from the front corners of the chassis.
26
il
Select a 1 megohm resistor (brown-black-green) and
trim the leads to
1/2”.
Connect one lead to TS lug
#2.
(S3).
One of these 3 leads has already been soldered to the
lower lug hole. Connect the other lead to TS lug
#3.
27
n
Select the diode and trim its leads to
1/2”.
Note that one
end of the diode is marked with a stripe (or an arrow
head will point to that end). Connect the marked end to
TS lug
#4.
Connect the other lead to TS lug
#3.
(S2).
28
0
Prepare a 4” green wire. Connect one end to TS lug
#4.
Select a spade connecting lug, and solder it to the other
end. Place this wire down against the chassis, and con-
nect it to the PS lug on the right, near the edge of the
chassis.
The proper way to attach a spade lug to a wire is to first
cut the bared wire end to the right length (no more than
1/4"
so that the insulation will be securely gripped by the
longer, outer tabs, while the wire does not protrude into
the spade clamp area. Tin the bare wire end. Bend the
shorter, middle set of tabs tightly around the bare wire,
and then bend the longer tabs around the insulation.
Then flow solder into the joint around the bare wire,
keeping the solder away from the spade section.
29
Prepare a 2” white wire. Connect one end to FC lug
#2.
(S). Select another spade lug, and solder it to the other
end. Connect it to the PS middle lug.
30
0
Select the 0.39 mfd
(.39K)
capacitor and trim its leads to
1/2"
Connect one lead to TS lug
#4.
(S3). Connect the
other lead to TS lug
#5.
31
0
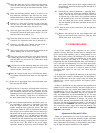
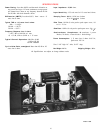
Select the two large round capacitor brackets, the two
large capacitors, and 6 sets of
#6
hardware. Place a
bracket around the bottom of each capacitor, and fasten
it snugly with one set of hardware through the clamp.
Note the direction of insertion of the screw for easy ser-
vicing access in the future. The clamps need not be
tightened now
-
just made snug. Place each assembly
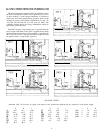
on the chassis, at CL and CR, noting the position of the
clamp, and fasten them securely. Be sure no wires are
trapped by the bracket. Then loosen the clamps, and
position the capacitors so that each + terminal is posi-
tioned as in the pictorial diagram. The + terminal will
usually be so marked, but if not, it may be identified by a
red dot. Note that the + terminal of CL is nearest the
-
terminal of CR. Make sure the capacitors are seated
against the chassis and tighten both clamps.
32
0
Select the 4 plain solder lugs and then 4 short
#lO
SEMS
screws (with lockwasher attached). Install these in the
capacitors, with the lugs pointing as in the diagram.
33
C
Prepare a 6” green wire. Connect one end to DB lug
#l.
(S). Connect the other end to CL lug
#l.
34
E
Prepare a 4%” green wire. Connect one end to FL lug
#l .
(S-2). Connect the other end to CL lug
#l.
(S2).
35
G Prepare a 6” white wire. Connect one end to DB lug
#4.
(S). Be sure this is the + terminal of the rectifier. Connect
the other end to CR lug
#2.
36
q
Prepare a
4 3/4"
white wire. Connect one end to
FRlug
#3.
(S-2). Connect the other end to CR lug
#2.
(S2).
37 •1 Remove all insulation from a 3” white wire. Connect one
end to CL lug
#2.
(S). Connect the other end to CR lug
#l.
(S).
38
[7
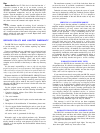
Select the power transformer, the 4 flat washers, and the
4 sets of
#10
hardware. Position the transformer with
the red leads to the center rear of the chassis, and the
black and black/white leads towards the power switch.
If the transformer is the special multiple voltage version,
the additional leads should be placed as shown else-
where in this manual for the desired line (mains) voltage.
The red/yellow lead will likely be the correct length. If
you wish to shorten the red leads for neatness in con-
necting them to the rectifier terminals, it is easier to strip
them before the transformer is mounted.
8
Place the white pair of wires under the front chassis lip.
Install a flat washer on top of each transformer foot after
the screw is inserted from below, and then add the nut.
Be sure no wires are trapped.


