


Page 3
INTRODUCTION
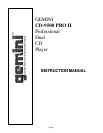
Congratulations on purchasing a Gemini CD-9500 PRO II Dual CD Player.
This state of the art professional CD player includes the latest features
and is backed by a three year warranty. Prior to use, we suggest that
you carefully read all the instructions.
CAUTIONS
Do not use this CD Player at temperatures below 41°F/5°C or higher
than 95°F/35°C.
Place the unit in a clean and dry location.
Do not place the unit in an unstable location.
When disconnecting the power cord from an AC outlet, always grasp it
by the plug. Never pull the power cord.
To prevent electric shock, do not remove the cover or the bottom
screws. There are no user serviceable parts inside. Please refer
servicing to a qualified technician.
Do not use chemical solvents to clean the unit.
Keep the laser pickup clean by keeping the drawer closed.
Keep this manual in a safe place for future reference.
SAFETY CERTIFICATIONS
Laser Diode Properties
Material: Ga - Al - As
Wavelength: 755 - 815 nm (25° C)
Laser Output: Continuous Wave, max. 0.5mW
IMPORTANT NOTE
Since the CD-9500 PRO II is a dual CD player, most of the functions and
controls are duplicated on both sides of the CD player. To eliminate
confusion and to make the drawings easier to understand, we will only
number the right side functions and controls. The only controls that are
not duplicated are the POWER SWITCH (1) and the VOLTAGE SELEC-
TOR SLIDE SWITCH (15).
LINE VOLTAGE SELECTION
Model CD-9500 PRO II is a dual voltage unit. It will operate at 115 or 230
volts. The unit is preset at the factory to 115 volts. To set the proper
voltage follow these steps:
1. Place the head of a screw driver in the center of the VOLTAGE
SELECTOR SLIDE SWITCH (15) found on the rear panel.
2. Slide the switch up for 115 volts or push the switch down for 230
volts.
3. Do not force or twist the switch. Excessive force may cause
damage. If the switch does not move smoothly, contact a qualified
technician.
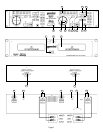
CONNECTIONS
1. Using the included cables, plug one end into the REMOTE JACK (18)
on side 2 and the other end into the PLAYER JACK (17) also on side
2. Do the same for side 1.
2. Plug one end of a set of RCA connectors into each of the LINE
OUTPUT JACKS (16).
3. Plug the other end of the RCA connectors into any available line level
input jacks on your mixer. If you are playing the CD-9500 PRO II
through a receiver, you can plug the RCA connectors into the CD or
AUX input jacks on your receiver. If there are no CD or AUX inputs,
use any line level (not phono) inputs.
FUNCTION DESCRIPTIONS
POWER SWITCH
: After making sure that the VOLTAGE SELECTOR
SLIDE SWITCH (15), found on the rear panel, is properly set, plug
the unit in and press the POWER SWITCH (1). The unit will turn on.
Pushing the POWER SWITCH (1) a second time will turn the unit off.
DISC TRAY
: The DISC TRAY (2) is where the CD is held during loading,
unloading and playback. Pressing the disc tray OPEN/CLOSE
BUTTON (3), will open or close the tray. The DISC TRAY (2) holds
both 12 cm and 8 cm CDs. Please note, if the CD-9500 PRO II is in the
play mode, the tray will not open.
OPEN/CLOSE BUTTON
: Press the OPEN/CLOSE BUTTON (3) to load
or remove a CD from the DISC TRAY (2).
DISPLAY
: The DISPLAY (4) shows the track number, play mode, pause
mode, and 3 different time displays. These time displays are time
elapsed on the track, time remaining on the disc and time remaining
on the track.
PLAY/PAUSE
: Each press of the PLAY/PAUSE BUTTON (5) causes
the operation to change from play to pause or from pause back to
play. See the CUE INSTRUCTIONS section for more information.
TRACK SKIP
: The TRACK SKIP BUTTONS (6) let you select the track
to play.
SEARCH BUTTONS
: The SEARCH BUTTONS (7) are used to
accurately position the disc at the point where you wish the track to
start playing. This position on the track is memorized as the cue
point. Each push of the SEARCH BUTTONS (7) will put the unit into
pause mode and move the memorized cue point 1 frame (1/75th
second). See the CUE INSTRUCTIONS section for more information.
SEARCH DIAL
: Use the SEARCH DIAL (8) to select the scanning
direction and speed. Turning the dial in the clockwise direction will
scan forward and counter clockwise will scan in reverse. The
scanning speed increases as the dial is turned further. The SEARCH
DIAL (8) will not change the cue point and will not bring the unit to
the pause mode.
STOP
: The STOP BUTTON (9) will end the playing of the CD.
TIME
: The TIME BUTTON (10) switches the time display between the
three available choices listed under
DISPLAY
.
CUE
: With the unit in the play mode (play/pause LED glows green), and
after using the SEARCH BUTTONS (7) to memorize the cue point,
pressing the CUE BUTTON (11) will cause the CD player to enter the
pause mode (play/pause LED blinks green) at the memorized cue
point (the cue LED glows yellow). If the cue point was not memo-
rized, the unit will return to the beginning of the track. Holding down
the cue button changes the cue function to preview (allowing you to
hear the music play at whatever tempo you adjusted to by holding
the cue button down). Releasing the cue button returns you to the
preset cue point.
CUE/B REPEAT
: After the cue point is memorized, pressing the CUE/B
BUTTON (12) in the play mode, (the cue LED BLINKS yellow),
repeats the section between the cue point and the point where the
CUE/B BUTTON (12) was pressed (there will be a slight delay
between the end and the restart of play).
PITCH
: Pushing the PITCH BUTTON (13) activates the pitch section of
the unit (pitch LED glows red). The pitch of the CD will change
according to the position of the PITCH CONTROL (13). Pushing the
PITCH BEND BUTTONS (14) will temporarily raise or lower the pitch
without changing the slide setting. Releasing the buttons will return
the pitch to the slide setting. Maximum pitch deviation is +/- 8 %.
DIGITAL OUTPUT JACK
: Connecting any type of DAT, MD, HARD
DRIVE, or other such items which accept digital signals to the BNC
OUTPUT CONNECTOR (19) on the rear panel of the transports
allows you to record a digital signal from CD.
OPERATING INSTRUCTIONS
1. Make sure that the VOLTAGE SELECTOR SLIDE SWITCH (15),
found on the rear panel, is set for the proper voltage. Plug the unit in
and press the POWER SWITCH (1). The unit will turn on. Pushing the
POWER SWITCH (1) a second time will turn the unit off.
2. Press the OPEN/CLOSE BUTTON (3), place a CD in the DISC TRAY
(2) and press the OPEN/CLOSE BUTTON (3) again. The tray will
close into the unit. The display will initially show the number of tracks
and the total time of the CD and the unit will be in the pause mode