


Page 5
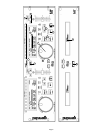
DIGITAL OUTPUT JACK
: Connecting any type of DAT, MD, HARD DRIVE,
or other such items which accept digital signals to the BNC OUTPUT
CONNECTOR (24) on the rear panel of the transports allows you to
record a digital signal from CD.
OPERATING INSTRUCTIONS
1. Make sure that the VOLTAGE SELECTOR SLIDE (22) switch, found on
the rear panel, is set for the proper voltage. Plug the unit in and press
the POWER SWITCH (20). The unit will turn on. Pushing the POWER
(20) switch a second time will turn the unit off.
2. Press the OPEN/CLOSE BUTTON (7), place a CD in the DISC TRAY
(19) and press the OPEN/CLOSE BUTTON (7) again. The tray will close
into the unit.
3. Push the TRACK SKIP BUTTONS (15) to select the track you want to
play.
4. Press the PLAY/PAUSE BUTTON (17) and the unit will instantly play.
CUE INSTRUCTIONS
Special Mode for CUE 1 (only):
1. Play the track you wish to play, push pause and move the SEARCH
JOG
WHEEL (9) to the exact point you wish play to begin, and then PLAY/
PAUSE (17) button to memorize the CUE 1 POINT (CUE 1 LED will
blink).
NOTE: When a CUE LED is not lit, there is no CUE POINT saved in
memory. When a CUE LED is blinking, the unit is ready for you to
change the CUE POINT. When a CUE LED stays lit, there is a CUE POINT
saved in memory. To change the saved CUE POINT you have to press
this CUE BUTTON (the CUE LED will then blink) and then you can
change the CUE POINT.
To set a cue point, follow these instructions:
1. Use the TRACK SKIP (15) to find the track you wish to play. Listen to
the track and when the track gets to the approximate spot, push the
PLAY/PAUSE (17) button, and if the cue LED is not blinking (indicating
the unit is ready for you to set the cue) press the CUE BUTTON you wish
to assign the cue to (CUE 1 or CUE 2), than you must touch the
SEARCH
JOG WHEEL (9) to fine tune the memorized cue point,
adjusting the CUE POINT forward or backward. The unit will go into CUE
MODE (cue LED will be lit) and the location indicated on the display will
be the memorized cue point. Push the PLAY/PAUSE (17) button, and the
unit will instantly play from the spot selected. If you don’t want to
memorize the adjusted CUE POINT, after touching the SEARCH
JOG
WHEEL (9), push the CUE BUTTON (with the blinking LED) and then
the PLAY/PAUSE (17) button. While in play mode, pressing the CUE
BUTTON will pause the play and bring you back to the CUE POINT.
2. Press the second CUE BUTTON from PLAY MODE ONLY and repeat
the process with the second CUE BUTTON, to set a second CUE
POINT.
3. To preview a CUE POINT, from PLAY MODE press PLAY/PAUSE (17)
button, and then press and hold down the CUE BUTTON to preview the
CUE. Letting go of the CUE BUTTON will bring you back to the CUE
POINT and PAUSE MODE.
AND/OR
To use the SET CUE BUTTON (15) and the DIRECT ACCESS BUTTONS
(2) to set a cue point, follow these instructions:
1. Press the SET CUE BUTTON (15) (the LED will light). Use the DIRECT
ACCESS BUTTONS (2) to memorize the spot at which you want play to
start, the CUE POINT, by selecting the proper track, minute, second
and frame. Press CUE 1 to set the cue to CUE 1 (press CUE 2 if you
wish to set the cue to CUE 2). You can do this in any mode, including
PLAY MODE, so that you may cue a track while playing a track.
SUGGESTION: To avoid confusion while setting cue points, keep the
time display in ELAPSED TIME mode. When you use the DIRECT
ACCESS BUTTONS to set a cue, the track, minute, second and frame
are always in elapsed time. If the unit’s time display is in TRACK
REMAIN or TOTAL REMAIN mode, the track, minute, second and frame
displayed will be the remain time and not the the track, minute, second
and frame you entered.
ROBO START INSTRUCTIONS
IN SINGLE-AUTO CUE MODE:
Use ROBO START in SINGLE-AUTO CUE MODE to alternate play between
the two sides of the CD player (one track from one side, then one track from
the other side). In SINGLE-AUTO CUE MODE play starts immediately from
the start of music without any blank space (which exists at the beginning of
every track). ROBO START causes one side of the CD player to play, while
the other side is paused.
1. Engage SINGLE-AUTO CUE MODE with the SINGLE-AUTO CUE/
CONTINUOUS (11) button.
2. Press the ROBO START (1) button to activate ROBO START (the button
will blink). Play will alternate between the two sides of the CD player. At
the end of the track, the playing side will pause, and the other side will
play. At the end of this track, the playing side will pause, and the other
side will play. The CD player will continue to alternate between the two
sides until you stop it (after the last track of the CD, it goes back to the
first track).
NOTE: Pausing the playing side in the middle of a track will cause the
other side to play. When that track ends, play will begin from the
middle of the track where play was paused.
IN CONTINUOUS MODE OR DURING NORMAL PLAY:
If you use ROBO START without SINGLE-AUTO CUE MODE (in CONTINU-
OUS MODE or during normal play), play will not alternate automatically.
Pressing pause on the playing side will cause the other side to play.
1. During normal play, set a cue point on the other side of the CD player.
2. Press the ROBO START (1) button to activate ROBO START (the button
will blink).
3. Press PLAY/PAUSE BUTTON (17) on the playing side to begin play from
the cue point on the other side.
PROGRAMMING INSTRUCTIONS
1. To program the unit to play songs in the order you select using the
DIRECT ACCESS BUTTONS (2), follow these instructions:
In stop mode, press the PROGRAM BUTTON (12) and then choose the
tracks you wish to play by pressing the DIRECT ACCESS BUTTONS (2).
Press the PLAY/PAUSE (17) button to play your programmed selections.
2. To program the unit to play songs in the order you select using the
TRACK SKIP BUTTONS (15), follow these instructions:
In stop mode, press the PROGRAM BUTTON (12) and then choose the
track you wish to play using the TRACK SKIP BUTTONS (15). Press the
PROGRAM BUTTON (12) to save the track. Repeat the process until
you are ready to start playing your selections. Press the PLAY/PAUSE
(17) button to play your programmed selections.
3. To clear items from your program, press the STOP/CLEAR BUTTON
(18).
SUGGESTION: In AUTO CUE mode, use the PROGRAM function with
ROBO START to create a music mix that will play without interruption.
The unit will play the programmed songs while alternating between the
two sides of the unit.
TROUBLE SHOOTING
• If the disk will not play, check to see if the disc was loaded correctly
(label side up). Also check the disc for excessive dirt, scratches, etc.
• If the disc turns but there is no sound, check the cable connections. If
they are okay, check your amplifier or receiver.
• If the CD skips, check the CD for dirt or scratches. Do not assume that
the CD player is defective. Many CDs are recorded out of spec and will
skip on most or all CD players. Before sending the unit in for repair, try
playing a CD that you are sure plays properly.