50
Editing
Information on disc editing
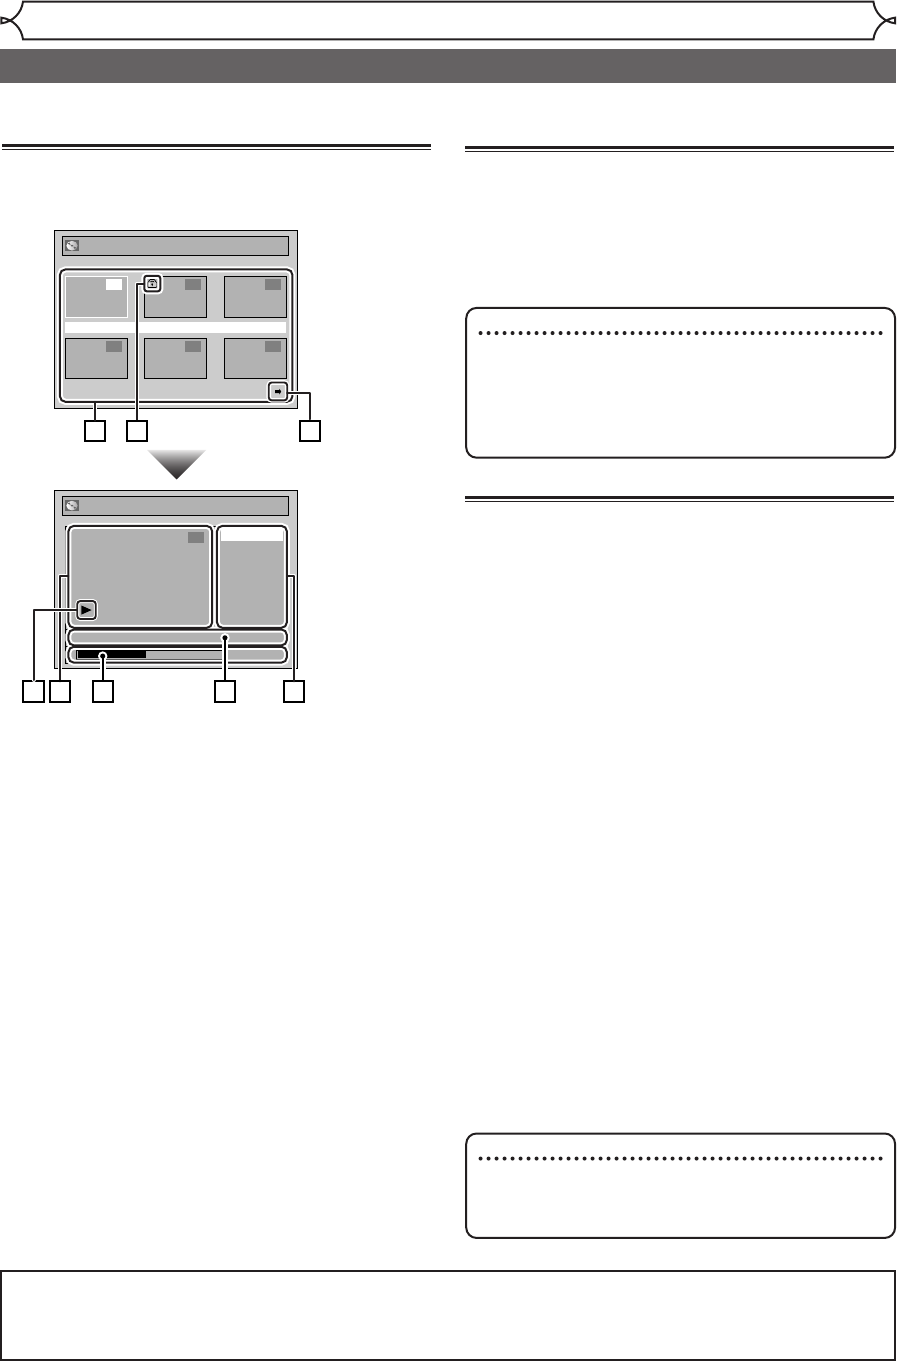
Guide to a title list
Title list allows you to check the titles recorded on
the disc easily.You can choose a title to play back from
this screen and easily edit the titles as you prefer.
1. Titles recorded on the disc can be selected for
editing by hitting [ENTER] with the cursor on
the title.
2. Protect icon, which appears when the title has
been protected. (original titles only)
3. The arrow icon, which means the title list has a
next or a previous page. Press
[{ / B] by following direction of the icon.
4. The menus for selecting a function for editing
titles.The available menus depends on the disc
type and the format type.An unavailable item is
grayed out.
5. The details of the title. Its name can be changed
on the Playlist.
6. Time status bar of the title.
After exiting the edit mode, you can resume
playback from the point you stopped for editing.
7. The thumbnail of the title selected from the
title list.
• The selected title will be played back auto-
matically.
8. Playback status of the current disc.
Editing discs in Video mode
You can edit discs in Video mode for the following items.
Be sure that once you edit titles, you cannot change
them back to the original ones.
• Deleting titles (Refer to page 51)
• Putting names on titles (Refer to page 52)
• Setting or clearing chapter markers (Refer to page 53)
Editing discs in VR mode
For discs in VR mode, you can use either “Original”
menu or “Playlist” menu, which is created from the
original, for editing.
Editing original titles
The following items are available to edit the origi-
nal titles.
• Deleting titles (Refer to page 54)
• Setting titles to protect (Refer to page 55)
• Releasing titles from protecting (Refer to page 56)
Editing playlists
You can create a playlist from original titles, in
order to edit as you prefer without losing original
titles.
The following items are available to edit with a
playlist.
• Deleting titles (Refer to page 57)
• Deleting parts of titles (Refer to page 58)
• Putting names on titles (Refer to page 59)
• Setting or clearing chapter markers (Refer to
page 60)
•
Setting pictures for thumbnails (Refer to page 61)
•
Dividing a title (Refer to page 62)
•
Combining titles (Refer to page 63)
• Adding titles to a playlist (Refer to page 64)
• Deleting a playlist (Refer to page 64)
Original
JAN/1 1:00AM CH12 XP
4 5 6
1 2 3
Original
Protect
Title Delete
JAN/1 1:00AM CH12 XP
0:00:59
6
1
7 4
6 5
8
2 3
Note
•
Once a disc is finalized, editing the disc or
recording to the disc will not be available.
(Except DVD-RW discs in VR mode.)
•
A playlist is not available with the DVD-R discs
and DVD-RW discs in Video mode.
After you finish all editing, hit [SETUP] to exit the editing mode. “Writing to Disc” appears momentari-
ly. If you open the disc tray, or hit [POWER] to turn the unit off, or when a recording error occurs after
editing,“Writing to Disc” also appears.
Note
•
Once-edited original titles will not remain as
recorded originally.When you want to leave the
original as it is, edit the playlist as you prefer.
E6720UD_ENSP.qx3 05.2.21 7:39 PM Page 50


