17
BASIC OPERATION
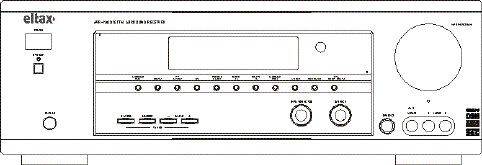
I. PHONES jack
For private listening, insert optional (not included)
headphones (1/4-inch plug) into the PHONES jack, and
then the center and surround speaker will be cut
automatically.
Note: When the headphone is used, the output will down
mix to STEREO automatically.
J. AV 3
The input ports for VCR, Video Camera Recorder, etc. It
contains one video input port and Analog Left and Right
input ports and an S-VIDEO jack.
K. BASS/TREBLE control
BASS control is used to adjust the level of the low
frequency sound range.
TREBLE control is used to adjust the level of high
frequency sound rang.
Press one of them on the remote control and then turn the
MASTER VOLUME to adjust the level of them.
L. Dolby Digital EX
When using surround back speakers, the Dolby Digital
source is played back using the matrix 6.1-channel
decoder.
M. DTS-ES Discrete 6.1
With the additional of the surround back channel, this
new format has all 6.1 channels recorded independently
for a completely discrete digital format. Since all
channels are recorded independently, high-fidelity
surround playback with the increased sound space is
achieved.
N. DTS-ES Matrix 6.1
This format has the surround back channel matrix
encoded and inserted into the left and right surround
channels so that at playback the output for the left, right,
and back surround channels are decoded using a
high-precision matrix decoder.
THE RADIO OPERATIONS
Automatic Tuning
1. Press the POWER button, then press the STANDBY
button to ON.
2. Select the TUNER mode by turning the INPUT
SELECTOR knob.
3. Select the FM or AM by pressing the BAND button
on remote control.
4. Press the “AUTO/MANUAL” button on remote
control to activate automatic selection. (Default mode
is Manual selection) Note: Auto appears on the
display.
5. Press TUNING +/ - to select the station you want to
listen to. When a station is tuned in, the tuning
process will stop automatically. (Automatic selection)
Press TUNING +/ - again to select another channel.
Manual Tuning
It is for selecting stations, which cannot be tuned
automatically (manual selection)
To tune a channel manually:
Skip step 4 in the above procedures. Each time the
TUNING +/ - button is pressed momentarily (0.5 second
or less), the frequency changes by a fixed step. FM: 50
kHz steps; MW: 9 kHz steps
Two FM modes available:
Press ST/MONO button on remote control to alternate
between Stereo mode and Mono mode.
Stereo
FM stereo broadcasts are received in stereo and the “
8
”
indicator lights on the display.
Mono
To compensate for weak FM stereo reception, select this
mode. Reception will now be forced monaural, reducing
unwanted noise.
If DISPLAY button is pressed, the details of incoming
digital source will be displayed.
Preset Tuning
This facility is used to store FM, AM broadcasting from
channel 1 to15 respectively.
Automatic Memory Presetting
1. Select the Tuner mode by rotating the INPUT
SELECTOR knob.
2. Select the AM or FM by pressing the BAND button.
3 Press the “APS” button on front panel.
Up to 15 of the best-received stations in your area
will be automatically stored.
Manual Memory Presetting
1. Select the TUNER by rotating the INPUT
SELECTOR knob.
2. Select the AM or FM by pressing the BAND
button.
3. Press the TUNING +/ - buttons to select a frequency
channel you want to preset.
4. Press the MEMORY button briefly.
5. While the “MEMORY” indicator is lit, press
TUNING +/ - button to select a preset station. The
station number will be displayed on the screen.
6. Press the MEMORY button.
To store more stations, repeat steps 3 to 6.
How to select preset stations
Press the “STATION +” or “STATION -” buttons on the
remote control or “STATION” button on the front panel
to select a preset channel during the tuner mode.


