6 – CLA37
CLA37– 7
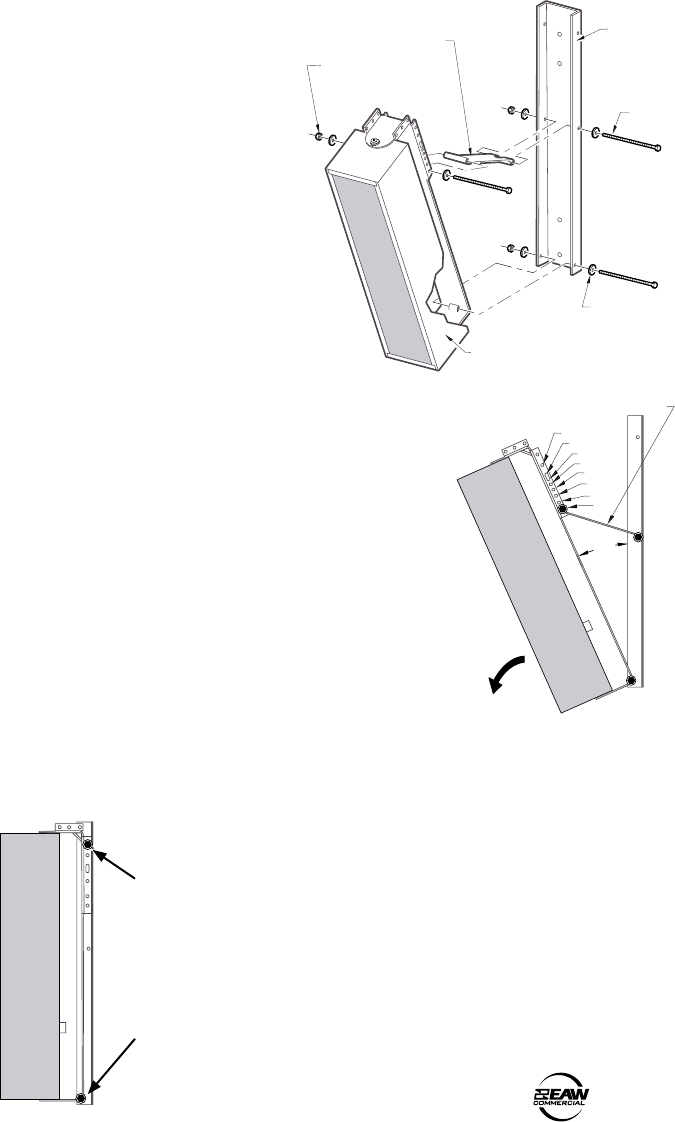
4. Mounting the Enclosure/Fly Bracket Assembly to the Wall Bracket:
The y bracket is used to secure
the enclosure to the wall bracket.
The enclosure may be tilted
forward at various angles or
mounted vertically. For a forward
tilt, refer to the gure to the right
and these instructions:
a. Insert a 4.25 in screw with a
at washer, through the middle
hole in the ange of the wall
bracket, through the channel
in the connecting bracket, and
through the second center
hole in the opposite ange
of the wall bracket. Onto the
threaded end of the screw,
place a at washer and a lock nut. Do not tighten
just yet.
b. Insert a 4.25 in screw with a at washer, through
the bottom hole in the ange of the wall bracket,
through the horizontal channel in the y bracket,
and through the second bottom hole in the opposite
ange of the wall bracket. Onto the threaded end of
the screw place a at washer and a lock nut. Do not
tighten just yet.
c. Secure the other end of the connecting bracket
to the desired holes in the enclosure/y bracket
assembly, using the 4.25 in screw/washer held in
place with the at washer and lock nut. Refer to
the gure to the right to achieve the desired angle.
Tighten all three lock nuts.
5. Vertical Mounting:
To mount the loudspeaker enclosure/y bracket assembly vertically,
discard the connecting bracket, and follow these instructions:
1. Align the top hole in the wall bracket ange with the top rear holes in
the enclosure/y bracket assembly, and insert a 4.25 in screw with a
at washer.
2. Onto the threaded end of the screw, place a at washer and a lock
nut. Do not tighten just yet.
3. Repeat step 4b above, to insert a screw into the wall bracket’s lowest
hole.
4. Tighten both lock nuts.
Step 4b.
Step 4a.
Step 4c.
SCREW 1/4 INCH-20
X 4.25 INCH LON
G
HEX HEAD
3 PLACES
FLAT WASHER
1/4 INCH
6 PLACES
LOCK NUT
1/4 INCH-20
3 PLACES
ENCLOSURE AND
FLY BRACKET
CONNECTING
BRACKET
WALL
BRACKET
13°
10°
16°
18°
22°
25°
4°
7°
25°
CONNECTING
BRACKET
TILTING THE
ENCLOSURE
MOUNTING THE
ENCLOSURE VERTICALL
Y


