


ENGLISH
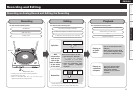
Connections Playback Recording and Editing Troubleshooting Specifications
r t y u
Accessories ·····················································································1
Special Features of This Device ····················································1
Cautions on Handlings ···································································1
Cleaning ·························································································1
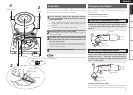
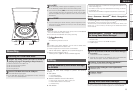
Assembly ·························································································2
Changing the Stylus ·······································································2
Removing the Replaceable Stylus ··················································2
Mounting the Replaceable Stylus ··················································2
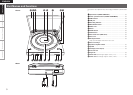
Part Names and Functions ·····························································3
Getting Started
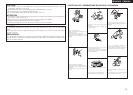
q Owner’s manual ......................................................................1
w Warranty (for North America model only) ................................1
e Service station list ...................................................................1
r Platter ......................................................................................1
t Rubber mat ..............................................................................1
y EP adapter ...............................................................................1
u Trans Music Manager (for DENON) disk (CD-ROM)................1
Check that the following parts are supplied with the product.
Note that the illustrations in this instructions may differ from the actual
set for explanation purposes.
1. Record analog records to a USB flash drive
• You can play back the tracks recorded on the USB flash drive on
any audio device with USB playback.
• The “Trans Music Manager” software supplied with the DP-
200USB enables you to edit music files and titles on your PC.
2. Easy-to-operate, fully automatic player
Simply press the START button to start playing an analog record.
When the record is finished the tone arm automatically returns to
its original position and the turntable stops.
3. Equalizer switch provided
The equalizer switch enables you to connect to a variety of audio
devices such as pre-main amplifiers and radio cassette players.
4. Lightweight, compact design
The lightweight, compact design makes it easy to use anywhere.
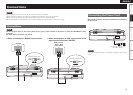
Connections ····················································································4
Connecting the Power Cord···························································4
Connections
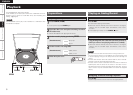
Preparations ····················································································5
Preparing to Play a Record ·····························································5
Playing an Analog Record ······························································5
Auto Start ·······················································································5
Manual Start···················································································5
Stopping a Record During Playback ···············································5
Playback
Recording an Analog Record and Editing the Recording ············6
Cautions to Observe When Recording or Editing ··························7
Recording ························································································8
Recording to a USB Flash Drive ·····················································8
Editing ·····························································································8
Shall be Enabled by Trans Music Manager for DENON ··················8
Recommended System Requirements for Using Trans Music
Manager ·························································································8
Installing “Trans Music Manager” ··················································8
Editing with Trans Music Manager ·················································8
Recording and Editing
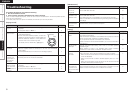
Troubleshooting ·································································9
Specifications ····································································10
Accessories
Cautions on Handling
Cleaning
• Use a wiping cloth and wipe lightly to remove dirt from the cabinet
and operation panel.
When using chemically treated cloths, follow the precautions that
have been written for them.
• Do not use benzene, thinners, or other organic solvents or insecticides
on the unit since they may cause a change in quality or color.
• Moving the unit
To prevent short-circuits or damaged wires in the connection cables,
always unplug the power supply cord and disconnect the connection
cables between all other audio components when moving the unit.
n Contents
Thank you for purchasing this DENON product. To ensure proper
operation, please read this owner’s manual carefully before using the
product.
After reading them, be sure to keep them for future reference.
Getting Started
Special Features of This Device
Getting Started