


support.dell.com
Dell PowerEdge 2400 Systems Rack Installation Guide 1-17
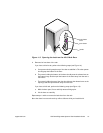
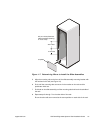
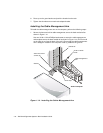
2. Align the bracket on the end of the cable-management arm with the correspond-
ing holes on the lower-right corner of the computer’sbackpanel(seeFigure1-14).
Secure the arm using two 8-32 x 0.313-inch Phillips-head screws.
3. Connect the cables to the computer.
For details, see your computer’s
Installation and Troubleshooting Guide
and the
User’s Guide
.
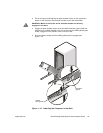
4. Secure the cables:
a. After connecting the cables to the computer, unscrew the thumbscrews that
secure the front rack adapter to the front vertical rail.
b. Slide the computer forward to the fully extended position.
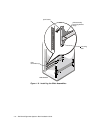
c. Route the cables along the cable-management arm, and secure the cables
to the cable-management arm with the Velcro strips attached to the
cable-management arm.
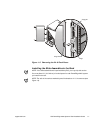
5. Slide the computer in and out of the rack to verify that the cables are routed
correctly and do not bind, stretch, or pinch with the movement of the
cable-management arm.
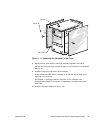
NOTE: As you pull the computer out to its furthest extension, the slide assem-
blies will lock in the extended position. To push the computer back into the rack,
press the green locking latch on the side of the rail to release the locks (see
Figure 1-13), and then slide the computer completely into the rack.
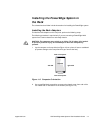
Replacing the Rack Doors
CAUTION: To prevent personal injury due to the size and weight of the
doors, never attempt to replace the doors by yourself.
To replace the 42-U rack’s front and back doors, perform the following steps:
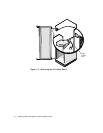
1. Lift the front door into position, and align the hinges with the holes in the rack as
showninFigure1-4.
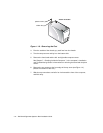
2. Slide the hinges into the holes in the rack until the hinge release levers lock the
hinges into position.
3. Verify that the hinges are latched.
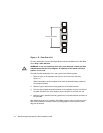
4. Close the door latch by rotating the handle counterclockwise until it stops, push
in the handle until it locks in position, and then slide the cover down over the
push button (see Figure 1-3).
5. Repeat steps 1 through 4 to install the back door.