


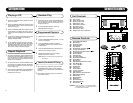

Erasing a CD-RW
Manual Track Division
11 4
CD Recording Operation
Getting Started
Unpacking
1 Remove packing materials from unit.
NOTE: Save all packing materials.
2 Remove plastic bag covering radio.
3 Remove plastic safety cover from A/C plug.
4 Remove tie from A/C cord and untie antenna
wire on back of radio.
5 Open lid and remove styrofoam shipping
material from turntable.
6 Remove black tie-wrap from under the tone
arm.
7 Remove white protective needle cover by gently
pulling towards the front of the unit.
8 Using your fingers, turn large chrome screw
clockwise until it is all the way down. do not
force it. This allows turntable to float on its shock
absorbers.
9 Release tone arm hold down clip by gently
pushing to the right. This will unlock tone arm
from its arm rest. Re-lock the hold down clip
when moving the unit to another location.
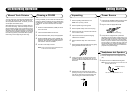
Power Source
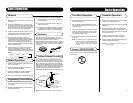
Headphones Jack Operation
1 Connect headphones to the Headphone Jack
(16)
2 Adjust volume to the desired listening level.
NOTE: When using headphones, the sound to the unit
speakers will be cut off.
If using a CD-RW, you can erase the whole CD and
rerecord it. Erase procedures are only possible with
CD-RW discs. It is not possible to erase or rerecord
a CD-R CD. To erase a CD-RW, follow the steps
below.
1 Press the FUNCTION button (28/58) to set the
unit to CD mode.
2 Load a recorded CD-RW into the unit.
3 Press the STOP button (13/77) to stop playback.
4 Press the ERASE button (10/57). ERASE will
appear on the display and the erasing process
will begin. When finished, the display will first
read F Done and then BLANK.
5 The CD is now ready to record.
NOTE: Once a CD is erased, the contents that were
on the CD cannot be retrieved.
You can divide your recording into separate tracks
if you wish. By doing this, each song will have its
own sequential track number. To do this, you must
use the Split Track button (5/70).
While Recording your record or cassette, listen for
the end of each song. There will usually be a brief
silence between songs. Once you are at the end of
the song, press the Split Track button. The recording
will then go to the next track number by increments
of one. Once the recording is finished, you can press
the Preset Up (22/52) or the Preset Down (23/54)
buttons to go to the beginning of each song.
The sound from all speakers is cut off.
Headphone Jack(16)
AC
Polarized Plug
1
Unwind the AC POWER CORD (43) at the back
of the unit and connect it to a power outlet.
2 Plug A/C cord into appropriate outlet.
3 This product is equipped with a polarized
alternating current line plug (a plug having one
blade wider than the other). This plug will fit into
the power outlet only one way. This is a safety
feature, If you are unable to insert the plug fully
into the outlet, try reversing the plug. If the plug
should still fail to fit, contact you electrician to
replace your obsolete outlet. Do not defeat the
purpose of the polarized plug.