2
AC Line Input
The AC line input is located at the back of the
unit below the AC Power switch Connect the
supplied AC power cord to this input. As the
CAUTION section on the previous page indicates,
it is always a wise PRECAUTION to connect all
interconnect cables before attaching the AC
power cords.
IMPORTANT NOTE: Make sure that the
operation voltage of the unit matches the AC
outlet voltage in your area. You will find the
operating voltage of your unit on the serial
number tag at the back of the CDP-10. Improper
voltage connection can severely damage your
CDP-10.
Infrared (IR) Input and Output
The CDP-10 is equipped with 3.5mm mono-plug
connectors that allow the unit to directly receive
and transmit remote IR commands. These
connectors can be used with equipment that
receives IR commands and converts them for
transmission on copper wire. This is especially
useful for situations where the CDP-10 is outside
of the line-of-sight of your listening location.
These connections will be found to the right of
the fuse holder at the back of the unit.
IR IN will permit you to install an outboard infra-
red sensor and therefore be able to control the
CDP-10 remotely from another room where the
outboard IR sensor has been installed.
IR OUT will permit you to communicate IR signals
to other Classé components. You will have to
install a 2 conductor shielded cable with 3.5mm
mini mono plugs at each end.
DC Trigger
This connection is located is located directly to
the right of the IR IN connection near the fuse
holder at the back of the unit. This connection
will permit you to trigger on or off another unit
when the CDP-10 will be put out or in STANDBY
mode. The CDP-0 will output a 12 VDC trigger
when the unit is out of STANDBY. There will be
no voltage present when the CDP-10 is in
STANDBY mode. For this purpose you will need
to install a conductor shielded cable with 3.5mm
mini mono plugs at each end. Polarity should be
positive on the tip.
Please consult you Classé dealer regarding these
accessories.
DISPLAY, FUNCTIONS AND
OPERATIONS
1. Functions
The front panel of the CDP-10 has nine buttons
that perform all the basic necessary functions.
The remote control contains all the basic
functions found on the front panel (except the
LOAD and POWER buttons) as well as all
advanced programming features.
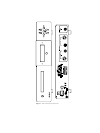
Using Figure 1, the front panel controls are (from
left to right):
LOAD: Press this button once to open the disk
tray. Pressing it again will close the tray.
STANDBY: Press this button to take the unit in
or out of STANDBY mode. Please note that this
button will only work if the back panel power
switch is ON.
PREVIOUS (<): Pressed once during playback,
the CDP-10 will start playing the previous track.
Pressing it sequentially will cause the CDP-10 to
go back one track each time it is pressed. This
button is also used to select tracks to play and
program into memory.
NEXT (>): Each time this button is pressed, the
CDP-10 will advance one track i.e. press it twice
to advance two tracks, three for three tracks, etc.
If pressed during playback, the CDP-10 resumes
playing from the desired track. If pressed while
stopped, the CDP-10 will await further
commands. This button is also used to select
tracks to play and program into memory.
STOP: Press this button to stop the CD from
playing.
PLAY: Press this button to start playback. If
pressed during playback the CDP-10 resumes
play from the start of the current track.
PAUSE: This button is used to pause the PLAY
function. To resume playback, press the PAUSE
key again.
FORWARD (>>) AND REVERSE (<<) SEARCH:
The CDP-10 employs a convenient 2-speed
search. These buttons allow you to quickly search
through the disk in both directions. Press and
hold down the desired SEARCH button. The time
counter will approximately double in speed, and
the track heard will be reduced in volume. Once
the desired point is reached, release the SEARCH
button, playback will resume.
If the SEARCH button is held for more than
4 seconds, the CDP-10 goes into a high-speed
search mode, and the time counter advances very
rapidly. During high-speed search, the volume is
completely muted.
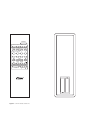
NOTE: In addition to the function keys described
above (except for the POWER switch), these
other function keys are found on the remote
handset. For visual aid, refer to fig.2 page 15.
STANDBY (On remote control and on the unit):
Use this key to put the CDP-10 in or out of
standby mode. Please note that this function will
only work if the back panel Power switch is ON.
SHUFFLE (On remote control only): Will access
and play the CD tracks randomly, in a different
order in which they were originally put on the
CD.
SCAN (On remote control only): This function will
play the first 10 seconds of each track of the CD.
NUMERIC KEYPAD (digits 0 through 9)
(On remote control only): This is a convenient
alternative to the PREVIOUS and NEXT buttons.
Pressing the desired track number on the
numeric keypad is usually faster than the
PREVIOUS and NEXT buttons. For example, if you
just inserted a disk and wish to play track 8,
pressing 8 followed by PLAY is easier than
pressing the NEXT button eight times, and then
PLAY.
REPEAT (On remote control only): Repeats the
whole disk, the programmed tracks or just the
single track being heard.
A-B (On remote control only): This function will
permit you to ‘loop’ a portion of a track when in
PLAY mode. When you have arrived at the
starting point of the desired loop, press the A-B
key once. When you have arrived at the end of
the desired portion of the loop, press the A-B key
again, the CDP-10 will then start playing this
portion.
DISPLAY (On remote control only): When pressed
once, the display will count upwards the total
time on the disc. If pressed once more, the
display will count backwards giving the total
remaining time on the disc. If pressed once
again, the display will return to its normal
function.
PROG (On remote control only): Stores selected
tracks into memory for playback. Up to 20 tracks
can be stored into the memory of the CDP-10.
NOTE: The front panel display of the CDP-10 will
not show the ‘total time’ if more than 13 tracks
are programmed.
NOTE: There is no variable output on the
CDP-10.
2. Display Information and Various Modes
of Operation
To insert a disk, press LOAD to open the CD tray.
Gently place the disk with the label side up on
the tray, and press LOAD again, the tray will
close, and several seconds later the display will
indicate the total number of tracks on the disk
with the total playing time. If the disk has not
been properly inserted, or is inserted upside
down, ‘NO DISC’ will appear on the display. Disks
with bad scratches, finger marks, pinholes, or
other severe manufacturing defects might also
not be useable.
Once the display confirms the number of tracks
and playing time, the CDP-10 is in STOP mode.
At this point, you can carry out several different
playback modes. Each is described in detail
below.
Playback from the beginning or from a
selected track
To play an entire disk from the beginning, press
PLAY. The CDP-10 will start playing in a few
seconds, and will play the entire disk. To play
from a desired track onwards, select the desired
track using the NEXT (>) and/or PREVIOUS (<)
buttons, or with the numeric keypad on the
remote control. Then press PLAY. The disk will


