


2
CONNECTIONS FOR LINE OR
BALANCED INPUTS:
The CLASSÉ CA-301 power amplifier is equipped
with both line and balanced inputs. Either one
may be used SEPARATELY, BUT NOT
SIMULTANEOUSLY. The balanced inputs must be
connected to a pre-amplifier which has balanced
main outputs. Balanced inter-connects with
“XLR” connectors are also required. Regardless
of the amplifier inputs used, stereo or mono
operation is possible on the CA-301.
Line Inputs
Engage the LINE/BALANCED switch to the
position marked “LINE”. (The amplifier is factory
set for “LINE”.)
NOTE: The LINE/ BALANCED switch will
not operate if the amplifier is turned on, you
will NOT be able to change from one mode to
the other, as the mode is “locked” while the
amplifier is on. To activate the circuit, turn off
the unit and engage the LINE/BALANCED switch
to LINE. If the unit has not been turned off
before engaging the switch, turn off the unit,
wait for about 10 seconds, and turn the unit on
again, the circuit will then engage. Connect the
line interconnects to the RCA input jacks on the
rear panels of the CA-301. The balanced
connectors are automatically disabled.
Balanced Inputs
Switch the LINE/BALANCED switch to the
position marked “BALANCED”. A balanced
preamplifier and balanced interconnects are
also required.
NOTE: The LINE/ BALANCED switch will
not operate if the amplifier is turned on, you
will NOT be able to change from one mode to
the other, as the mode is "locked" while the
amplifier is on. If the unit has not been turned
off before engaging the switch, turn off the unit,
wait for about 10 seconds, and turn the unit on
again, the circuit will then engage. For use with
balanced preamplifiers other than Classé, the
wiring of the 3-pin XLR connectors must be
matched to that of the CLASSÉ CA-301
which are wired as follows:
• PIN 1: GROUND
• PIN 2: POSITIVE (NON-INVERTED)
SIGNAL, “HOT“
• PIN 3: NEGATIVE (INVERTED) SIGNAL
All Classé preamplifiers and amplifiers are
configured as above. Some preamplifiers from
other manufacturers have PIN-3 set as the
positive or “HOT” side. If this is true of your
preamplifier, and you wish to maintain absolute
phase throughout your system, the interconnects
must have the wire which is connected to PIN-3
at the preamplifier output end switched to PIN-2
at the amplifier input end and the wire which is
connected to PIN-2 at the preamplifier output
switched to PIN-3 at the amplifier input end.
Having confirmed the correct connections, plug
the XLR connectors of the balanced interconnects
into the locking XLR connectors on the rear panel
of the CA-301. Push the connectors in until
the locking mechanism clicks. (To remove the
connectors, press the tab above the connector
while pulling gently on the connector body.)
Protection Circuit
A special circuit in the Classé CA-301
continuously monitors the output audio signal
to detect output overload, clipping or DC
content. In addition, each channel has two front
end supply voltage fuses (
3
/
4
amp fast blow),
located on the front end voltage regulation
board, to protect the input circuitry from
damage due to overload.
There is also an AC line fuse, located at the rear
of the amplifier immediately above the IEC
receptacle.
If the protection circuit of the unit is triggered
or any of the protection fuses has blown,
the FRONT PANEL POWER LED will go to
BLINKING GREEN.
IF THE PROTECTION CIRCUIT HAS BEEN
TRIGGERED, TURN THE CA-301 OFF. After the
situation which has triggered the protection
circuit has been clearly identified and corrected,
attempt to re-start the unit. IF THE UNIT STILL
GOES INTO PROTECTION MODE, OR IF IT
APPEARS THAT PROTECTION FUSES DID BLOW,
CONTACT YOUR LOCAL DEALER. DO NOT TRY
TO CHANGE A BLOWN FUSE. REPLACING A FUSE
WITHOUT CHECKING FOR COMPONENT FAILURE
COULD RESULT IN FURTHER, SERIOUS DAMAGE
TO VITAL COMPONENTS IN YOUR AMPLIFIER.
CONTACT YOUR LOCAL DEALER or Customer
Service at the Classé Audio, Inc –
+1(514) 636 63 84.
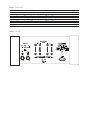
IR Out and In:
The CA-301 may also be turned on and off using
our SSP-75 Surround Sound Processor, utilising
the IR OUT and IN jacks. To turn on your CA-301
with the SSP-75, Disconnect you CA-301 from
the AC line completely, open the top cover and
locate the 4 internal jumpers inside the CA-301
located to the right side of the regulator board
(top board located at the back of the unit).
When facing the amplifier from the front, remove
the jumper located completely at the back (the
last in the row) and save this jumper. Re-install
the top cover. Install a mini jack into IR IN at the
back of the CA-301 and plug the other end of
the mini jack into the 5VDC mini jack at the back
of your SSP-75. When the Standby button of the
SSP-75 is pressed, it will now activate the turn
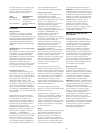
on turn off circuitry of your CA-301. Several
amplifiers may be turned on automatically in
sequence or all at once, depending upon the
configuration of the jumper settings in the
amplifier. The table in Fig 1 tells you which
jumper should be inserted or removed to obtain
the correct sequence on which you will want
your amplifier to turn on.
J3 J2 J1 J0 ADDRESS RC Auto
Button ON
X X X X 0 Amp 1 No
X X X out 1 Amp 2 No
X X out X 2 Amp 3 No
X X out out 3 Amp 4 No
X out X X 4 Amp 5 No
X out X out 5 Amp 6 No
X out out X 0 Amp 1 No
X out out out 0 Amp 1 Yes
CA-301 FEATURES:
Newly developed special Classé symetrical
circuitry from input to output. Current capacity
increased above standard units. One massive
toroidal transformer totalizing 2 KVA. Over
70000 µF storage capacity for each channel.
Ten high current/voltage Bi-Polar devices per
channel. Discrete high voltage/current regulation
for the pre-driver and input sections. Metalized
polypropylene capacitors bypassing each output
device. Heavily gold plated bars connecting all
supplies for the ouput devices. Heavily gold
plated input and output connectors. All signal
carrying cables are shielded and have Litz type
configuration. All other wiring is oxygen free
copper.
Notice to all Classé Product owners:
Thank you for your purchase of a Classé Audio
component.
All of us at Classé have taken extreme care to
ensure that your purchase will become a prized
investment. We are proud to inform you that all
Classé Audio components have been officially
approved for the European Community CE mark.
This means that your Classé product has been
subjected to the most rigorous manufacturing
and safety tests in the world, and have proven
to meet or exceed all European Community CE
requirements for unit to unit consistency and
consumer safety.
All of us at Classé Audio wish you many years of
musical enjoyment.
As of July 18, 1996, Classé Audio has been
granted Certificate No: C401CLA1.MGS, which
indicates CE approval for all models of the Classé
Audio product line.
CLASSÉ AUDIO
5070 François Cusson
Lachine, Québec
Canada H8T 1B3
Telephone: +1 (514) 636-6384
Fax: +1 (514) 636-1428