


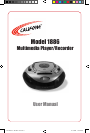

califone.com
6
califone.com
7
2. PACKAGE CONTENTS
• 1886 Multimedia Player/Recorder with external power adapter (at-
tached)
• User Manual
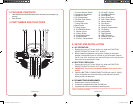
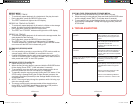
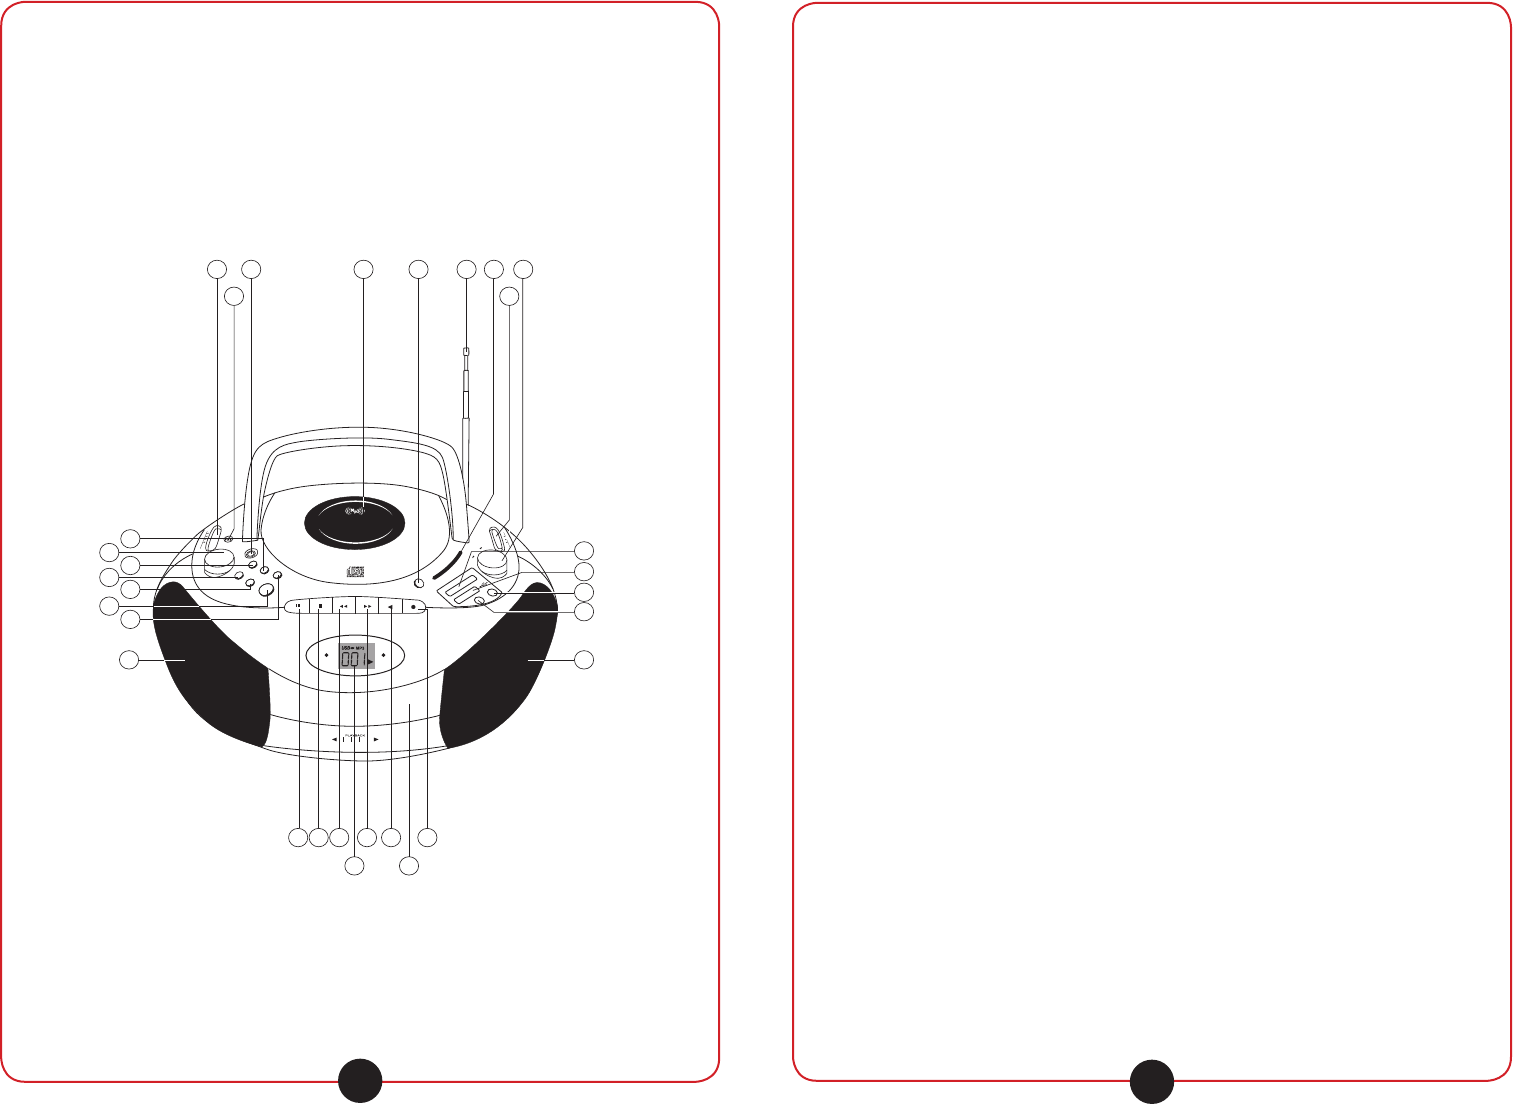
3. PART NAMES AND FUNCTIONS
CD Boombox
Instruction Manual
- P.1 -
- P.2 - - P.3 -
CONTROL LOCATION
1. Function Selector Switch
2. Condenser Microphone
3. Headphone Socket
4. CD Compartment
5. CD Door Open Button
6. FM Antenna
7. Tuning Dial Scale
8. Band Switch
9. Tuning Control
10. CD DN/Rew Button
11. Volume Control
12. Folder+ Button
13. Prog/Repeat Button
14. CD Stop Button
15. CD Play / Pause Button
16. CD Up/F.F. Button
17. CD/USB/SD Button
18. Pause Button
19. Stop / Eject Button
20. Fast Forward Button
21. Rewind Button
22. Play Button
23. Record Button
24. Cassette Compartment
25. CD Display
26. Left Speaker
27. Right Speaker
28. USB Connector
29. SD/MMC Card Slot
30. Encode Button
CAUTION
RISK OF ELECTRIC SHOCK
DO NOT OPEN
DANGER: Invisible laser radiation when
open and inter-lock
failed or defeated. Avoid direct posure to
beam.
CAUTION: Hazardous laser radiation when
open and interlock defeated.
AC OPERATION
Before operation please be sure that the VOLTAGE on the set corresponds
to the VOLTAGE of your local area. Unravel the AC Line Cord, insert one end
into the AC jack on the set, and the other end into a standard AC outlet.
BATTERY OPERATION
Disconnect the AC Cord Set completely. Open the
BATTERY COMPARTMENT DOOR and insert UM-2
size x 8 batteries (not supplied) making sure that the
indicated battery polarity is observed.
TURN OFF UNIT
To turn off the unit, slide the FUNCTION SELECTOR SWITCH(1) to the
"OFF" position.
RADIO OPERATION SELECTOR
Slide the FUNCTION SELECTOR SWITCH(1) to the "RADIO" position. Slide
the BAND switch to the desired waveband. Turn the TUNING KNOB to your
desired radio station. Adjust the sound level by rotating the VOLUME
CONTROL KNOB(11). To turn off the radio, simply slide the FUNCTION
SELECTOR SWITCH(1) to "OFF" position.
FM STEREO RECEPTION
Slide the BAND Switch(8) to the FM position. The FM STEREO indicator will
light when listening to a strong station that is broadcasting in stereo.
ANTENNA
s&OR&-PULLOUTTHETELESCOPICAERIAL4OIMPROVE&-2ECEPTIONINCLINEAND
turn the aerial, reduce its length if the FM-signal is toostrong (very close to
a transmitter).
s&OR!-3737THESETISPROVIDEDWITHABUILTINAERIALSOTHEREIS
no need to use the telescopic aerial, the aerial can be directed by turning
the whole set.
CASSETTE OPERATION
TAPE PLAYBACK
Depress the STOP/EJECT (19) button to open the cassette door. Insert a
cassette tape into the CASSETTE COMPARTMENT and push the cassette
door to close. Slide the FUNCTION SELECTOR SWITCH(1) to TAPE
position. Depress the PLAY (22) button. Adjust the VOLUME CONTROL
KNOB(11) to your desired listening level. To stop the tape, depress the
STOP/EJECT (19) button.
- P.4 - - P.5 -
FAST FORWARD AND REWIND
The tape can be fast FORWARDED or REWOUND by depressing the FAST
FORWARD (20) button or REWIND (21) button respectively.
PAUSE FUNCTION
During playback or recording, the tape can be stopped temporarily by
depressing the PAUSE (18) button. To continue playback or recording, press
the PAUSE (18) button once again.
AUTO STOP SYSTEM
When the tape runs to its end during playback or recording, the cassette
operation will be stopped automatically.
CAUTION
To avoid damage to the cassette mechanism or to the cassette tapes,
always depress the STOP/EJECT(19) Button between each operation.
RECORDING FROM THE RADIO
1. Tune to a desired radio program as described in the "RADIO
OPERATION" section.
2. Insert a blank cassette tape into the CASSETTE COMPARTMENT.
3. Press the PAUSE (18) button.
4. Press the RECORD (23) button. The PLAY (22) button is engaged
simultaneously to start recording. With the built-in Automatic Level Control
(ALC), the best recording quality is automatically adjusted. Changing the
volume level will not affect the recording.
5. To activate recording, release the PAUSE (18) button.
6. To stop recording temporarily, press the PAUSE (18) button. To continue
the recording, press the PAUSE (18) button once again.
7. Press the STOP/EJECT (19) button to stop recording.
8. When the tape runs to its end, the cassette operation will be stopped
automatically.
RECORDING FROM BUILT-IN CONDENSER MICROPHONE
s3ETTHE&5.#4)/.3%,%#4/237)4#(TOTHE4!0%POSITION
s/PENTHE#!33%44%#/-0!24-%.4BYPRESSINGTHE34/0%*%#4
(19) button and insert a blank tape into the cassette compartment. Close
the door gently.
- P.6 -
- P.8 -
- P.7 -
- P.9 -
2. For interruption while the CD/USB/SD is playing, press the PLAY/PAUSE
(15) button once. In the CD mode, though the sound stops, the disc will
continue to spin. To re-start playing, press the PLAY/PAUSE (15) button
once again. The music will start from the exact position where it was
interrupted.
3. To stop the CD/USB/SD, press the STOP (14) button once whether the
CD/USB/SD is in Play or Pause mode.
SKIP AND SEARCH MODE
s$URING0LAYOR0AUSEMODEPRESSTHE50&&OR$.2%7BUTTON
once to go to next track or previous track.
s$URING0LAYOR0AUSEMODEPRESSANDHOLDTHE50&&OR$.2%7
(10) button to search within a track and the elapsed time will be shown on
the Display.
s2ELEASETHE50&&OR$.2%7BUTTONONCETHEDESIREDTIMEIS
reached.
PROGRAM
I
T IS NOT POSSIBLE TO ENTER PROGRAMS DURING DISC/USB/SD/MMC
CARD PLAY. PRESS STOP (14) BUTTON FIRST, AND FOLLOWS THE
FOLLOWING PROCEDURE:
s0RESSTHE02/'BUTTONTHEDISPLAYWILLSHOW0ANDIN
flashing. “P01” for the program location, and “000” for your desire songs.
s4HENPRESS50&&OR$.2%7BUTTONTOSEARCHFORTHETRACKTOBE
stored.
s0RESSTHE02/'BUTTONTOSTORETHETRACK
s#ONTINUEENTERINGTRACKSINTHISWAYUNTILALLTHEDESIREDTRACKSARESTORED
(up to a limit of 20 track).
s
0RESS THE 0,!90!53% BUTTON ONCE TO START PLAYING THE FIRST
programmed track.
s$URING THEPLAYBACK OF0ROGRAMMEDTRACKSTHE02/')NDICATORONTHE
LCD display will remain lighted.
CLEAR PROGRAMMED DISC PLAY
s0RESSTHE34/0BUTTONTOCLEARDISCPLAY
ENCODE (RECORD) MODE
IT IS NOT POSSIBLE TO ENCODE (RECORD) DURING STOP MODE OR
NO STORAGE MEDIA (USB or SD/MMC) CONNECT WITH THE UNIT.
To Start Encode (Record) from CD Disc to USB or SD/MMC card, make sure
the USB Flash player is TURN ON and also NOT in HOLD mode. While for
the SD/MMC card, make sure the write protect tab is NOT in LOCK positiion.
REPEAT ALL TRACK IN FOLDER
s4OSET2%0%!4!,,TRACKSINSIDEINDIVIDUAL&/,$%2PRESS&/,$%2
(12) button during play mode. You can select the desire FOLDER by
pressing FOLDER+ (12) button, the FOLDER indicator will flashing on the
LCD display. Then press REPEAT (13) button twice to play all tracks
within current FOLDER continuously, both FOLDER and REP ALL
indicators will remain lighted.
s4OCANCEL2EPEAT!,,TRACKSWITHIN&/,$%2PRESS2%0%!4BUTTON
once more and the REP ALL indicator will go off.
FOLDER MODE
Press FOLDER+ (12) button to select the desired song. The Folder number
will be flashing by 3 sec.
STEREO HEADPHONE JACK
For private
listening, insert the headphone plug into the STEREO
HEADPHONE JACK(3) and adjust the VOLUME CONTROL KNOB(11)
accordingly. During the use of a headphone, the Speakers are
automatically disconnected.
GENERAL INFORMATION
CARE AND MAINTENANCE
Handle your compact discs, cassette tapes, and tape deck carefully, and
they can last a long time.
Handle your compact discs carefully, and they can last a long time.
s5SEASOFTCLEANCLOTHMOISTENEDWITHPLAINLUKEWARMWATERTOCLEANTHE
exterior of the unit.
s.EVERUSESLOVENTSSUCHASBENZENEOROTHERSTRONGCHEMICAL
cleaners since these could damage the unit's finish.
s)TISIMPORTANTTHATNOLIQUIDREACHESTHEINSIDEOFTHEUNIT
s4HISPRODUCTSHALLNOTBEEXPOSEDTODRIPPINGORSPLASHINGANDTHATNO
objects filled with liquids, such as vases, shall be placed on the
apparatus.
s$ONOTPLACETHESYSTEMINCLOSED BOOKCASESORRACKSWITHOUTPROPER
ventilation.
s 4HE VENTILATION SHOULD NOT BE IMPEDED BY COVERING THE VENTILATION
openings with items, such as newspapers, table-cloths, curtains, etc.
s.ONAKEDFLAMESOURCESSUCHASLIGHTEDCANDLESSHOULDBEPLACEDON
the product.
With USB CONNECTOR & SD SLOT
ENCODING (FOR CD PLAYBACK)
1. Select and Play the CD song.
2. When the CD song is being played, press and hold the ENCODE (30)
button till the display showing “ENC”.(It will take about 3 sec)
3. To have the CD song successfully Encode (Record) to the Storage Media,
do not interfere the unit until the completion of song playback.
NOTE: The Play/Pause function is allow to carry on during Encoding
(Recording). There will be no elapse of time stored into the Storage Media
even PAUSE carried out.
4. In case the STOP (14) button is pressed during the Encode (Record)
process, the song being Encoded (Recorded) to the Storage Media will
also stop at the same time.
5. Please note the songs Encode (Record) into the Storage Media will stored
inside folder name “TRACK” and each song will name from 1st song
“TRACK0001”, 2nd song “TRACK0002”,…….…..
6. Press STOP (14) button to stop the encode function.
RIPPING: (FOR MP3 PLAYBACK)
1. Select and Play the desired song.
2. When the MP3 song is being played, press and hold the ENCODE (30)
button till the display showing “ENC”.(It will take about 3 sec)
3. To have the MP3 song successfully ripping to the Storage Media, do not
interfere the unit until the completion of copying.
4. The ripping will automatically stop when complete.
REPEAT MODE (FOR MP3 PLAYBACK AND USB STORAGE
MEDIA PLAYBACK)
REPEAT 1 ON SINGLE TRACK
s4OSET2%0%!4MUSTBEDURINGTHEPLAYBACKOF#$-053"3$--#
storage media), press REPEAT (13) button once to play single track
continuously. The REP indicator will remain lighted on the LCD display.
REPEAT ALL ON ALL TRACKS
s 4O SET 2%0%!4 !,, MUST BE DURING THE PLAYBACK OF
CD/MP3/USB/SD/MMC storage media), press REPEAT (13) button three
times to play whole Disc/USB/SD/MMC storage media continuously. The
REP ALL indicator will remain lighted on the LCD display.
PAUSE STOP/EJ. F.FWD REWIND PLAY RECORD
POWER FM.ST
D
I
G
I
T
A
L
OPEN
5
3
0
6
0
0
7
0
0
9
0
0
1
2
0
0
1
6
0
0
k
H
z
8
8
9
2
9
6
1
0
2
1
0
6
1
0
8
AM
FM
UP/F.
F.DN/R
EWFOLDER
PORTABLE RADIO COMPACT DISC PLAYER
6 7 94 5
82
1 3
26
27
181920
21
22 23
25 24
12
10
14
16
13
11
15
TUNING
- P.12 -
- P.10 - - P.11 -
s#LASS),ASER0RODUCT
s)FTHECABINETBECOMESDUSTYWIPEITWITHASOFTCLOTH)FTHECABINET
becomes smudged or dirty, clean it with a soft, slightly dampened cloth.
Never allow water or any liquid to get inside the cabinet. Never use any
abrasive cleaners or cleaning pads as these will damage the finish of
your radio.
s7HERETHEMAINSPLUGORANAPPLIANCECOUPLERISUSEDASTHEDISCONNECT
device, the disconnect device shall remain readily operable.
COMPACT DISCS
Remove the CD from the case by holding it at the edges while pressing the
center hole lightly. Do not touch the shiny surface of the CD, or bend the
CD. Place the CD into the open tray positions with label facing up. A dirty
CD may not play correctly. If a CD becomes dirty, wipe it with a soft cloth in
a straight line from center to edge.
CASSETTE TAPES
If the tape is loose in its cassette, take up the slack by inserting a pencil in
one of the reels and rotating if the tape is loose it may get stretched, cut, or
caught in the cassette.
Do not touch the tape surface.
To prevent recording from being erased accidentally, remove the tab(s) A
and B.
To record after the tabs have been broken off. Reseal the slots A and B with
a piece of adhesive tape.
CLEANING THE TAPE HEADS AND TAPE PATH
For continued high performance from your cassette deck, periodically clean
the head, pinch roller, and capstan. We recommend cleaning after every
20-30 hours of operation. To clean the tape deck, press the Stop/Eject key
to open the deck door. Remove any cassette in the deck. Make sure that
the power to the unit is Off.
"The apparatus shall not be exposed to dripping or splashing and that no
objects filled with liquids, such as vases, shall be placed on the apparatus."
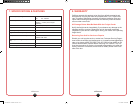
TIPS AND TROUBLESHOOTING
SYMPTOM CAUSE / SOLUTION
Freezing / Problem occur during
unit operation.
No Playback via USB Flash Player /
USB / SD Card.
No Playback via USB Flash Player /
USB / SD Card.
Should the unit Freeze or exhibit
problem during operation, turn off
the unit and disconnect the power
supply and then restart again.
However due to the variance in the
use of USB Flash Players software
and capacity of the USB / SD Card,
not all USB MP3 Players / USB / SD
Card are compatible in the unit.
Due to the variance in MP3 or WMA
transferring, some files may not be
support.
Problem occur during playback of
songs via USB / SD Card.
Should the unit exhibit problem via
USB / SD Media, turn off the unit
and disconnect the power supply
and then restart again.
Not able to Encode (Record) to
USB / SD Card
Should the memory in the USB / SD
Media being used up, delete files
and free up memory from Computer
and do the Encoding (Recording)
again.
Make sure the write protect tab of
SD Card is NOT in LOCK position.
Make sure the USB Flash Player in
TURN ON and NOT in HOLD
position.
SPECIFICATION
Power Source AC: 230V ~ 50Hz
DC: 12V "UM-2" x 8pcs
Radio Frequency
Output Power
CD Playback
USB 2.0 and SD / MMC Card
iPod (Thru iPod Dock Connector to
USB 2.0 Cable)
AM: 530 - 1600 kHz
FM: 88 - 108 MHz
1.8W x 2
MP3 / CD-RW / CD-R / CD
compatible
This unit can read CD-RW discs,
however not all types of CD-RW
discs are compatible. Thus the full
playability with all CD-RW disc is
not guaranteed.
Capacity: 16MB / 32MB / 64MB /
128MB / 256MB / 512MB / 1GB / 2GB
Playback: In MP3 and WMA version.
Make sure the file extension is in
appropriate .mp3 or .wma.
The ipod initial setting must be use
with a Window PC for MP3 playback.
However not all ipod models is
guaranteed to play on this unit.
HDD This unit cannot guarantee HDD
playback through USB Connector.
Encoding (Recording) Speed CD to USB/SD: 128 kbps
PLAYING COMPACT DISCS WITH MP3 - GETTING STARTED
NOTE: Should skipping of tracks occur during CD playing, try turning the
volume down. When CD is playing, do not open the CD Door.
1. Select FUNCTION SELECTOR SWITCH (1) to MODE.
2. Press the CD door open (5) button to open the CD DOOR. Put a MP3
Disc into the CD COMPARTMENT and close the CD DOOR.
3. When the CD DOOR is closed with a MP3 Disc inside, the disc will be
played automatically.
4. If the CD DOOR is not closed or there is no disc inside, the DISPLAY will
show "OPN" or "NOd" and go to "STOP" mode.
PLAYING USB / SD - GETTING STARTED
NOTE: It is not possible to operate the USB/SD functions when the CD door
is open. Make sure the CD door is closed during USB/SD Playback.
PLAYBACK OF MP3 SONG VIA USB STORAGE MEDIA
This system is able to decode and playback all MP3 files which stored in the
memory media with USB connector and SD Card.
1. Select FUNCTION SELECTOR SWITCH (1) to MODE.
2. Remove the rubber cover of the USB Connector
3. Before connecting the USB/SD media to the unit, make sure the port is in
correct direction and will connect.
4. The system will automatically start reading the MP3 files in the USB /SD
Storage Media.
Wrongly connect the USB Storage Media or SD/MMC Card upside down
could damage the unit or the USB Storage Media or SD/MMC Card.
SWITCH FUNCTION BETWEEN CD/USB
Press CD/USB/SD (17) button to switch function between CD/USB/SD.
PLAY/PAUSE MODE
1. When the PLAY/PAUSE (15) button is pressed during "STOP" mode, the
first track will be played. The LCD DISPLAY will show the specific number
of track being played.
Model no. : CDR-692 USB
BRAND
s0RESSTHE2%#/2$BUTTONAND0,!9BUTTONSIMULTANEOUSLYTO
start the recording process. This process will record the signals that are
received by the built-in CONDENSER MICROPHONE (2).
s0RESSTHE34/0%*%#4BUTTONWHENFINISHED
NOTE: Monitoring during MICROPHONE recording is not possible.
RECORDING FROM CD PLAYER
1. Slide the FUNCTION SELECTOR SWITCH(1) to "CD" position.
2. Put a CD into the CD compartment with the label side upward.
3. Insert a blank cassette into the CASSETTE COMPARTMENT and press
PAUSE (18) button of the cassette deck.
4. Press RECORD (23) button and PLAY (22) button simultaneously for
recording stand-by. With the built-in ALC, the best recording quality is
adjusted automatically.
5. Activate the CD players, playing in a desired TRACK as described in the
COMPACT DISC PLATER OPERATION section. Release the PAUSE (18)
button of the cassette deck to start recording.
6. To stop recording temporarily, press the PAUSE (18) button. To continue
recording, press the PAUSE (18) button again.
7. Press STOP/EJECT (19) button of the cassette deck to stop recording.
Then stop CD playback by pressing the CD STOP (14) button of the CD
player.
OPERATION - USB, MP3, CD, CD-R, CD-RW
PLAYING COMPACT DISCS - GETTING STARTED
NOTE: Should skipping of tracks occur during CD playing, try turning the
volume down. When CD is playing, do not open the CD Door.
1. Select FUNCTION SELECTOR SWITCH (1) to MODE.
2. Press the CD door open (5) button to open the CD DOOR. Put a CD into
the CD COMPARTMENT and close the CD DOOR.
3. When the CD DOOR is closed with a CD inside, the total number of tracks
of the disc will be shown on the LCD DISPLAY.
4. If the CD DOOR is not closed or there is no disc inside the CD
compartment, the DISPLAY will show "OPN" or "NOd" and go to "STOP"
CD/USB/SD
ENCODE
SD / MMC CARD
28
17
30
(The marking plate is placed at the bottom of the apparatus.)
29
1. Function Selector Switch
2. Condenser Microphone
3. Headphone Jack
4. CD Compartment
5. CD Door Open Button
6. FM Antenna
7. Tuning Dial Scale
8. Band Switch
9. Tuning Control
10. CD DN/REW Button
11. Volume Control
12. Folder+ Button
13. Prog/Repeat Button
14. CD Stop Button
15. CD Play / Pause Button
16. CD Up/F.F. Button
17. CD/USB/SD Button
18. Pause Button
19. Stop / Eject Button
20. Fast Forward Button
21. Rewind Button
22. Play Button
23. Record Button
24. Cassette Compartment
25. CD Display
26. Left Speaker
27. Right Speaker
28. USB Connector
29. SD/MMC Card Slot
30. Encode Button
4. SETUP AND INSTALLATION
4.1 AC OPERATION
1. Ensure the unit is off. To turn off the unit, slide the FUNCTION
SELECTOR SWITCH to the "OFF" position.
2. Before operation please be sure that the voltage on the power
adapter corresponds to the AC voltage of your local area. Unravel
the AC Line Cord, insert one end into the AC jack on the set, and the
other end into a standard AC outlet.
4.2 BATTERY OPERATION
1. Ensure the unit is off. To turn off the unit, slide the FUNCTION
SELECTOR SWITCH to the "OFF" position.
2. IMPORTANT:DisconnectthepoweradapterfromtheACmain
power.
3. Open the BATTERY COMPARTMENT DOOR and insert C (UM-2)
size x 8 batteries (not included) making sure that the indicated
battery polarity is observed.
4.3 CONNECTING HEADPHONES
1. Decrease the volume to minimum.
2. Connect the headphones to the PHONE jack.
3. Increase the volume to the desired listening level.
CAUTION: Avoid excessive volume for long periods of time as this can
result in hearing damage.
1886 Manual - JH 2009.11.09.indd 6-7 11/11/2009 1:20:06 PM