


ADJUSTING THE SYSTEM 9
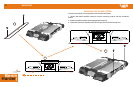
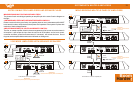
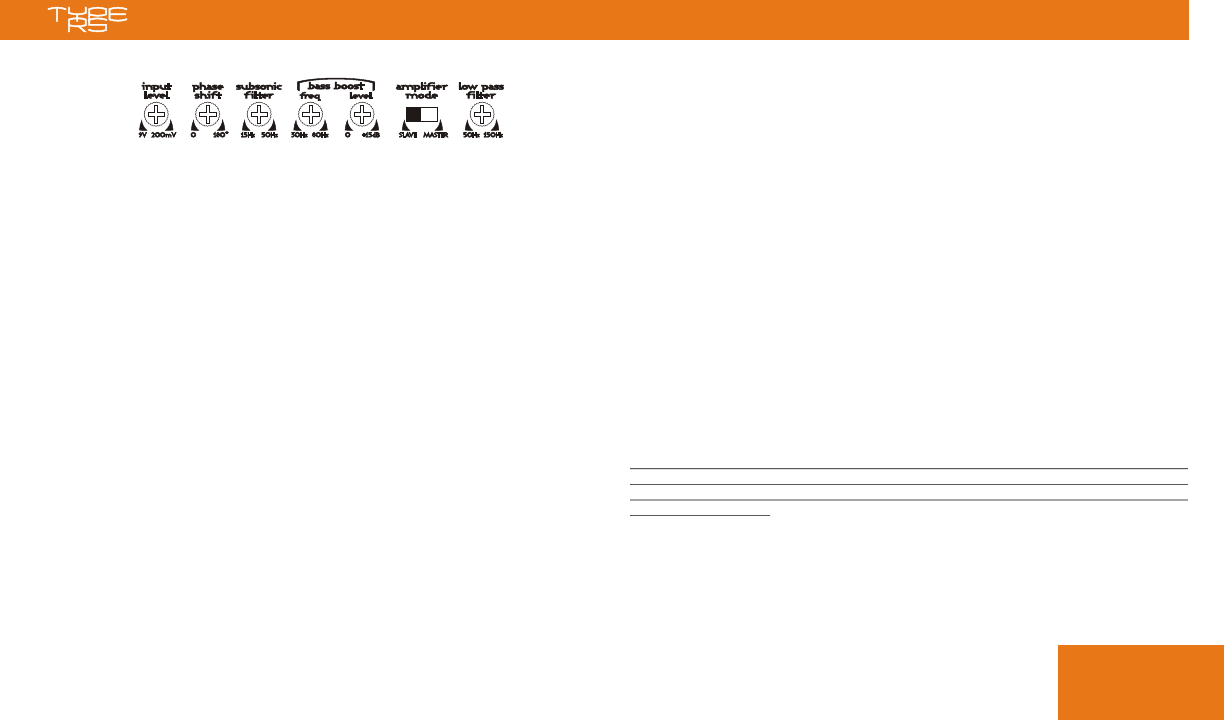
SETTING THE TOP PANEL CONTROLS
ADJUSTING THE SYSTEM
AUDIO PREAMP INPUT
AUDIO PREAMP OUTPUT
USING THE BUILT-IN LOW PASS ELECTRONIC CROSSOVER
SUBSONIC FILTERING.
PHASE SHIFT CONTROL
AMPLIFIER MODE SWITCH
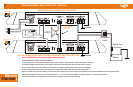
The RS amplifiers feature RCA preamp inputs. Run RCA cables from your sound source to
the inputs of the amplifier. We suggest the use of high quality shielded RCA patch cords to
help reduce and eliminate unwanted electrical noise from your system.
Be sure to run the RCA cables on the opposite side of the vehicle that you used to carry the
power and ground leads of the amplifier.
The RS amplifiers feature RCA preamp outputs which can be used to signal feed secondary
amplifiers in your system without the use and expense of "Y" adaptors. The preamp output is
full range.
All the RS amplifiers feature 24dB per octave fully adjustable low-pass crossovers.
Set the frequency adjustment knob marked LOW PAS FILTER to adjust the filter frequencies.
Your RS amplifier is capable of subsonic filtering. This feature is useful for today's popular
bandpass or vented subwoofer enclosures. The subsonic filter acts as a High Pass crossover
blocking the unwanted signals from reaching specific speakers. This helps to control the
mechanical excursion of the woofers at very low frequencies, thus causing a cleaner sound,
better utilization of amplifier power and improved speaker reliability.
The Phase Shift control on the RS amplifiers allows you to adjust acoustical integration
between the sub bass and higher frequency speakers in a system. Adjust this control for best
audible results.
This switch enables you to slave multiple RS amplifiers off one master. Set it to MASTER for
single RS amplifier, or first of a multiple RS amplifier systems. In multiple RS amplifier
systems, set this switch to SLAVE for any amplifiers slaved off a master.
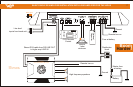
Once the system is operational, the first thing to do, is set all crossover points to approximate
settings. In the case of the basic system described on Page 6, start off with the RS amplifier
Low Pass filter, and the highs 2 channel amplifier’s internal crossover at 100 Hz or so. Set all
equalizer controls to 0 dB
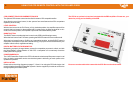
Now you should set the amplifiers LEVEL adjustment. The knob accessible on the top of the
amplifier marked Input Level adjusts the input sensitivity from 200mV to 9Volts.
To adjust the input sensitivity, turn the control using a small flat head screwdriver fully counter
clock wise to the 9volt minimum position. Do not apply any pressure while turning as this
might break the control unit. Adjust your radio volume level to maximum volume. Now turn the
level control on the amplifier clockwise towards 200mV marking and until audible distortion
occurs. When you begin to hear any distortion in the sound back down one notch and your
amp is set. It is helpful to have a second person to help you set the gain.
When setting up a multi-amp system, set each amplifier’s gain separately. Start off with the
bass amplifier, then adjust the highs amplifier’s level control to match.
Once you’re satisfied with the level control settings, use the equalizer controls to adjust the
system tonal level for personal preference. Keep in mind that after equalizing, you may have
to go back and reset the level controls.
The level control of any car amplifier should not be mistaken for a volume control. It is
a sophisticated device designed to match the output level of your source unit to the
input level of the amplifier. Do not adjust the amplifier gain to maximum unless your
input level requires it.
Your system can also be extremely sensitive to noise when the LEVEL is set to maximum and
does not match your input signal. The gain adjustments need to be made only once when first
setting up the system.
If your unit has been professionally installed please do not change the gain settings set by the
installer, he is the professional!
Boom
!
Harder