


7
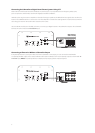
If you are using spade lugs, attach them to the wires as specified by the manufacturer. Loosen the top cap by turning it
counter-clockwise until there is enough clearance for the spade lug to be positioned around the terminal post. Place the
spade lug around the post and turn the top cap clockwise by hand to clamp it in place. Do not use tools to tighten it.
Repeat for the other loudspeaker connections.
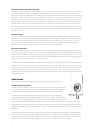
If you are using single or dual banana plugs, attach them to the wire as specified by the manufacturer. Turn the top cap
of the terminal clockwise to ensure that it is fully seated. Do not use tools to tighten it. Insert the banana plug into the
hole provided in the center of the top cap. Repeat for the other loudspeaker connections.
For information on connecting the speaker wires to your receiver or amplifier, refer to its owner’s manual.
Important!
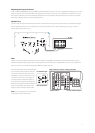
To ensure the best performance, observe polarities when making loudspeaker connections. The terminal cups have +
and – symbols included on them and the top caps have a red ring for + and black ring for –. Connect each + terminal
on the back of the amplifier or receiver to the respective + (red) terminal on each loudspeaker. Connect the – (black)
terminals in the same way. If the connections are not made correctly, it can cause poor bass response and imaging. Also,
to avoid short circuits that may damage your equipment, be careful not to let the ends of the wires to make contact with
the ends of any other wires.
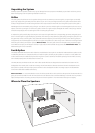
Subwoofer
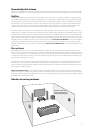
For optimal results, place the subwoofer on the same wall (or in a corner) as your front speakers. In principal, the lower
the crossover point, the greater the distance the subwoofer can be from the front speakers, however, the sound is typi-
cally best when the subwoofer is within 12 feet (3.5m) of the front speakers. The perceived level of bass output from the
subwoofer will vary significantly at different positions in the room. When placed near walls, the output level is empha-
sized with corner placement providing the highest perceived output level. Placement away from walls may produce too
little perceived bass.
Regardless of the perceived bass level within the room, you always have the ability to adjust the level
of the subwoofer from the built in volume control or from the level control of your preamplifier or receiver. If at any time
you move the subwoofer, be sure to re-check your outputs levels and EQ settings if any. Since the human ear is less able to
localize low frequencies, the bass will still appear to come from the front speakers. Experimentation is key but most
positions in the room should work well
.
IMPORTANT: Do not place the subwoofer where there is a chance of contact between the rear panel and drapes
or furniture. The amplifier panel also serves to dissipate heat and should have at least 3 inches (76mm) clearance so it
does not overheat.
NOTE: Power is always supplied to the MSubwoofer electronics unless it is unplugged or switched to the OFF position
using the power switch located on the rear panel. The auto-on circuitry only activates or deactivates the power amplifier.
Make sure your MSubwoofer and preamp/receiver are unplugged when making connections.
Power: When plugging in your MSubwoofer be sure to use a wall outlet, or dedicated electrical outlet. Some receivers
will provide a switched outlet. Do not use this. These on board electrical outlets do not offer the amount of current or
proper isolation required by a power amplifier, such as the one in your MSubwoofer.
Line level or LFE:
On most systems use the Line Level input or the LFE input. These inputs accept the line-level signal
from your preamp/receiver’s subwoofer output. Your receiver’s manual should indicate which input is most appropriate.