


– 15 –
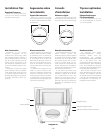
All Installations
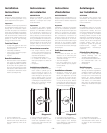
1. Strip
1
/2-inch (12mm) of insulation
from the wire, and twist the wire
strands together. The T2 speaker
jack will accept either bare wire (up
to 12-gauge) or single banana
plugs.
2. Connect the wire to the speaker,
being careful to retain proper
polarity.
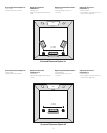
3
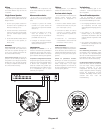
. Slide the speaker into the cutout
(see diagram #6).
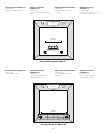
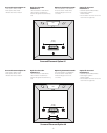
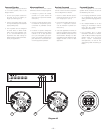
4. Tighten the four Phillips mounting
screws. The mounting arms will
pivot into position and clamp the
speaker to the mounting surface
(see diagram #7).
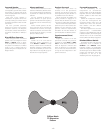
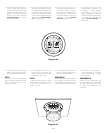
NOTE
The tweeter island can be rotated 180
degrees, allowing you to redirect the
null without loosening the entire
speaker to reposition the tweeter
island.
WARNING
Do NOT overtighten the mounting
screws.
Todas las instalaciones
1. Pele 12 mm (
1
/2 pulgada) de ais-
lante del cable y gire el cable para
unir los hilos. El conector del
altavoz T2 acepta tanto el cable
pelado (hasta un calibre 12) como
un enchufe sencillo con punta
cónica.
2. Conecte el cable al altavoz con
cuidado de mantener la polaridad
c
orrecta.
3. Deslice el altavoz hacia el recorte
(consulte el croquis nº 6).
4.
Apriete los cuatro tornillos de
soporte Phillips. Los brazos de
soporte pivotarán en su posición
y sujetarán el altavoz a la superfi-
cie de instalación (consulte el cro-
quis nº 7).
NOTA
La isla del altavoz de agudos puede
girarse 180 grados, lo que le permite
redirigir el nulo sin necesidad de soltar
todo el altavoz para recolocar la isla del
altavoz de agudos.
ADVERTENCIA
No apriete excesivamente los tornillos
de soporte.
Toutes installations
1. Dénudez 12 mm (
1
/2") du câble et
torsadez les brins. Le réceptacle de
l’enceinte T2 accepte des câbles
dénudés (jusqu’au calibre 12) ou
des fiches « banane ». simples.
2. Connectez les câbles à l’enceinte en
observant de maintenir la polarité
correcte.
3. Glissez l’enceinte dans la cavité
d
écoupée (voir diagramme 6).
4. Serrez les quatre vis Phillips de
montage. Les bras de montage piv-
oteront en position et ancreront
l’enceinte à la surface de montage
(voir diagramme 7).
REMARQUE
L’îlot des tweeter peut être pivoté sur
180 degrés, ce qui vous permettra de
diriger le « zéro » sans avoir à démon-
ter l’enceinte complète pour atteindre
l’îlot des tweeters.
AVERTISSEMENT
NE JAMAIS serrer excessivement les vis
de montage.
Alle Installationen
1. 12 mm Kabelmantel entfernen und
die Aderenden verdrillen. Der
Anschluss an die T2-Speaker-Buchse
kann mit blankem Draht (bis 12-
gauge, etwa 2 mm) oder einem
einzelnen Bananenstecker ausge-
führt werden.
2. Das Kabel an den Lautsprecher
anschließen, dabei auf die richtige
P
olarität achten.
3. Den Lautsprecher in die Einbau-
öffnung einsetzen (siehe Abb. 6).
4. Die vier Kreuzschlitzschrauben
anziehen. Die Einbaubügel klap-
pen in Position und klemmen den
Lautsprecher an der Einbaufläche
fest (siehe Abb. 7).
ANMERKUNG
Die Tweeter-Insel kann um 180° gedreht
werden, wodurch die Null-Achse neu
ausgerichtet wird, ohne den gesamten
Lautsprecher zur Neupositionierung der
Tweeter-Insel lösen zu müssen.
ACHTUNG
Die Befestigungsschrauben nicht zu
fest anziehen.
Diagram #6
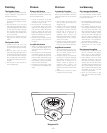
Diagram #7