


7
Installation (cont.)
DRYWALL OR OTHER HARD SURFACES:
1 Be sure you know the location of the ceiling joists before cutting the speaker open-
ing. Cut a 14-1/4" circular hole where the CSUB will be installed. Use the includ-
ed template as a guide.
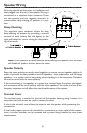
2. Make electrical connections to the snap-lock input connector and then plug it into
the CSUB (see Speaker Wiring section).
3. Install terminal cover using the supplied screws. If using conduit, refer to the Terminal
Cover section of this manual.
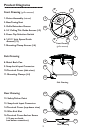
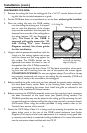
4. Place the CSUB in the ceiling cut-out. To help
properly place the CSUB in the ceiling,
the front of the CSUB is engraved with
guide arrows for “14-1/2" Joist Space”
(see Product Diagrams, #6). Use these
guides for this installation.
Important:
Be certain to position the subwoofer so that
the engraving “14-1/2" Joist Space” aligns
perpendicularly between the studs. Failure to
do so may result in the clamps being unable
to swing out far enough to seat the speaker
properly.
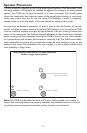
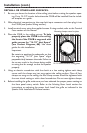
5. Using an electric screwdriver with the clutch at a low setting, tighten each clamp
screw until the clamps are just snug against the ceiling surface. Once all four
clamps are snug on the ceiling, the four clamp screws should be tightened with
the next clutch setting or with a hand screwdriver. Do not over-tighten clamps.
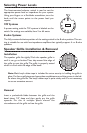
6. Before installing the grille, make sure you have selected the proper power setting on
the front panel rotary switch. Refer to the Selecting Power Levels section for
instructions on selecting the power level. Install the grille as indicated in the
Speaker Grille Installation & Removal section.
Mounting clamps extend to joists.
14-1/2 Inches between ceiling joists.