


6
Installation (cont.)
SUSPENDED CEILINGS:
1. Remove the ceiling tile from the ceiling grid. Cut a 14-1/4" circular hole in the ceil-
ing tile. Use the included template as a guide.
2. Put the CSUB face down on a workbench or on the floor without grille installed.
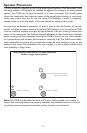
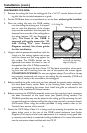
3. Place the ceiling tile over the CSUB, making
sure the ceiling tile is facing out. It is impor-
tant to note the direction of the clamps:
they must be installed so that they span the
distance from one side of the ceiling tile to
the other (approx. 24", see illustration at
right). The front of the CSUB is
engraved with guide arrows for “24-
Inch Ceiling Tile” (see Product
Diagrams section). Use these guides
for this installation.
4. Using an electric powered screwdriver with the
clutch at a low setting, tighten each screw
until the clamps are just snug against the
tile surface. The CSUB’s clamps can be
tightened from either the front or rear of
the speaker. Use a No. 3 Phillips screwdriv-
er when working from the front. Use a 1/4" flat-blade screwdriver when work-
ing from the rear. If working from the rear of the speaker, the screws tighten
COUNTERCLOCKWISE. Do not over-tighten clamps. Once all four clamps
are properly positioned and snug on the ceiling tile, the assembly (CSUB and
ceiling tile) is ready to be mounted in the ceiling grid.
5. Before installing the grille, make sure you have selected the proper power setting on
the front panel rotary switch. Refer to the Selecting Power Levels section for
instructions on selecting the power level. Install the grille as indicated in the
Speaker Grille Installation & Removal section.
6. Before mounting the CSUB/tile assembly, make sure the snap-lock input connector
has been connected to the input wires (see Speaker Wiring section). The
CSUB/tile assembly may now be placed in the ceiling grid. By accessing the ceil-
ing space through an adjacent ceiling tile, plug in the snap-lock connector. Attach
the Terminal Cover using the screws provided. If using conduit, refer to the
Terminal Cover section of this manual.
7. Attach the CK10 Safety Cable, if it is being used, by screwing the eyebolt into the
safety tether point in the rear of the CSUB’s metal enclosure (see Product
Diagrams). This may be a local code requirement. It is certainly a very good safe-
ty measure, particularly in suspended ceiling installations. For more information
see the instruction sheet included with the CK10.
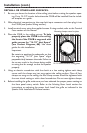
Mounting clamps extend
to, but do not overhang,
edge of ceiling tile.
2×2 Ceiling Tile
Mounting clamps (×4)
Support rail