


13
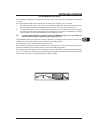
ULTRALINK UL2000M
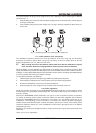
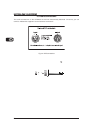
1. Turn the selection switch to one of the positions 1 - 8, corresponding to the desired channel number. If
a valid value is selected (i.e. neither 9 nor 0), the LED blinks quickly once as a confirmation.
2. Briefly press the POWER button. The LED blinks with medium tempo. The number of individual flashes
within one cycle corresponds to the value/channel number selected on the selection switch.
If an invalid channel number is selected (0 or 9), the channel selected last remains selected.
Changing the channel when the transmitter is powered off
1. Turn the selection switch to one of the values (1 - 8), corresponding to the desired channel number.
2. If you turn on the transmitter, the channel you selected is automatically loaded.
If an invalid channel number was selected (0 or 9), the channel selected last remains selected.
3.2.3 Setting your own frequency
A carrier frequency in the range between 798.1 and 805.9 MHz can be freely selected. This frequency is
stored in a self-assignable user preset (Preset 1).
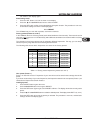
The carrier frequency can only be set in 25-kHz steps. The frequency you select has to be a
multiple of 25 kHz. If you select a frequency that is not a multiple of 25 kHz or does not lie in
the frequency range between 798.1 and 805.9 MHz, the ULM2000 gives off an error message
(the LED blinks quickly 5 times).
1. Engage MUTE. The transmitter can now be switched to the programming mode.
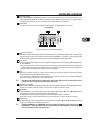
2. Turn the selection switch to 9 and confirm your selection by keeping the POWER button pressed for
about 2 seconds. The LED indicates confirmation by blinking once with medium tempo and blinking
once slowly. The transmitter is now in the programming mode and awaits the entry of a 6-digit frequency.
3. Enter all 6 digits one after another in the following fashion:
Select the desired value on the selection switch, for example 4. If a valid value is selected, the
LED blinks quickly once as a confirmation. This way, you can be sure that a correct value is
entered (in regard to the frequency range and divisibility by 25 kHz) even before confirming your
selection.
Confirm your selection by briefly pressing the POWER button.
If the end frequency value you entered is valid, the LED blinks quickly once more. If the frequency
value is invalid, the LED blinks quickly 5 times, and the unit is no longer in the programming
mode. In this case, start anew with step 2.
After a brief interruption, a second blink code is given: the LED blinks corresponding to the value
selected (in this case, 4 times) with medium tempo.
The value 0 is indicated by a very short blink of the LED, and you will easily tell a
0 from a 1.
If no entry is made for more than 5 seconds (either on the selection switch or by pressing the
POWER button), the LED blinks quickly 5 times, and the programming mode is aborted.
After entering the 6 digits for the frequency value, enter another value to indicate the channel number under
which the frequency will be stored.
4. Select a desired channel number on the selection switch, for example channel 2 (possible values: 1 - 8).
If a valid value is selected, the LED blinks quickly once to confirm. This way, you can be sure that a
correct channel number is being entered even before confirming your selection.
5. Confirm your selection by briefly pressing the POWER button.
6. When a valid value is selected, the LED blinks briefly again. When an invalid value is selected, the
LED blinks quickly 5 times and the unit is no longer in the programming mode. In this case, start anew
with step 2.
After a brief interruption, a second blink code is given: the LED blinks corresponding to the value
selected (in this case, 2 times) with medium tempo.
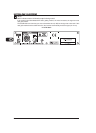
3. ULM2000 MICROPHONE