


9
ULTRALINK UL2000M
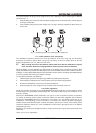
4. If a valid frequency value is set, press the SET button again. In the display, you are asked to enter
where you want to save your settings. Depending on the basic settings (ch. 2.2.5), the ULR2000 asks
you to enter a channel color (BLUE, RED, ...) or a channel number (CHAN1, CHAN2, ...).
5. A storage location can be selected by pressing the UP or DOWN buttons.
6. Press the SET button again to store your frequency at the location you selected. The procedure is
now over, and the basic settings are shown in the display again (channel number, channel frequency
or channel color).
A user-selected frequency is always stored in the user preset (Preset 1)! If necessary, the
unit automatically switches to this preset.
2.2.2 SCAN
Similar to a tuner in a radio or a TV set, the ULR2000 automatically searches for a transmitter when in SCAN
mode. For it to work, the transmitter (e.g. the ULM2000) must be turned on!
1. Press the SET button to get to the menu.
2. Press the UP button once to get to SCAN.
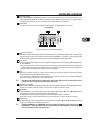
3. Press the SET button again to get to the SCAN submenu. The display shows the current frequency.
4. Either press UP or DOWN. This way, you determine if the scan is going to be performed in the
ascending or descending direction. The scan begins.
5. As soon as the ULR2000 recognizes the transmitter frequency, it is shown in the display.
If this frequency is not the frequency you were looking for, you can start a new scan by pressing the
UP or DOWN buttons.
6. If the receiver found the correct frequency, press the SET button again. In the display, you are asked to
enter where you want to save your settings. Depending on the basic settings, the ULR2000 asks you to
enter a channel color (BLUE, RED, ...) or a channel number (CHAN1, CHAN2, ...).
7. A storage location can be selected by pressing the UP or DOWN buttons.
8. Press the SET button again to store your frequency at the location you selected. The procedure is
now over, and the basic settings are shown in the display again.
A scan can also be halted manually (e.g. in case the receiver is unable to locate a transmitter).
To do this, press the SET button; the scan is immediately interrupted. Now, you can either
start another scan (see lines 4 and 5), or the frequency shown can be stored (see lines 6, 7
and 8).
2.2.3 SQUELCH
With wireless signal transmission, restricted reception conditions may cause the transmission of additional
noise and interference. The Squelch function lets you adjust if the ULR2000 is muted under such conditions.
You can also enter the noise level that will trigger the mute function:
0 dB: the receiver is not muted
low dB value: the receiver is muted only if substantial noise is transmitted with the signal
high dB value: the receiver is muted even if the noise floor is low
Setting a Squelch value
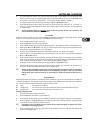
1. Press the SET button to get to the menu.
2. Press the UP button twice to get to SQELCH.
3. Press the SET button again to get to the SQELCH submenu. The display shows the current dB value.
4. Press the UP or the DOWN buttons to adjust the dB value of the noise limiter. Values between
0 and 40 dB can be selected in 5-dB increments.
If a squelch value of 0 dB is set, the receiver will not mute the signal no matter how noise-
saturated the incoming signal is.
5. Press the SET button to store your dB value. The procedure is now over, and the basic settings are
shown in the display again.
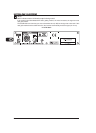
2. ULR2000 RECEIVER