


INTRODUCTION
Thank you for purchasing the B&W CC3 Centre Channel speaker.
Since its foundation in 1966, the continuing philosophy of B&W has
been the quest for perfect sound reproduction. Inspired by the
company’s founder, the late John Bowers, this quest has entailed
not only high investment in audio technology and innovation but
also an abiding appreciation of music to ensure that the technology
is put to maximum effect.
It is also our policy to make sure the advanced features pioneered
on one product are incorporated into others we manufacture.
The CC3 has a Prism System (Patent pending) rear baffle designed
to mimic the interior of an anechoic chamber. This greatly helps to
break up the regular internal cabinet volume that would otherwise
encourage coloration from internal standing waves. Homogeneous
fibre cone bass/midrange drive units are used for minimum
coloration and maximum definition. The CC3 also uses a soft dome
tweeter with magnetic fluid cooling to ensure good definition to the
limits of audibility and maintain dynamics to high sound levels.
However, no matter how good the speakers themselves, they must
work well into the listening room and time spent on the installation
process will reap the reward of many hours listening pleasure.
Please read through this manual fully. It will help you optimise the
performance of your audio system.
B&W distribute to over 50 countries world-wide and maintain a
network of dedicated distributors who will be able to help should
you have any problems your dealer cannot resolve.
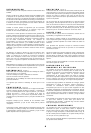
UNPACKING (figure 1)
Fold the top carton flaps right back and invert the carton and
contents.
Lift the carton clear of the contents.
Remove the inner packing from the product.
Check in the carton for 4 self-adhesive rubber feet.
We suggest you retain the packaging for future use.
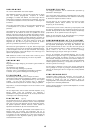
CONNECTIONS (figure 2)
All connections should be made with the equipment turned off.
Connect the positive terminal on the speaker (marked + and
coloured red) to the positive terminal on the power amplifier and
negative (-, black) to negative (figure 2). Failure to observe correct
polarity will result in poor sound balance and image focusing.
Always make sure all the terminal caps are screwed down tight, as
otherwise they may rattle.
When choosing cable, keep the total electrical impedance (out and
back) below the maximum recommended in the specification. Ask
your dealer for advice, as the optimum cable will depend on the
length required.
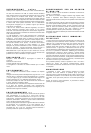
POSITIONING (figure 3)
The ideal position for a centre channel speaker from an image point
of view is in line with the centre of the screen. Position the speaker
either immediately above or below the screen, choosing whichever
position places the speaker nearest ear level. Line the front of the
speaker approximately in line with the plane of the screen.
Fix the 4 self-adhesive rubber feet to the base of the speaker to
protect the both surface on which the speaker stands and the
underside of the speaker. If placing the speaker directly on top of a
television, be aware that there may be restricted depth to the flat
surface, so place the feet accordingly.
FINE TUNING
Before fine tuning the installation, double check the polarity and
security of the connections.
For greatest realism in home theatre installations it is important
both to match the acoustic image to the size of the screen and to
balance the relative levels all the speakers.
For smaller screens, place the left and right front speakers closer
together than you might in an audio only installation.
Adjust the levels of the left, centre and right speakers to give a
balanced sound as images pan across the screen. Move your head
from side to side and sit in all likely listening positions when
deciding on the optimum levels.
Consult your decoder manual for further information on how to set
the levels.
DISTORTION OF
TELEVISION PICTURES
The drive units in the CC3 are magnetically shielded so that the
system may be used in close proximity to television and computer
monitor screens, but the stray magnetic field can never be
completely eliminated. The typical maximum value of the field at
any point on the veneered surfaces of the cabinet is 120A/m (flux
density 1.5 gauss) which is low enough not to cause picture
distortion with the vast majority of screens.
If you have a problem with picture distortion, first de-gauss the
television set. Some televisions and computer monitors have a
button specifically for this purpose. Those not equipped with such
a facility generally de-gauss at switch-on. Turn the television off
completely by disconnecting the mains supply (putting the set into
stand-by mode is not sufficient). Leave the set switched off for up
to 15 minutes and then switch on again.
If you still have a problem, try either moving the CC3 forwards and
backwards a little to get a more favourable juxtaposition or spacing
it further away from the television until the problem disappears.
AFTERCARE
The vinyl veneers normally only require dusting. If you wish to use
an aerosol cleaner, remove the grille first by gently pulling it away
from the cabinet. Spray onto the cleaning cloth, not directly onto
the cabinet. The grille fabric may be cleaned with a normal clothes
brush after removing the grille from the cabinet.
Avoid touching the drive units, especially the tweeter, as damage
may result.
1